
 | ||
Introduction
This document provides an overview of all Manage Contacts popups touched in the process of making a new Contact Group while simultaneously taking the reader through the process required to add that new Contact Group. It also discusses editing existing Groups to add or remove contacts. By the end of this article, the user should be comfortable with the Group Manager and Add/Edit Contact Group popups, while also understanding that these popups link to the Import, Create Contact, and Email functionalities that are presented in other help articles.
A. Problem Statement
Users managing large contact databases need an efficient way to organize contacts into logical groups for quick retrieval and targeted communication. Without a systematic approach to creating and managing contact groups, users waste time searching for individual contacts and struggle to perform group-based operations like bulk emailing.
B. Solution
To follow along with this guide, please use the main navigation bar to navigate to Tools > Manage Contacts.
Step 1: Open the Group Manager
Contacts present in the Manage Contacts grid can be assigned user-defined Groups. This allows organizations to keep thematically or organizationally linked Contacts together for easy retrieval. The first step in this process is to define a Group that can have Contacts added to it. To do so, from the Contacts Manager page, click the Group Manager button located among the green buttons in the top right part of the page.
Image: Location of the Group Manager Button

Step 2: Anatomy of the Group Manager
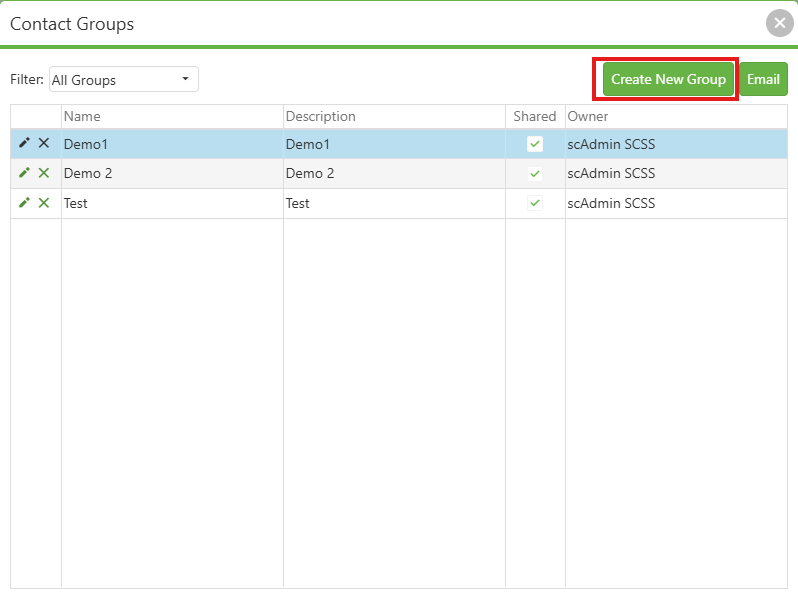
The Group Manager popup is now visible. Let's break down the contents of this popup. When ready to continue the process to make a new Group, proceed to Step 3.
Filter - The Filter dropdown allows filtering by All Groups, Shared Groups, and My Groups. My Groups are groups that the user has personally created, while Shared Groups are groups that have been created by another user and shared so that others may use it.
Create New Group - The Create New Group button brings up the Contact Groups popup, where the user can define a new group.
Email - The Email button brings up the Email wizard, which allows the user to compose an email to be received by a contact, or group of contacts.
Contact Groups Grid - The bulk of the popup is given up to a grid that displays the details of each Group to which the user has access.
- Edit (Pencil Icon) - The edit button allows the user to edit the details of the Group, including group membership. It does so by sending the user to the Add/Edit Contact Group Popup, so refer to Step 4 of this article for details on that popup's functionality.
- Delete (X Icon) - The delete button allows the user to delete a group entirely.
- Name - This is the name of the group.
- Description - This is the user-defined description of the group.
- Shared - If a group is shared, the checkbox here will be filled. If it is not shared, it will be empty.
- Owner - This is the owner of the group.
Image: Group Manager Popup with Create New Group Highlighted
Step 3: Open the Add/Edit Contact Group Popup
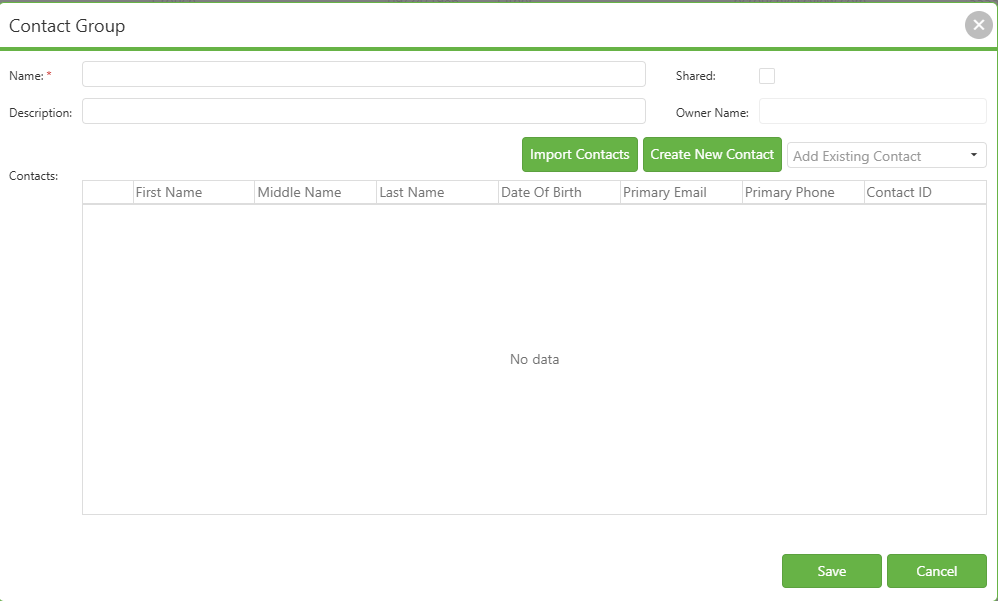
From the Group Manager popup, click the Create New Group button. This opens the Add/Edit Contact Group Popup.
Image: The Add/Edit Contact Group Popup
Step 4: Anatomy of the Add/Edit Contact Group Popup
The Group Manager popup is now visible. Let's break down the contents of this popup. When ready to continue the process to make a new Group, proceed to Step 5.
Name - This is the name of the Contact Group.
Shared - If this checkbox is checked, then the Contact Group is shared.
Description - This is a user-defined description for the Contact Group.
Owner Name - Once the Contact Group is published, this field will populate with the name of the user who made it.
Import Contacts - This button functions identically to the Import Contacts button on the main Manage Contacts Manager page. See Article: Manage Contacts: Import Contacts for details.
Create New Contact - This button functions identically to the Create New Contact button on the main Manage Contacts Manager page. See Article:
Add Existing Contact (Dropdown) - This user contacts all contacts that have been added to the database. Selecting a contact will add it to the current group.
Contacts Grid - Taking up the bulk of the popup, this grid contains information on each contact added to the Contact Group.
- Edit (Pencil Icon) - This button allows the user to edit the details of a Contact. See Article:
- Delete (X Icon) - This button deletes a Contact from the current Contact Group.
- First Name - This is the Contact's first name.
- Middle Name - This is the Contact's middle name.
- Last Name - This is the Contact's last name.
- Date of Birth - This is the Contact's birth date.
- Primary Email - While a Contact can have multiple emails in its details, the one marked as Primary displays here.
- Primary Phone - While a Contact can have multiple phone numbers in its details, the one marked as Primary displays here.
- Contact ID - This is the contact ID for the Contact.
Save - Clicking Save returns the user to the previous popup with changes saved.
Cancel - Clicking Cancel returns the user to the previous popup with changes discarded.
Step 5: Creating a New Group with the Add/Edit Contact Group Popup
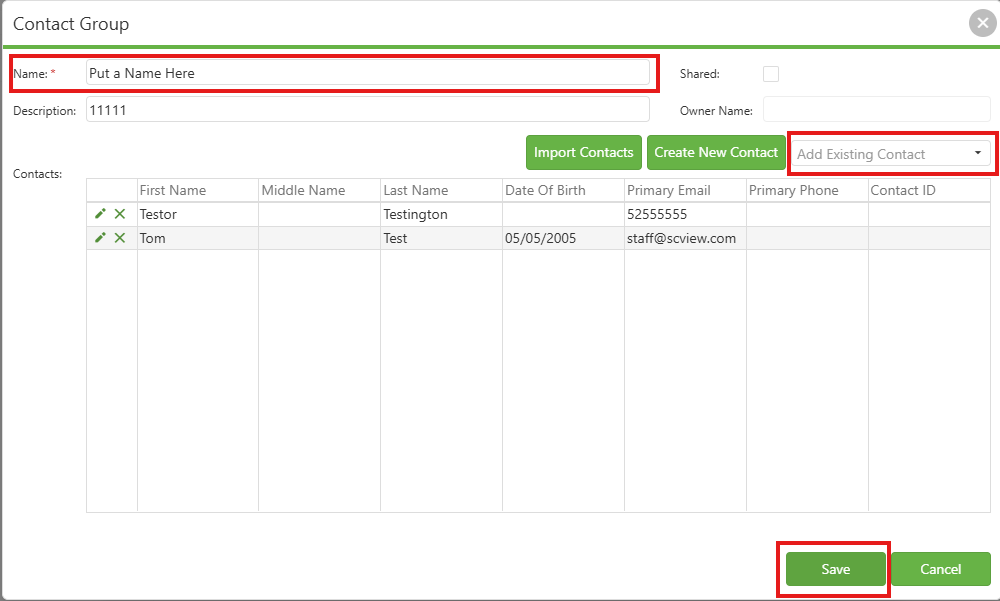
To create a new group from the Add/Edit Contact Group popup, please perform the following operations in the order listed.
1 - Enter a name in the Name field.
2 - Use the Add Existing Contact dropdown to select at least one Contact, which populates the Contacts grid in the popup.
3 - Click the Save button.
Image: Creating a New Group
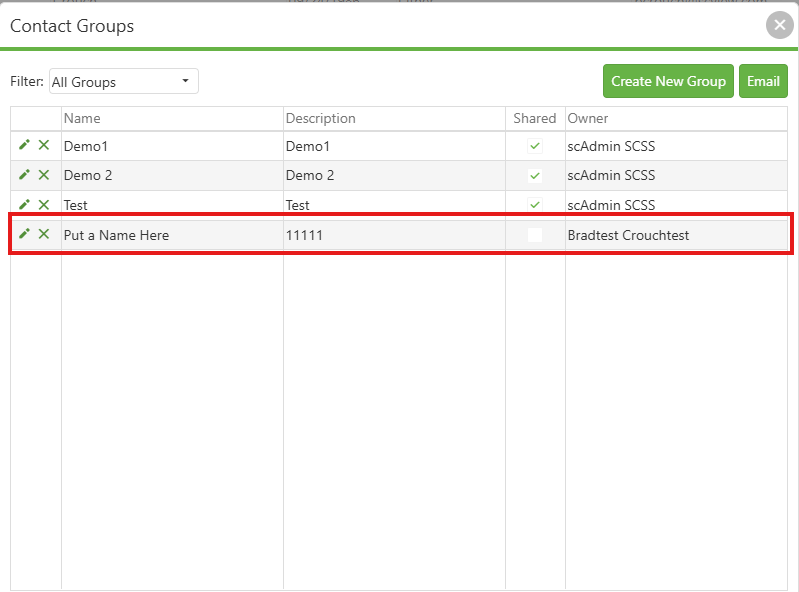
The end result is the group added to the Group Manager popup, as seen below.
Table: New Group Visible
Step 6: Adding Contacts to or Removing Contacts from Existing Groups
There are three methods that can be used to change which Contacts are associated with a Contact Group.
Method 1 - Target Specific Contacts
From the main Manage Contacts Manager, click the edit (pencil) icon for a Contact in the Contacts Grid. This will call up the details for the individual contact, including the Contact Groups field.
Image: Manage Contacts Manager Edit Icon

To add this specific Contact to a group, click blank space inside the Contact Groups field, select the name of the Group to which the Contact will be added, and click Save to confirm the change.
Video: Adding Specific Contact to Group
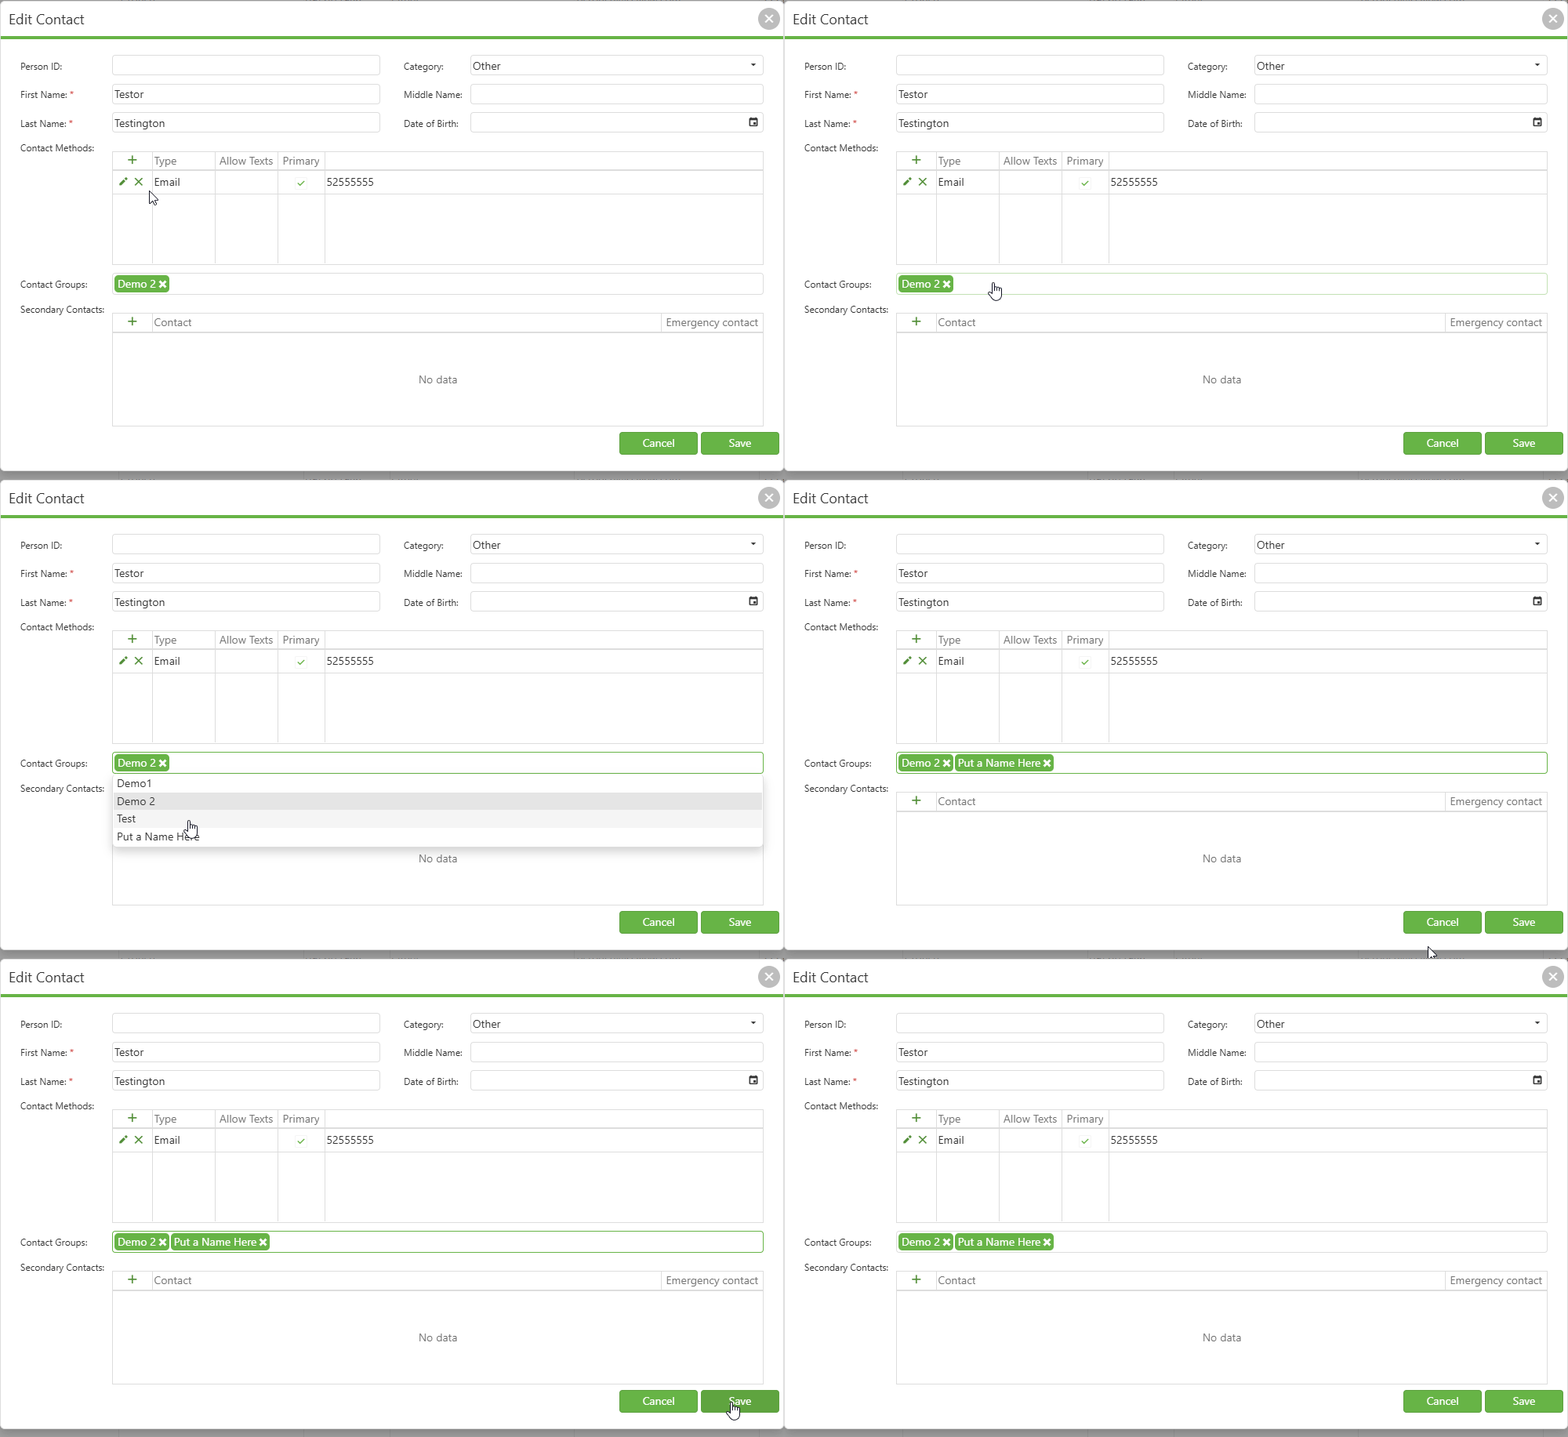
To remove this specific Contact from a Group, click the X icon next to that Group's name, and click Save to confirm the change.
Video: Removing Specific Contact from Group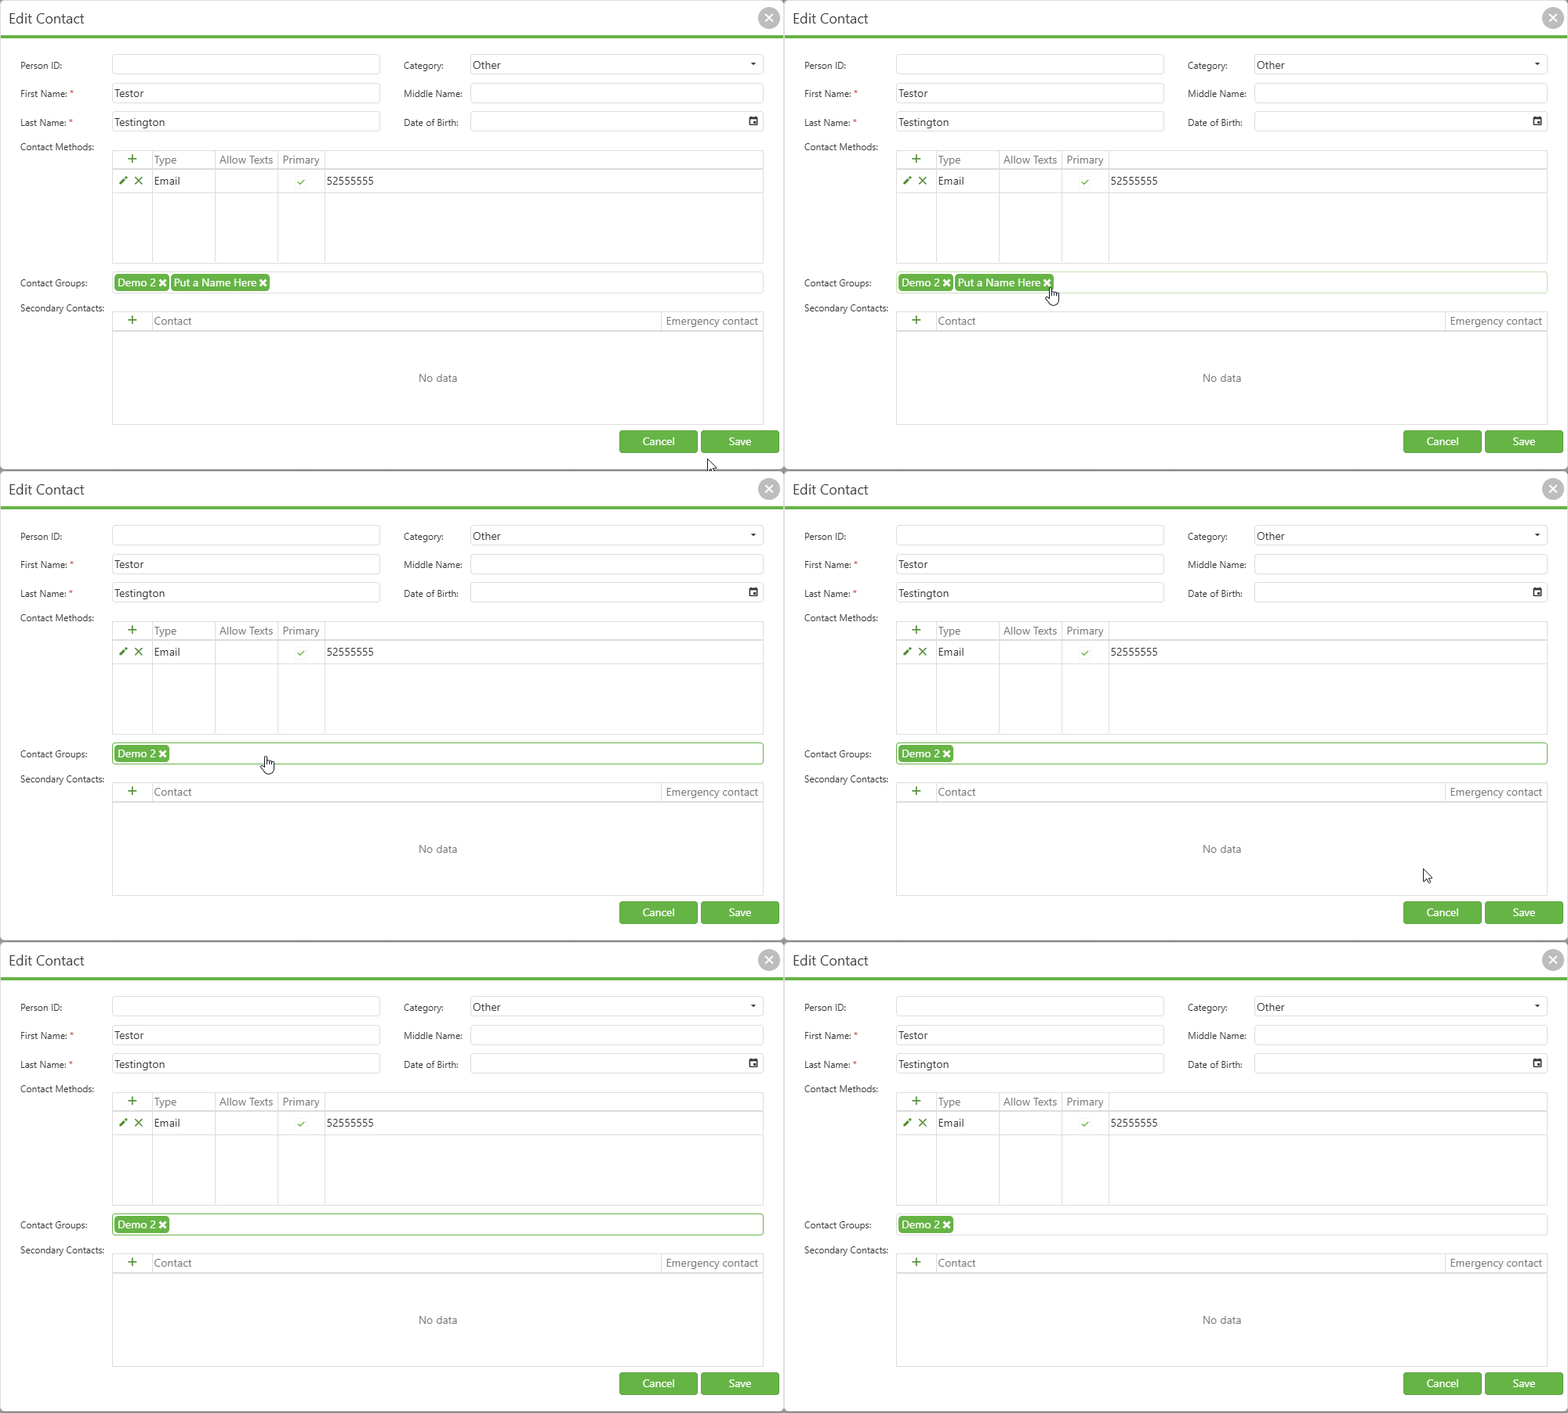
Method 2 - Edit the Contact Group
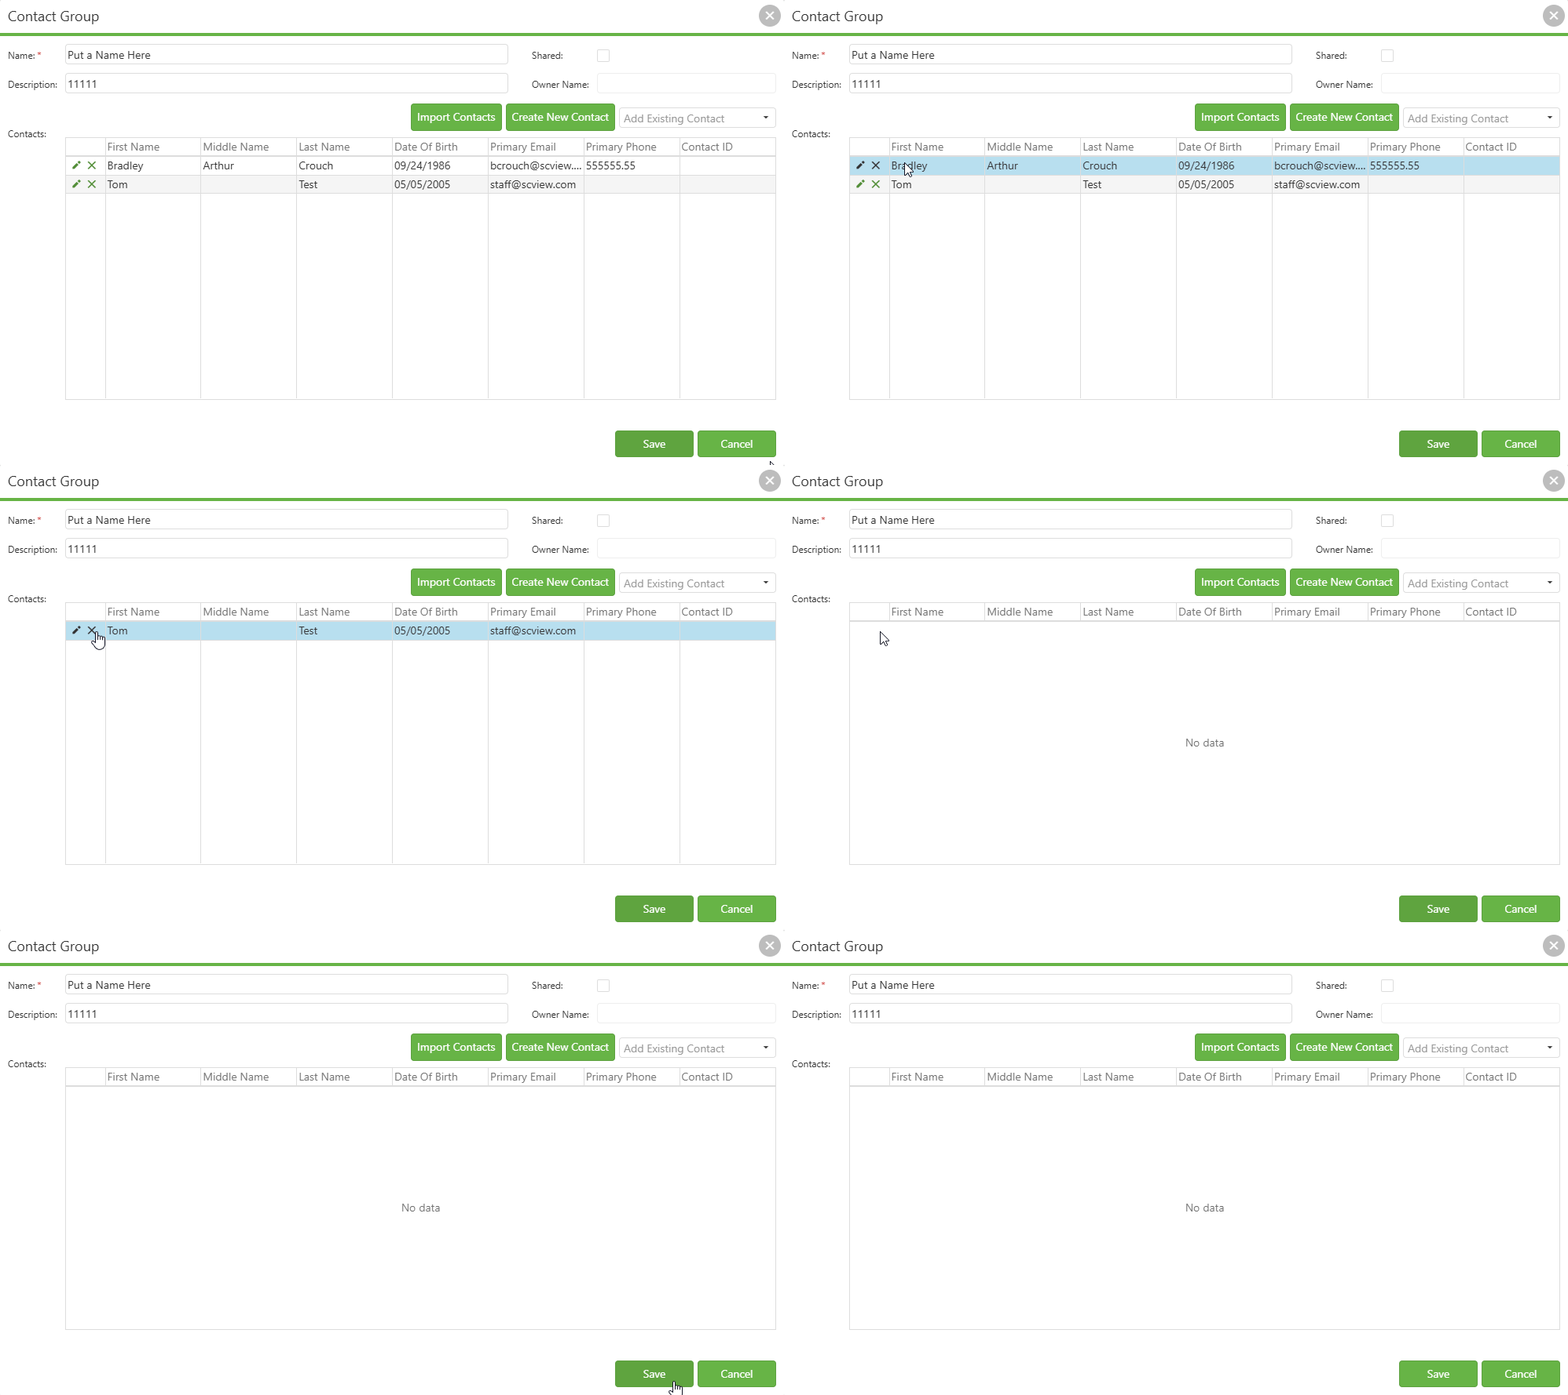
From the main Manage Contacts Manager, click the Group Manager button, then click the edit (pencil) icon corresponding to the group that needs edited. This calls up the now-familiar Add/Edit Contact Group popup in edit mode.
Video: Accessing the Add/Edit Contact Group Popup in Group Edit Mode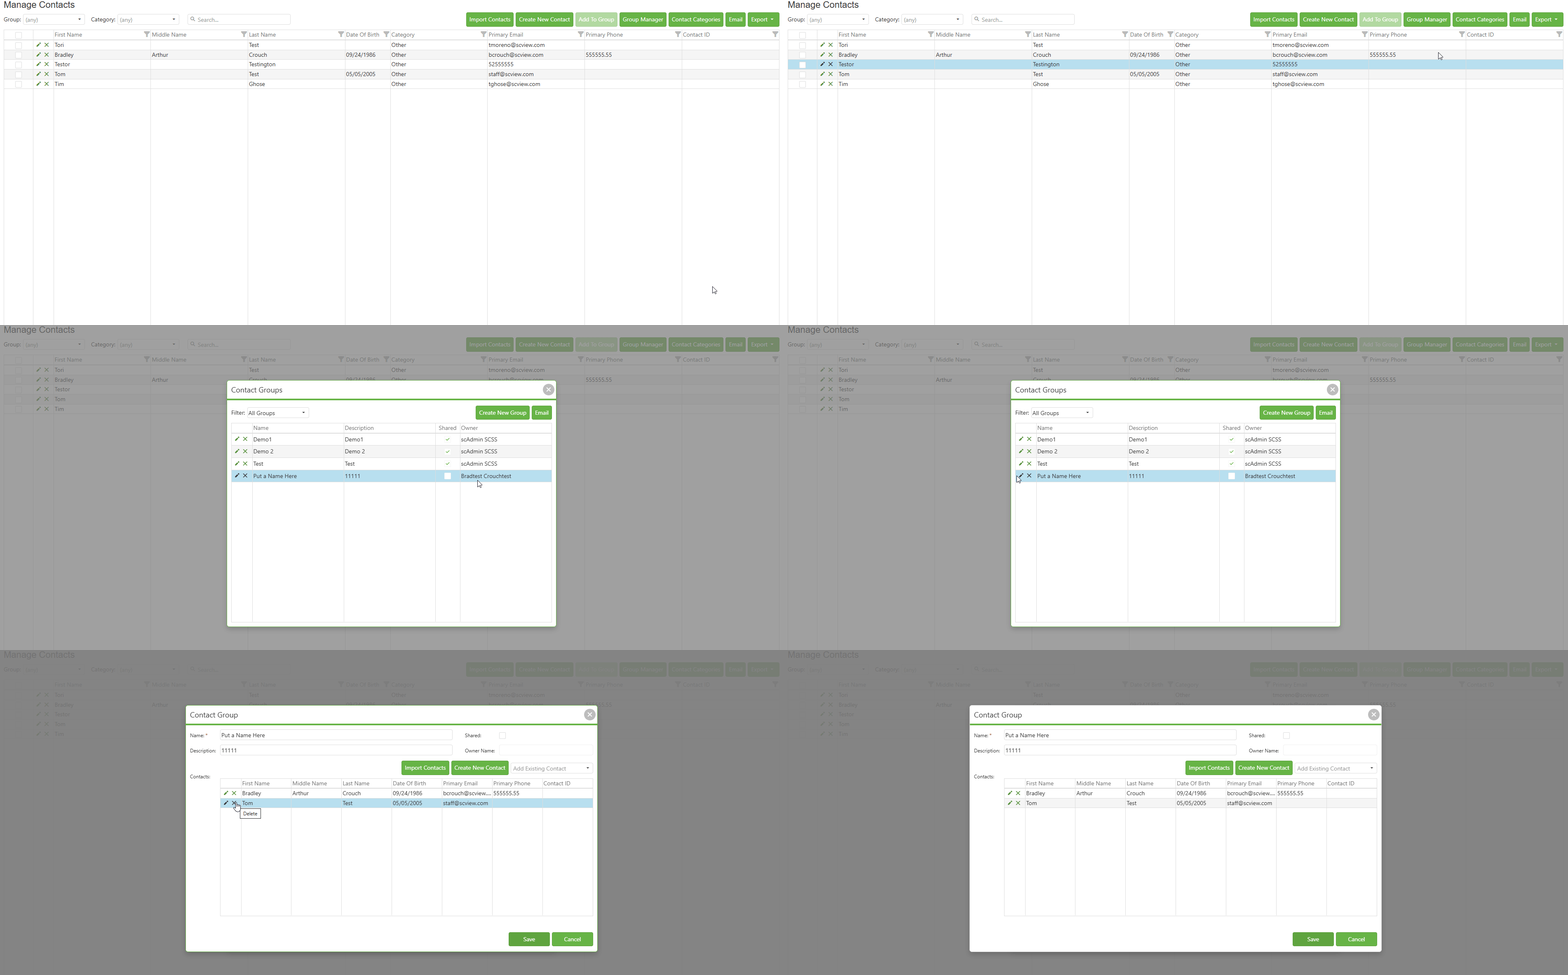
To add a contact to the Contact Group, use the Add Existing Contact dropdown to select the desired contact, then click Save to confirm the change.
Video: Adding Users to a Specific Contact Group
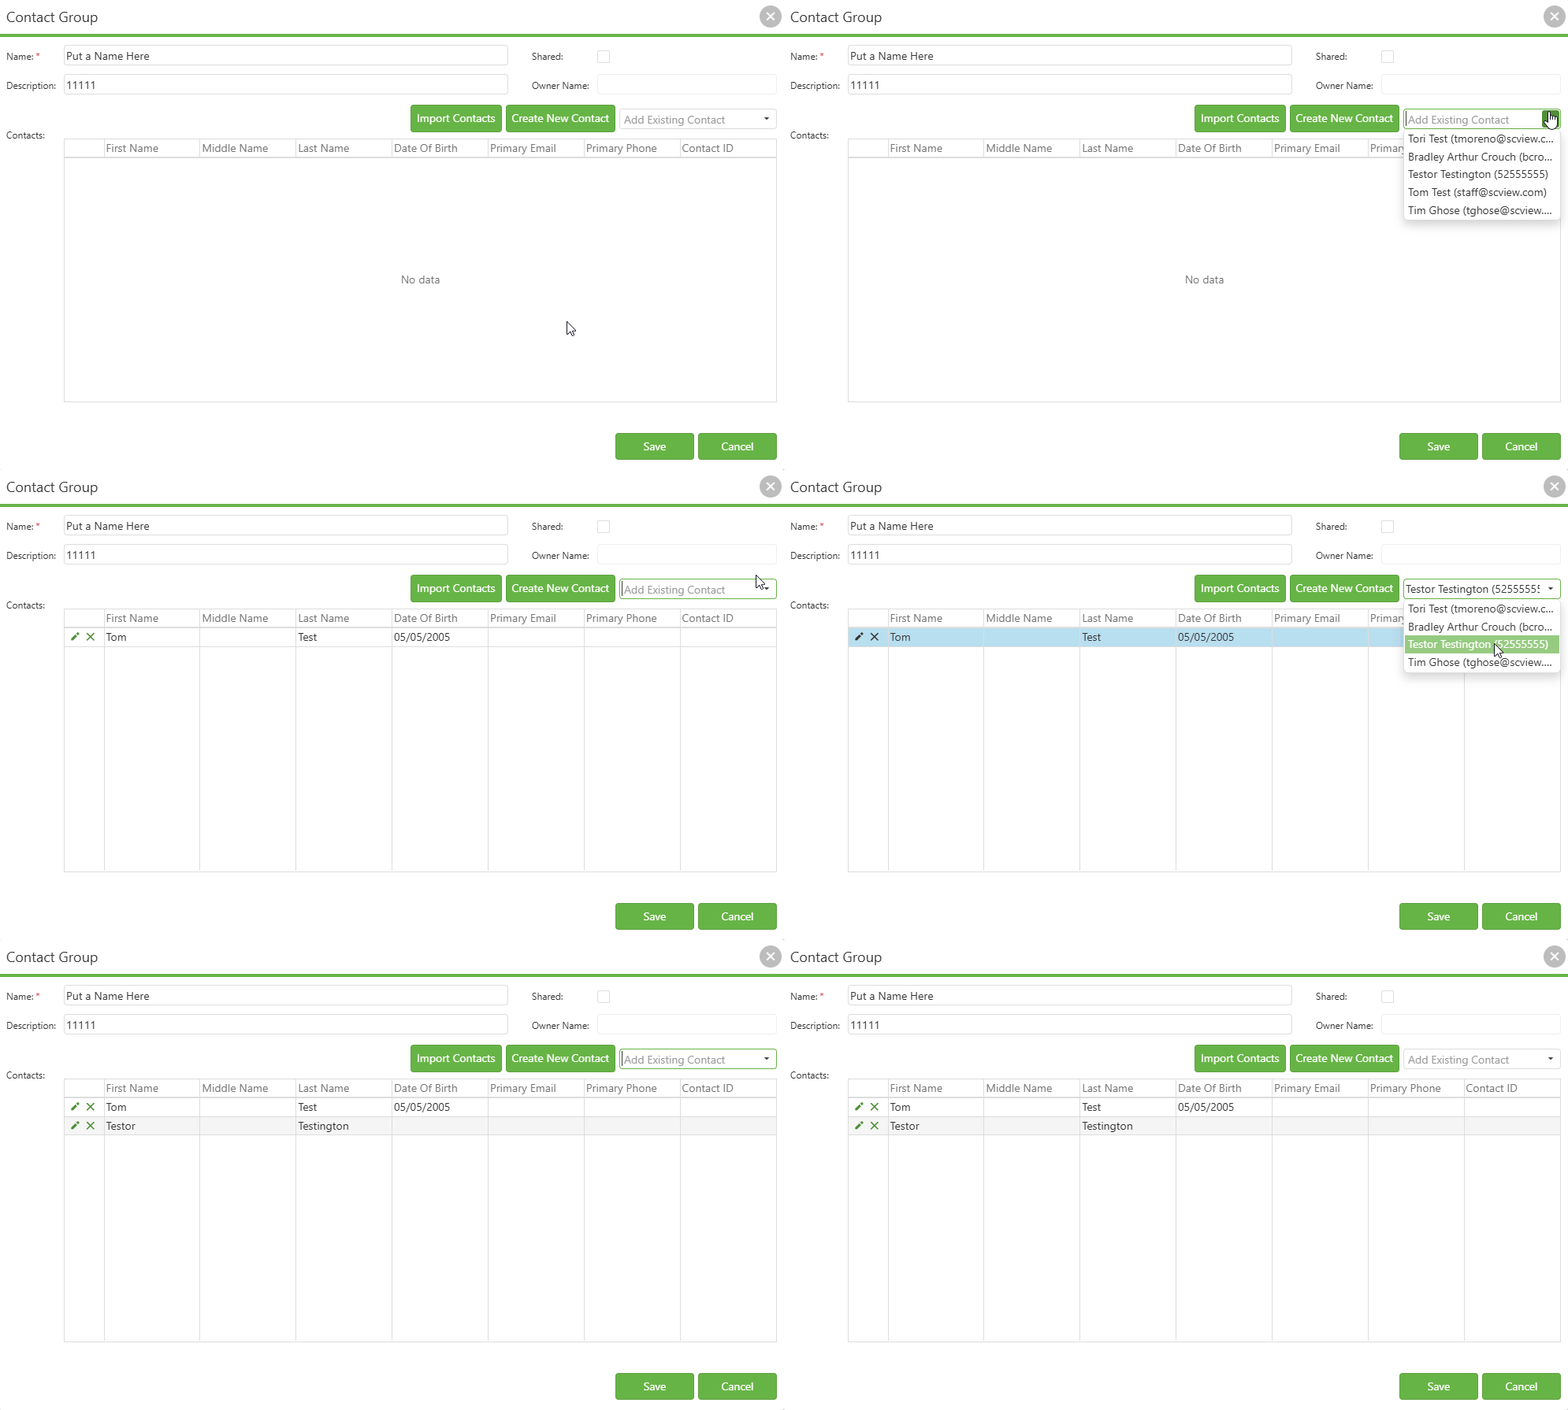
To remove a contact from the Contact Group, click the delete (x) icon corresponding to the user(s) to be removed to remove them from the Contacts Grid, then click Save to confirm the change.
Video: Removing Users from a Specific Contact Group
Method 3 - Use Add to Group Button
1. Select 1 or more contacts and click Add To Group.
Image: Manage Contacts Add to Group Button

2. Select one or more groups we wish to add the contact(s) to and click OK.
Image: Add to Group Popup
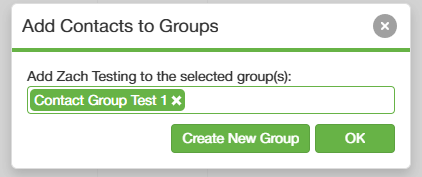
3. If you need to create a new group from this section, click the 'Create New Group' button
Image: Create New Group in Add to Group

4. Fill out the required fields in the 'Contact Group' popup, then save.
Image: Creating a New Group via Add to Group
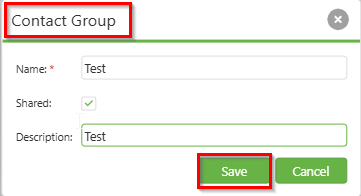
5. The new group will automatically appear as selected in the dropdown menu. In addition, the new group will instantly appear in the dropdown list for easy addition of other contacts to this group.
Image: New Group is Available in Add to Group

C. Best Practices
- Users have the option to add or remove a single Contact to many Groups at once, add or remove many Contacts to a single Group at once, or add many Groups to many Contacts at once. Consider your current needs and use the approach that fits your use case.
- Remember to Share groups that others will appreciate.
- Conversely, if a group is private or only useful to yourself, don't Share it.
D. Troubleshooting
- Popups in Contacts Manager link to each other in multiple places. If something unexpected occurs, try the other route to access the popup, or just go back to the manager page and try again.
E. Related Articles
Manage Contacts: Contacts Manager
Manage Contacts: Group Management
Manage Contacts: Import Contacts
Conclusion
Contact Groups are essential tools for organizing and managing your SCView contact database efficiently. By creating well-named groups with clear descriptions and sharing them appropriately with your team, you establish a foundation for streamlined contact management.