
 | ||
Introduction
As the number of contacts an organization has grows, the need to subdivide them for the sake of organization increases. This article presents Contact Categories, a means to define each contact by its role, which stands in contrast to Contact Group Management in Article: Manage Contacts: Group Management. After reading this article, the reader will have the ability to create, edit, delete, and assign Contact Categories; moreover, after reading both this and the Group Management article, the reader will have all knowledge necessary to design a contact matrix that can subdivide by multiple variables.
A. Problem Statement
As organizations grow and accumulate more contacts, managing them becomes increasingly difficult without a clear system for categorization. Users struggle to identify and organize contacts based on their roles and relationships to the organization, leading to confusion when trying to communicate with specific groups or find the right person for a particular task. Contact Categories provide a solution by allowing administrators to define and assign role-based categories that bring clarity and structure to contact management.
B. Solution
To follow along with this guide, please use the main navigation bar to navigate to Tools > Manage Contacts.
Step 1: Access Contact Categories
To begin, click the green Contact Categories button located on the right, above the Manage Contacts grid. This will call up the Contact Categories popup.
Image: Contact Categories Button Location
Step 2: Adding a New Contact Category
To create a new Contact Category, first click the "New" link at the top-left corner of the Contact Categories grid that dominates the Contact Categories popup. This will create a new, blank row at the top of the Contact Categories grid. Fill this row out by selecting a value from the Contact Type dropdown and filling in the Text and Description fields. When done, click the Save (floppy disk) icon on the new row to save, or the Cancel (counterclockwise arrow) icon to throw out the new Contact Category.
The video below demonstrates the process.
Video: Creating a New Contact Category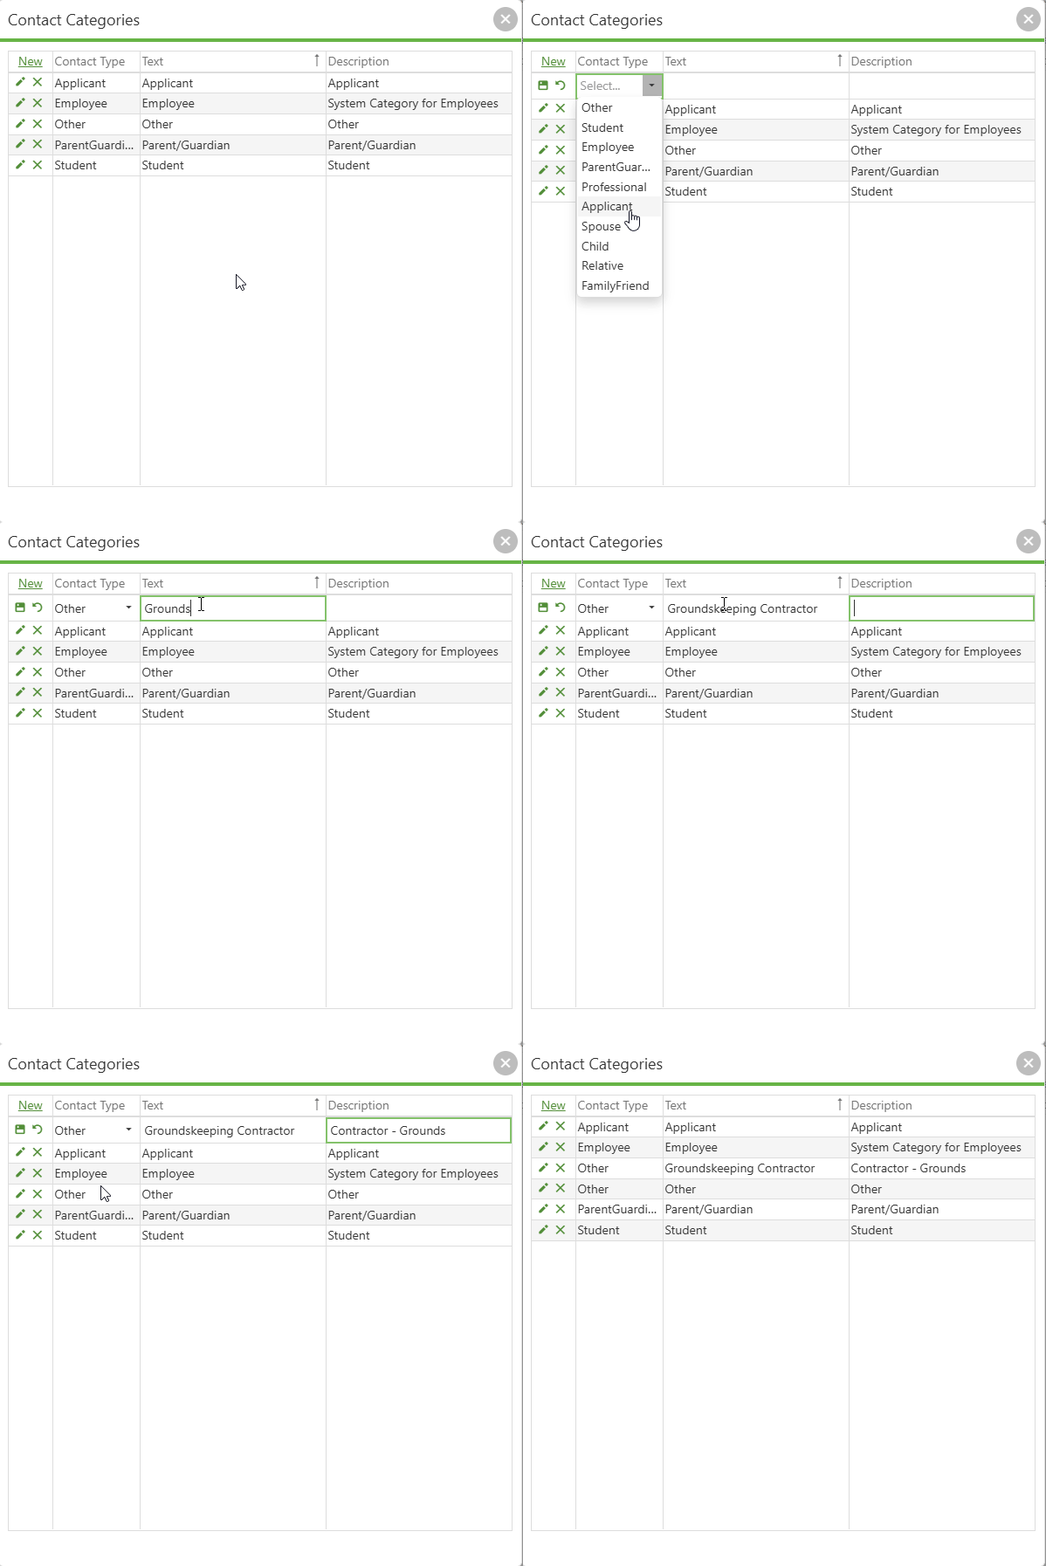
Step 3: Editing a Contact Category
To edit an existing Contact Category, click the Edit (pencil) icon corresponding to the data row that needs edited. This opens the Contact Category for editing. The Contact Type can be changed by selecting a new value from the dropdown, while the Text and Description fields can be changed simply by editing the text in those fields. When done, click the Save (floppy disk) icon on the new row to save, or the Cancel (counterclockwise arrow) icon to throw out the changes.
The video below demonstrates the process.
Video: Editing an Existing Contact Category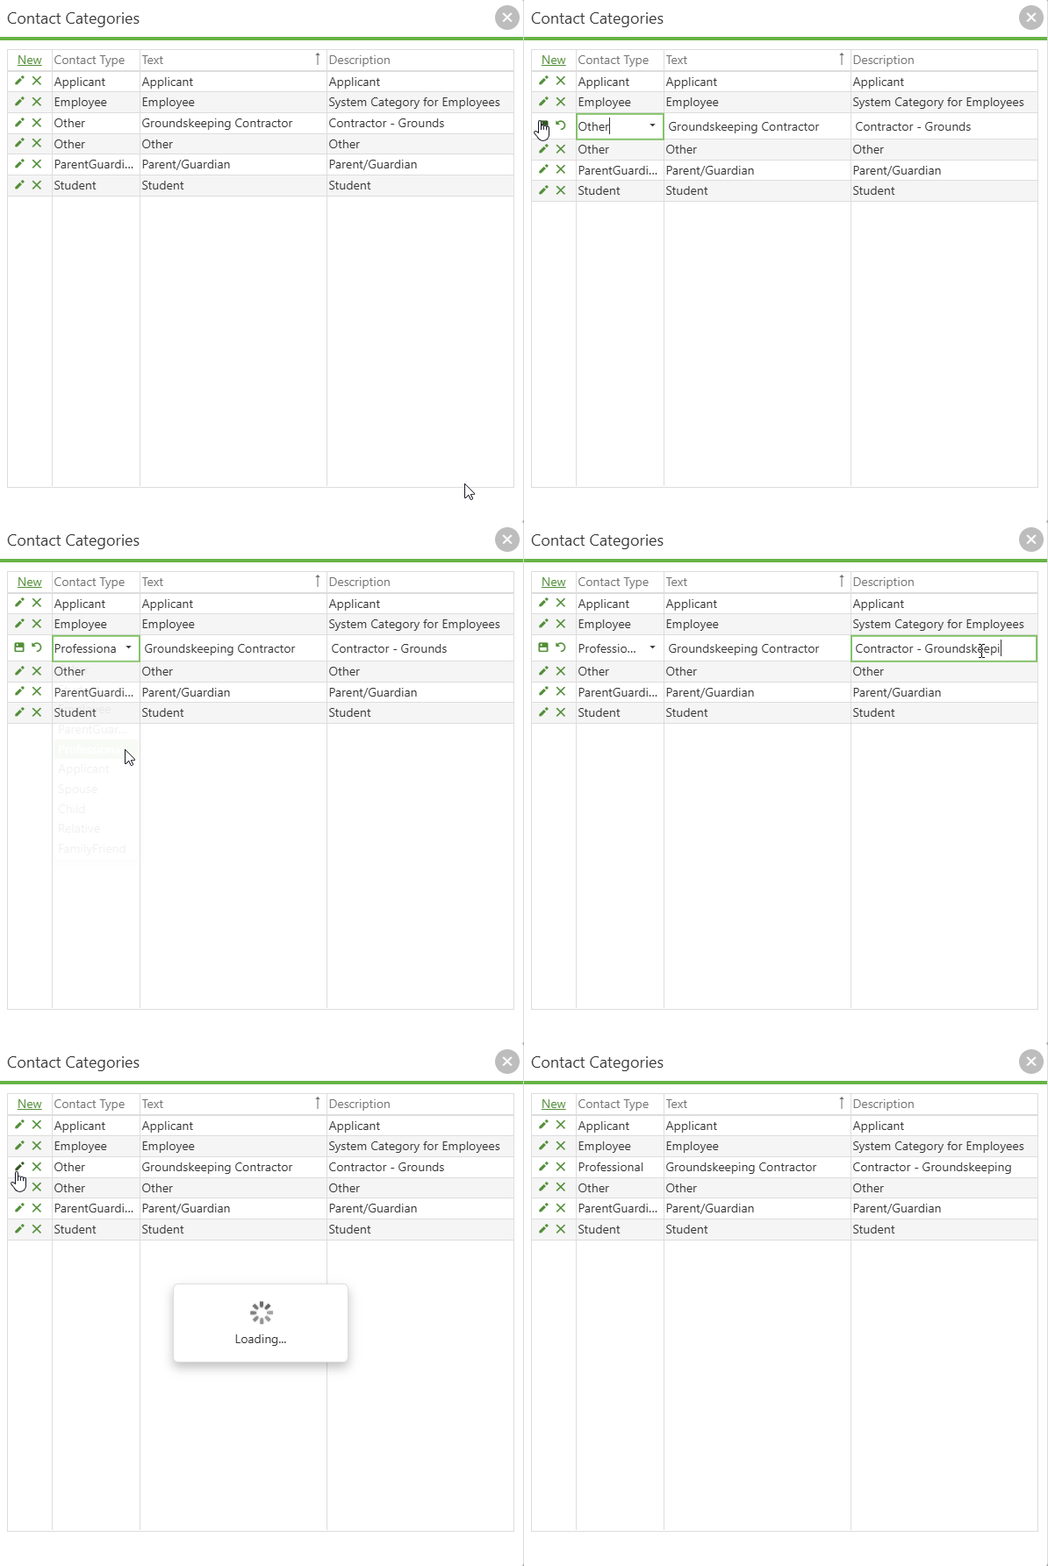
Step 4: Deleting a Contact Category
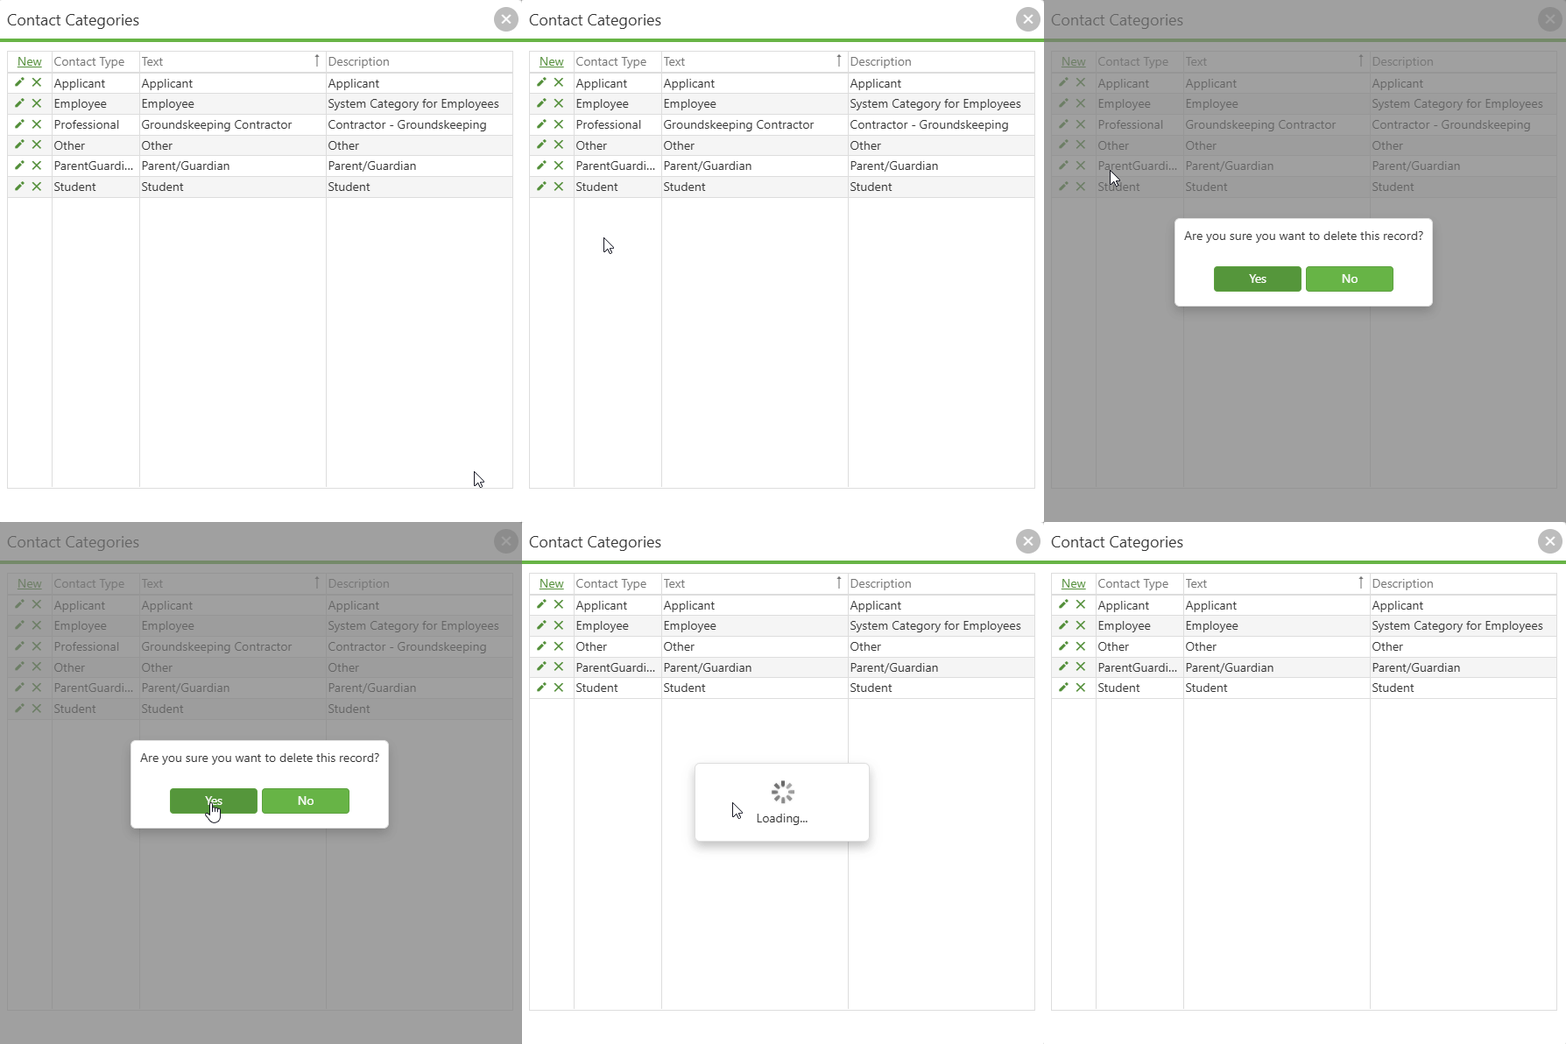
To delete an existing Contact Category, click the Delete (X) icon corresponding to the data row that needs deleted, then confirm the choice in the resulting confirmation popup.
Note: If the "Text" column of a Contact Category is exactly equal to "HR Employee",
"Employee", "Student", "Other", "Applicant", or "Parent/Guardian", then these are
considered to be System categories and SCView will refuse to delete them.
The video below demonstrates the process.
Video: Deleting an Existing Contact Category
Step 5: Assigning a Contact Category to an Existing Contact
Unlike other operations discussed in this guide, assigning a contact to a Contact Category does not occur in the Contact Categories popup. If the popup is open, please close it to return to the main Manage Contacts Manager page.
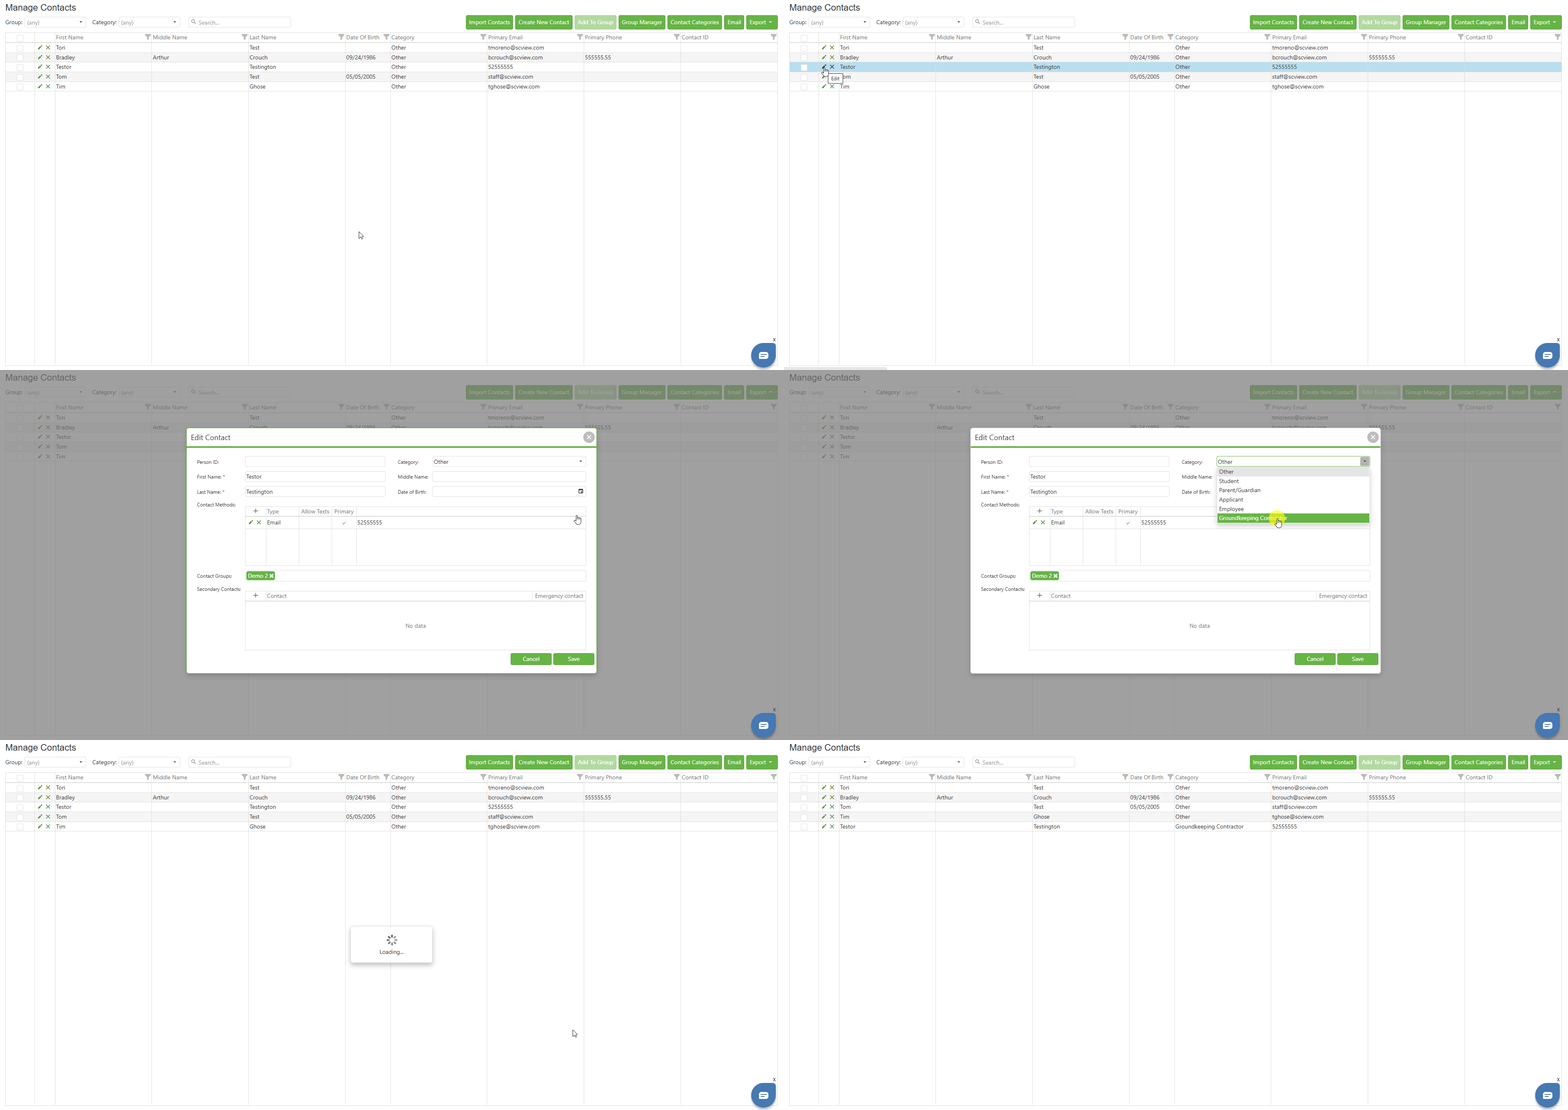
To assign a Contact Category to an Existing Contact, begin by clicking the Edit (pencil) icon corresponding to that contact's row in the main Contact Manager grid. A popup will appear with that Contact's details. Use the Category dropdown in the top right to set the desired Contact Category, then click the green Save button to record changes.
The video below demonstrates the process.
Video: Assigning a Contact Category
C. Best Practices
- Be sure to give Contact Categories precise, evocative Text values when creating them. This text value is what will be seen elsewhere in the module.
- Contact Categories are mutually exclusive. While they must be precise, they must also be defining. Make sure that the Categories you create properly encompass what that contact means to your organization.
D. Troubleshooting
- If you are unable to delete a Contact Category, check the Text of that Category against the list of System Categories. Those cannot be deleted.
- Contact Categories were created as a concept after the launch of Manage Contacts. Some early clients may not have a full list of System Contact Categories, which allows those clients to create undeletable categories by making a category with one of the System "Text" values. If this has happened to you and you need help deleting it because it's not what you want, contact SCView Support.
- If you are unable to add a Contact Category, check the Text column. Two Contact Categories cannot share the exact same Text value.
E. Related Articles
Manage Contacts: Contacts Manager
Manage Contacts: Group Management
Manage Contacts: Import Contacts
Conclusion
Contact Categories offer a straightforward solution to contact management challenges by providing role-based classification capabilities. Throughout this article, you've discovered how to leverage the Contact Categories feature to create, modify, remove, and assign categories that bring structure to your contact database. This system ensures that every contact is properly identified according to their relationship with your organization, making communication targeting and contact lookup significantly more efficient.