 | ||
Introduction
The Image Bar in SCView is a comprehensive toolbar that provides users with essential tools for viewing, navigating, manipulating, and annotating document images. Located at the top of the image viewing area, this toolbar becomes active when a document is selected and its images are displayed. The Image Bar contains a wide range of functionalities including document creation, page management, navigation controls, zoom options, rotation tools, annotation features, stored annotation management, and signature request capabilities. Understanding how to effectively use each tool in the Image Bar is crucial for efficient document management and processing. This article provides detailed instructions on every feature available in the Image Bar, enabling users to maximize their productivity when working with document images in SCView.
A. Problem Statement
Users working with document images in SCView often encounter challenges that can hinder their productivity and document management efficiency. Common difficulties include:
- Uncertainty about how to add new documents or append additional pages to existing documents
- Difficulty navigating through multi-page documents efficiently
- Not knowing how to adjust the image view for optimal readability using zoom and fit options
- Confusion about the different rotation options available for correcting improperly scanned documents
- Lack of understanding about the various annotation tools and their specific purposes
- Uncertainty about when and how to make annotations permanent using the burn feature
- Not knowing how to initiate signature requests directly from the document viewer
- Difficulty accessing and managing the print queue for document printing
- Confusion about the difference between stored text annotations and custom text annotations
- Not knowing how to save custom annotations for reuse across multiple documents
- Uncertainty about how to access and manage saved stored annotations
- Confusion about how to delete stored annotations that are no longer needed
Without proper knowledge of the Image Bar features, users may struggle to perform basic document operations, waste time with inefficient workflows, or fail to utilize powerful annotation and document management capabilities.
B. Solution
SCView's Image Bar provides a centralized location for all essential document image operations. The toolbar offers intuitive icons for document creation, page navigation, view adjustments, rotation controls, annotation tools, stored annotation management and signature management. By mastering these tools, users can efficiently navigate documents, make necessary corrections, add annotations for communication and record-keeping, save frequently used annotations for quick reuse and manage document workflows seamlessly. Each tool is designed with specific functionality that contributes to a comprehensive document management experience.
NOTE: When logged into SCView and looking at the Search tab, each user's view will
be slightly different depending on their permissions. Some Image Bar options may not
be available based on your assigned access level and system configuration.
Locating and Understanding the Image Bar
Step 1:
Navigate to the Search tab in SCView by clicking on "Search" in the main navigation menu at the top of the screen. The Search interface will load, displaying the search criteria fields on the left side and the image viewing area on the right side.

Step 2:
Locate the Image Bar at the top of the image viewing area on the right side of the screen. When no document is selected, the Image Bar icons will appear grayed out or inactive, indicating that no document image is currently available for manipulation.
Step 3:
Perform a search by entering your search criteria and clicking the "Search" button. Select a document from the Search Result Grid by double-clicking on a row. Once the document images load, the Image Bar icons will become active and fully functional, ready for use.
Step 4:
Observe that the Image Bar contains multiple icons arranged horizontally from left to right. Each icon represents a specific function or tool. Hovering your mouse cursor over any icon will display a tooltip describing that tool's function.
Create New Document
Step 1:
Locate the "Create New Doc" icon on the far left side of the Image Bar. This icon appears as a blank document page with a folded corner, representing the creation of a new document folder.
Step 2:
Click on the "Create New Doc" icon. The "New Document" dialog window will open, displaying a form interface for creating your new document.

At the top of the dialog, configure the following settings:
- Department: Select the appropriate department from the dropdown menu.
- Document Type: Select the document type from the dropdown menu.
- Create eSign Request on Submit: Check this box if you want to initiate an electronic signature request when the document is submitted
After completing all required fields, select one of the following actions:
- Save Draft: Saves the document as a draft for later completion
- Scan: Opens the scanning interface to add scanned pages to the document
- Submit: Submits the completed document to the system
- Cancel: Cancels the document creation and closes the dialog
NOTE: This feature should only be used when necessary. Do not create a new document
if you are using SCScan to add images, as SCScan handles document creation automatically. Additionally, new documents with a document type that corresponds to an SCView module
(such as Leave or Mileage) cannot be created using this method. To create a new module document, navigate to that specific module.
Step 3:
Alternatively, you can create a new document by dragging an image file from your computer and dropping it over the Search Result Grid area in the lower left corner. After dropping the file, a dialog will appear allowing you to choose the document type for the new record.

After selecting or dropping the file(s), the "Add Page" dialog will appear with the following options:
- Replace Existing File: Replaces the current file (may be grayed out if not applicable)
- Create New Document: Creates a new document with the selected file(s)
- Index New Document: Creates a new document and allows you to add index metadata
Step 4:
Click on the "Create New Document" button. The "Create Page" dialog will open, displaying a list of available document types.
Step 5:
In the "Create New Document" dialog, review the available document types displayed in a multi-column list. Click the "OK" button to confirm your selection and create the new document with the uploaded file(s).
Note: Click "Back" to return to the previous screen, or click "Cancel" to abort the
operation entirely.
Step 6:
The system will generate a new document folder with the selected document type, and the uploaded file(s) will be attached as pages. The new document will appear in your Search Result Grid.
Append Pages
Step 1:
Ensure you have a document selected in the Search Result Grid before attempting to append pages. The Append Pages function requires an existing document to be selected as the destination for the new pages.
Step 2:
Click on the "Append Pages" icon in the Image Bar. A file browser dialog window will open, allowing you to navigate to and select the rasterized file(s) you wish to add to the document.
Step 3:
Click the "Open" button in the file browser dialog to confirm your selection. The "Add Page" dialog window will appear, presenting three options:

- Add to Current: Adds the selected file(s) to the currently selected document
- Create New Document: Creates a new document with the selected file(s)
- Index New Document: Creates a new document and allows you to index it with metadata
Step 4:
Click on the "Add to Current" button to append the pages to your existing document. A secondary dialog titled "Append to the Current Document" will appear.
Step 5:
In the "Append to the Current Document" dialog, specify where you would like to insert the new pages by selecting one of the following options:
- Beginning: Inserts the new page(s) at the start of the document, before all existing pages
- End: Inserts the new page(s) at the end of the document, after all existing pages (default selection)
- After: Inserts the new page(s) after a specific page number. Enter the page number in the adjacent field
- Page Type: Select the appropriate Page Type from the dropdown menu. The available page types will depend on your system configuration and document type settings.
Step 6:
Click the "OK" button to complete the append operation. The system will process and upload the images, adding them to the document at the specified location.
Note: Click "Back" to return to the previous screen if you need to change your
selection, or click "Cancel" to abort the operation entirely.
Step 7:
Once complete, the new pages will appear in the thumbnail panel on the left side of the image viewing area. The page count indicator will update to reflect the additional pages.
Step 8:
Alternatively, you can append pages by dragging and dropping image files directly into the image viewing area or onto the thumbnail panel while a document is selected. The same "Add Page" dialog will appear, allowing you to choose your preferred option.
Scan
Step 1:
Click on the Scan icon to open the "Scan - mySCView" window. This dedicated scanning interface allows you to scan documents directly into SCView.

Step 2:
If the scanning plug-in is not installed on your system, a toast notification message will appear stating: "The scanning plug-in does not appear to be installed. Click Here to install the scanning plug-in. You will need to refresh the page after installing the plug-in."
NOTE: For detailed installation instructions, upgrade information, or to uninstall
old extensions, click the Help icon (?) within the Scan window.
Step 3:
Once the plug-in is installed, ensure your scanner is properly connected to your computer and powered on before attempting to scan.
The Scan window contains the following toolbar icons arranged from left to right:
- Scan: Initiates the scanning process to capture documents from your connected scanner
- Select Scanner: Opens a dialog to choose from available scanners connected to your computer
- Save: Saves the scanned image(s) to the current document in SCView
- Previous Page: Navigates to the previous scanned page in the thumbnail preview
- Next Page: Navigates to the next scanned page in the thumbnail preview
- Zoom In: Increases the magnification of the scanned image preview
- Zoom Out: Decreases the magnification of the scanned image preview
- Fit Image Width: Adjusts the zoom to fit the image width within the viewing area
- Fit to Page: Adjusts the zoom to display the entire page within the viewing area
- Display Full Size: Displays the scanned image at its actual pixel dimensions (1:1 ratio)
- Help (?): Opens help documentation with plug-in installation, upgrade, and uninstallation instructions
Previous Page
The "Previous Page" icon, indicating backward navigation through document pages. This function is only useful when viewing documents containing more than one page. Clicking on the Previous Page icon navigates to the page immediately preceding the currently displayed page. The image viewing area will update to show the previous page, and the page count indicator will reflect the change. You can continue clicking the Previous Page icon to move backward through the document one page at a time. If you are already viewing the first page of the document, clicking this icon will have no effect as there are no earlier pages to display. The corresponding thumbnail in the thumbnail panel will also update to indicate the currently selected page, with the active thumbnail highlighted in orange.

Page Count Indicator
The Page Count Indicator is positioned in the Image Bar between the Previous and next page. This indicator displays the current page number and total number of pages in the format "current page / total pages" (for example, "1 / 2" indicates page 1 of 2 total pages). The first number shows which page you are currently viewing, while the second number shows the total number of pages in the document. You can click directly on the page number field (the first number) to make it editable, allowing you to type a specific page number to navigate directly to that page. After entering the desired page number, press the Enter key to confirm. The image viewing area will automatically display the specified page, and the thumbnail panel will update to highlight the corresponding thumbnail. If you enter a page number that exceeds the total number of pages, the system will either navigate to the last page or display an error message.

Next Page
The "Next Page" icon, indicating forward navigation through document pages. This function is only useful when viewing documents containing more than one page. Clicking on the Next Page icon navigates to the page immediately following the currently displayed page. The image viewing area will update to show the next page, and the page count indicator will reflect the change. You can continue clicking the Next Page icon to move forward through the document one page at a time. If you are already viewing the last page of the document, clicking this icon will have no effect as there are no additional pages to display. The corresponding thumbnail in the thumbnail panel will also update to indicate the currently selected page, with the active thumbnail highlighted in orange.

Print and Print Queue
Step 1:
Locate the "Print" icon in the Image Bar. This icon appears as a printer symbol with a small dropdown arrow next to it, indicating additional options are available.
Step 2:
Click directly on the Print icon to initiate printing. The "Print Setup" dialog will appear with the following options:
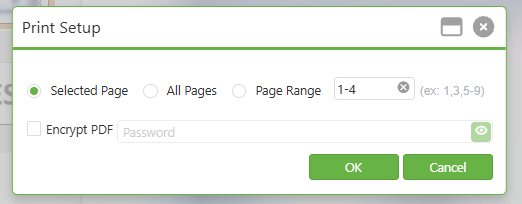
- Selected Page: Prints only the currently selected/displayed page
- All Pages: Prints all pages in the document
- Page Range: Prints specific pages based on the range entered (e.g., 1-2, 1,3,5-9)
- Encrypt PDF: Checkbox that enables password protection for the generated PDF
- Password: Text field that becomes active when encryption is enabled
NOTE: The user who enters the password is required to remember the password, we are not storing this password anywhere on the site.
Step 3:
Encryption Functionality:
When the "Encrypt PDF" checkbox is unchecked (default state):
- The password field remains disabled and grayed out
- The PDF will be generated without encryption
- Users can open and view the PDF directly without any password requirement
When the "Encrypt PDF" checkbox is checked:
- The password field becomes enabled and is required
- You must enter a password before the PDF can be generated
- If you attempt to click "OK" without entering a password, an error alert will appear
- An error message "Password is required" will display below the password field
- Once a password is entered and you click "OK", the PDF will be encrypted with the specified password
Step 4:
Click the "OK" button to generate the printable PDF. The system will process your request and add the print job to the Print Queue. For encrypted PDFs, remember to securely share the password with intended recipients through a separate communication channel. Click "Cancel" to abort the print operation.
Step 5:
To access the Print Queue, click on the small dropdown arrow next to the Print icon and select "Print Queue" from the menu.
Step 6:
The Print Queue modal window will open, displaying a list of your print jobs with the following columns:

- Document: The name of the generated PDF file.
- Printed: The date and time when the print job was created.
- Progress: The current status of the print job
Note: The Print Queue maintains a comprehensive record of all print jobs, tracking both encrypted and non-encrypted PDF generation actions. This provides an audit trail of all document printing activities, including security measures applied.
Step 7:
Click on any document name in the Print Queue that shows "available" status to download or open that PDF file.
For encrypted PDFs: When you click to download or open an encrypted PDF from the Print Queue, the PDF viewer will prompt you to enter the password that was set during the Print Setup. The document cannot be accessed without the correct password, ensuring document security even after generation.
For non-encrypted PDFs: These will open directly without any password prompt, allowing immediate access to the document content.
Step 8:
Click the "Refresh" button (green button) at the bottom of the Print Queue modal to update the list and check for any newly completed print jobs.
Step 9:
Click the "Close" button (green button) to close the Print Queue modal and return to the normal document view.
Zoom In
The "Zoom In" icon, indicating magnification increase. Clicking on the Zoom In icon increases the magnification of the currently displayed document image. Each click will incrementally enlarge the image, allowing you to see more detail. Continue clicking the Zoom In icon to further increase magnification until you reach the desired zoom level, revealing finer details within the document. After zooming in, use your mouse to click and drag on the image to pan and navigate to different areas of the enlarged document. Alternatively, use the scroll bars that appear when the image exceeds the viewing area dimensions.

Zoom Out
The "Zoom Out" icon, indicating magnification decrease. Clicking on the Zoom Out icon decreases the magnification of the currently displayed document image. Each click will incrementally reduce the image size, allowing you to see more of the document at once. Continue clicking the Zoom Out icon to further decrease magnification until you reach the desired zoom level or the image fits within the viewing area. Use the Zoom Out function after zooming in to return to a more comfortable viewing level, or to see an overview of the entire document page.

Fit to Image Width
Clicking on this icon automatically adjusts the zoom level so that the document image fills the entire width of the viewing area

Fit to Page
Clicking on this icon automatically adjusts the zoom level so that the entire document page is visible within the viewing area
Display Full Size
Clicking on this icon displays the document image at its actual pixel dimensions, without any scaling applied.

Rotate Left
Clicking on the Rotate Left icon rotates the selected page(s) 90 degrees counterclockwise, and the image will immediately update to display the rotated orientation.
Rotate Right
Clicking on the Rotate Right icon rotates the selected page(s) 90 degrees clockwise, and the image will immediately update to display the rotated orientation.

Rotate 180 Degrees
Clicking on the Rotate 180 Degrees icon flips the selected page(s) upside down. This is equivalent to clicking Rotate Left or Rotate Right twice.

Create Redaction Annotation
The "Create Redaction Annotation" icon, representing the redaction tool used to obscure sensitive information. Clicking on the Redaction Annotation icon activates the redaction tool. Click on the area where you want to start the redaction and drag until you cover the desired area. Once placed, you can adjust the height and width using the resize handles (small squares) that appear on the corners and edges of the selection box.

Create Highlighter Annotation
The "Create Highlighter Annotation" icon, representing the highlighting tool used to draw attention to important information. Clicking on the Highlighter Annotation icon activates the highlighting tool. Click on the area where you want to start the highlight and drag until you cover the desired area. Once placed, you can adjust the height and width using the resize handles (small squares) that appear on the corners and edges of the selection box. The highlight creates a semi-transparent yellow overlay that draws attention to the underlying content while still allowing it to be visible.

Create Text Annotation
Clicking directly on the Text Annotation icon (not the dropdown arrow) activates the text box creation tool. Click on the area where you want to place the text and drag to create a text box of your desired size. Once placed, Double-Click it a cursor will appear inside the text box ready for text input. Type your desired annotation text, then click outside the text box to save your changes. You can adjust the height and width using the resize handles (small squares) that appear on the corners and edges of the selection box.

Stored Text Annotations are predefined text options that allow you to quickly add standard annotations without manual typing, ensuring consistency across all documents.
To access Stored Text Annotations, click on the small dropdown arrow next to the Text Annotation icon. A dropdown menu will appear displaying the available predefined text options:
- APPROVED: Indicates the document has been approved
- COPY: Indicates the document is a copy of the original
- DENIED: Indicates the document or request has been denied
- PAID: Indicates the document or invoice has been paid
- VOID: Indicates the document is void and no longer valid
Click on the desired stored text annotation from the dropdown menu. The annotation tool will be activated with the selected predefined text.

Create Freehand Annotation (Pen Tool)
The "Create Freehand Annotation" icon , representing the freehand drawing tool for creating custom markings on documents. Clicking on the Pen icon activates the freehand annotation tool, and your mouse cursor will change to indicate that you can now draw directly on the document. Position your cursor where you want to begin drawing, then click and hold the left mouse button and move your mouse to draw on the document. Your mouse movements will create a freehand line that follows your cursor path, similar to drawing with a pen. Release the mouse button when you have completed your freehand drawing.

NOTE: The following operations are common for all annotation types (Redaction,
Highlighter, Text, Freehand, annotations)
Right-Click Context Menu
Right-clicking on any annotation displays a context menu with three options:
- Properties: Opens the Properties dialog to customize the redaction appearance
- Delete: Removes the redaction annotation from the document
- Save: Opens the Save Annotation dialog to save as a reusable annotation
NOTE: The following operations are common for all annotation types (Redaction, Highlighter, Text, and Freehand annotations)

Saving Annotations for Reuse
SCView allows users to save any annotation (Redaction, Highlighter, Text, or Freehand) as a stored annotation for quick reuse across multiple documents. This feature is particularly useful for frequently used markings, signatures, stamps, or standardized annotations.
Step 1: Create an annotation on the document using any of the annotation tools (Redaction, Highlighter, Text, or Freehand).
Step 2: Right-click on the annotation you wish to save. A context menu will appear with three options: Properties, Delete, and Save.
Step 3: Click on "Save" from the context menu. The "Save Annotation" dialog window will open.
In the Save Annotation dialog, complete the following required fields:
- Name (Required): Enter a unique, descriptive name for the annotation. This name will appear in the stored annotation dropdown menu.
- Description (Required): The system automatically populates this field based on the annotation type (e.g., "Freehand Annotation", "Text Annotation", "Redaction Annotation", "Highlighter Annotation"). You can modify this description if needed.
- Shared: Check this box if you want the annotation to be available to other users in your organization. Leave unchecked to keep the annotation private to your account only.
- Anchor Position (Required): Select the anchor position from the dropdown menu. Options include "Anchor to the top left" and other positioning options. This determines where the annotation will be placed relative to the click point when applied from the stored annotations menu.
Step 4: Click the "OK" button to save the annotation. Click "Cancel" to abort the save operation and close the dialog.
Step 5: Once saved, the stored annotation will be available in the dropdown menu of its associated annotation tool. For example:
- A saved freehand annotation will appear in the Freehand Annotation dropdown
- A saved text annotation will appear in the Text Annotation dropdown
- A saved redaction annotation will appear in the Redaction Annotation dropdown
- A saved highlighter annotation will appear in the Highlighter Annotation dropdown

Accessing Stored Annotations
Step 1: Locate the annotation tool icon in the Image Bar that corresponds to the type of stored annotation you want to use (Redaction, Highlighter, Text, or Freehand).
Step 2: Click on the small dropdown arrow next to the annotation tool icon. A dropdown menu will appear displaying all available stored annotations of that type.
Step 3: Your saved annotations will appear in the dropdown list with their assigned names. Click on the desired stored annotation to select it.
Step 4: Click on the document where you want to place the stored annotation. The annotation will be applied at the specified location based on the anchor position configured during save.

NOTE: The dropdown arrow next to the Redaction, Highlighter, and Freehand annotation tools will be grayed out and inaccessible if no stored annotations of that type exist. Once you save at least one annotation of a specific type, the corresponding dropdown menu will become active and accessible, allowing you to select from your saved annotations.
Deleting Stored Annotations
Step 1: Click on the dropdown arrow next to the annotation tool icon (Redaction, Highlighter, Text, or Freehand) to view the list of stored annotations.
Step 2: Locate the stored annotation you wish to delete in the dropdown menu. Each stored annotation will display with a delete icon (X) next to its name.
Step 3: Click on the delete icon (X) next to the stored annotation name you want to remove.
Step 4: A Confirm Delete popup dialog will appear. This operation will NOT remove annotations from images.
Step 5: Review the confirmation message carefully. Note that deleting a stored annotation:
- Will remove the annotation from the stored annotations dropdown menu
- Will NOT remove any instances of this annotation that have already been placed on documents
Step 6: Click "Yes" to confirm the deletion and permanently remove the stored annotation from your available options. Click "No" to cancel the deletion and keep the stored annotation.
Step 7: After clicking "Yes", the stored annotation will be immediately removed from the dropdown menu and will no longer be available for future use.

Create Image Annotation (Stamp)
This feature is used for signatures only and is generally reserved for Treasurer's use. It places a pre-set image (such as a signature) on the document. To access available stamps, click on the small dropdown arrow next to the Image Annotation icon. A dropdown menu will appear displaying available image stamps, such as "My Signature" if you have a signature configured in the system. Click on the desired stamp from the dropdown menu, then click on the document where you want to place the stamp image. Once placed, you can reposition the stamp by clicking and dragging it, or resize it using the resize handles while maintaining the aspect ratio.
Right-clicking on the image annotation displays a context menu with two options:
- Properties: Opens the Properties dialog to customize the stamp appearance
- Delete: Removes the image annotation from the document
NOTE: Unlike other annotations, the Image Annotation (Stamp) does not have a Save option
in the right-click menu as stamps are pre-configured in the system. The available stamps
depend on your system configuration and user permissions. After placing a stamp, an orange notification banner will appear at the top of the screen displaying: "Use the flame icon
(burn) after positioning your image annotation to make it permanent.
Make Image Annotation Permanent (Burn)
This feature burns the stamp into the image permanently, making it an inseparable part of the document. Once burned, the stamp cannot be removed, edited, or repositioned. All other annotations (Redaction, Highlighter, Text, and Freehand) can be removed from the document. The Burn function is primarily used for Image Annotations (Stamps) such as Treasurer signatures to ensure they become a permanent part of the document record.

Delete Page(s)
This will delete the selected page(s).

Add Signature Request
This will take you to the eSign request page, allowing you to select who to send to, and to place the signature field onto the document.

C. Best Practices
Recommendations and best practices to help users optimize the Image Bar features and get the most out of them:
- Document Creation & Management: Use SCScan for bulk scanning (it handles document creation automatically), navigate directly to specific modules for module documents (Leave, Mileage, etc.), verify document type before creation, and utilize drag-and-drop into the Search Result Grid or image viewing area for quick uploads.
- Page Navigation & Viewing: Use Fit to Page for quick document overviews, Fit to Image Width for reading full lines of text without horizontal scrolling, Zoom In for examining signatures and fine details while avoiding over-zooming that causes pixelation, and click directly on the page number field to type and jump to specific pages.
- Rotation Best Practices: Rotate pages immediately after import to prevent confusion, select multiple pages from the thumbnail panel using Ctrl or Shift for batch rotation, and use Rotate 180 Degrees for upside-down documents instead of clicking rotate buttons twice.
- Annotation Best Practices: Select the correct annotation tool before use, apply stored text annotations (APPROVED, COPY, DENIED, PAID, VOID) for consistency, use redactions for sensitive information, highlights for emphasis, and always verify annotations before using the Burn function as burned annotations cannot be removed or edited. Save frequently used annotations (such as signatures, custom stamps, or standard markings) as stored annotations to improve efficiency and ensure consistency. Use descriptive names when saving annotations so they are easily identifiable in the dropdown menu. Enable the "Shared" option when saving annotations that should be available to team members. Choose the appropriate anchor position based on how you typically place the annotation on documents
- Stored Annotation Management Best Practices: Regularly review and clean up stored annotations that are no longer needed. Use consistent naming conventions for stored annotations across your team. Before deleting a stored annotation, note that it will not affect annotations already placed on documents. Test saved annotations on a non-critical document before applying to important records
- Print & Signature Best Practices: Use Page Range option (e.g., 1-2, 1,3,5-9) for selective printing, regularly check the Print Queue to access previously generated files and monitor job status, position stamps carefully before burning, and track signature request status through the Notifications section.
- General Best Practices: Hover over icons to display tooltips when unsure of functions, periodically refresh the page to ensure changes are saved, verify your access permissions with the system administrator if options are unavailable, and ensure the scanning plug-in is installed with your scanner properly connected before attempting to scan.
D. Troubleshooting
Image Bar icons grayed out:
- Perform a search using the Search tab and double-click a document in the Search Result Grid to load images and activate the Image Bar icons. If icons remain inactive, verify the document contains image files or check your user permissions.
Scanning plug-in not detected:
- Click the provided link in the toast notification to download and install the plug-in, then refresh your browser completely. If issues persist, click the Help icon (?) within the Scan window for detailed troubleshooting.
Scanner not appearing:
- Ensure your scanner is connected, powered on, and has proper drivers installed. Try disconnecting/reconnecting the scanner and clicking Select Scanner again, or restart your browser.
Pages not appending to document:
- Select a document in the Search Result Grid first, ensure the file format is supported (common image formats), check your internet connection for large files, and verify you have modification permissions.
Burn feature not working:
- Place an Image Annotation (Stamp) on the document first, ensure it's properly positioned, and verify you have the required permissions (often restricted to Treasurer accounts).
Print jobs not appearing in queue:
- Click the Refresh button in the Print Queue modal, ensure you clicked OK (not Cancel) in Print Setup, and check your internet connection. Contact your administrator if problems persist.
- Password field not enabling: Ensure the "Encrypt PDF" checkbox is properly checked
- Error when generating PDF: Verify a password has been entered in the password field
- Cannot open downloaded PDF: Confirm you're entering the correct password (check for case sensitivity and typos)
- Recipients cannot access encrypted PDF: Verify the correct password was shared with them through a secure channel
Print queue showing stuck/failed jobs:
- Refresh the Print Queue, recreate stuck jobs by closing the queue and initiating a new print job, or contact your system administrator for consistent failures.
Page navigation not working:
- Verify the document has multiple pages using the Page Count Indicator, press Enter after typing a direct page number and ensure the page number doesn't exceed the total page count.
Rotation changes not persisting:
- Navigate away and return to confirm rotation saved, check your modification permissions, and contact your administrator if changes consistently revert after page refresh.
Document creation errors:
- Complete all required fields before clicking Submit, avoid using Create New Doc for SCView modules (Leave/Mileage) or when using SCScan (which creates documents automatically).
Drag and drop not working:
- Drop files onto the correct area (Search Result Grid for new documents, image viewing area for appending), verify file formats are supported, try alternative methods (Append Pages/Create New Doc icons), and check browser compatibility.
Unable to save annotation:
- Ensure all required fields (Name, Description, Anchor Position) are completed in the Save Annotation dialog. The Name field will display a red border if left empty, indicating a validation error. Enter a valid name and try again.
Saved annotation not appearing in dropdown:
- Refresh the page and check the dropdown menu again. Ensure you are looking at the correct annotation tool dropdown (e.g., saved freehand annotations appear only in the Freehand Annotation dropdown). If the issue persists, try saving the annotation again.
Cannot delete stored annotation:
- Ensure you have the proper permissions to delete stored annotations. If the annotation was shared by another user, you may not have deletion rights. Contact your system administrator if you need to remove a shared annotation.
Stored annotation appearing in wrong position:
- When applying a stored annotation, it will be placed based on the Anchor Position setting configured during save. To change the default position, delete the stored annotation and save it again with the correct Anchor Position selected.
Deleted stored annotation still appears on documents:
- This is expected behavior. Deleting a stored annotation only removes it from the dropdown menu for future use. Any instances of the annotation already placed on documents will remain intact. To remove those, manually delete each annotation instance from the affected documents.
E. Related Articles
Search: Page Image and Right-Click Context Menu Options
Search: Paste Document to a New Document
Search: Adding a Signature/Annotations to Documents
Search: How to Print and Download
Conclusion
The Image Bar in SCView centralizes essential document management tools including document creation, page appending, scanning, navigation, zoom controls, rotation, annotations (redaction, highlighting, text notes, freehand drawing, and stamps), stored annotation management, page deletion, and electronic signature requests. Mastering these features enables efficient document organization and review, with annotation capabilities providing flexible markup options—though the Burn feature for making annotations permanent is irreversible and requires careful use. The ability to save and manage stored annotations provides significant time savings for frequently used markings, ensuring consistency across documents while allowing easy access through the associated annotation tool dropdowns. To maximize productivity, implement best practices like using Stored Text Annotations for consistency, saving custom annotations for reuse, selecting appropriate zoom levels for different tasks, and practicing with non-critical documents to become familiar with all functionality. When issues arise, consult troubleshooting resources for quick resolution, and contact your system administrator if you need access to restricted features necessary for your job responsibilities.