 | ||
Introduction
The Search Result Grid in SCView is a powerful component that displays document records matching your search criteria. Located in the lower section of the Search tab, this grid provides a comprehensive view of all documents retrieved from your search query. Understanding how to navigate, customize, and interact with the Search Result Grid is essential for efficient document management. This article will guide you through the various features and functionalities of the Search Result Grid, including how column headers dynamically change based on document types, how to customize field visibility, how to reorder columns, and how to group results for better organization.
A. Problem Statement
Users often face challenges when working with search results in document management systems. Common difficulties include:
- Understanding why column headers change when switching between different document types
- Not knowing how to customize which fields appear in the search result grid
- Difficulty organizing large sets of search results in a meaningful way
- Confusion about why certain fields display asterisks (*) instead of actual values
- Inability to rearrange columns to match preferred viewing order
- Lack of knowledge about grouping functionality to categorize results effectively
Without proper understanding of the Search Result Grid features, users may spend excessive time scrolling through results, miss important document information, or fail to leverage the grid's full customization capabilities.
B. Solution
SCView's Search Result Grid offers extensive customization and organization features that allow users to tailor their view according to their specific needs. The grid dynamically updates its columns based on the selected document type, ensuring relevant index fields are always visible. Users can further customize their experience by selecting which fields to display, reordering columns, and grouping results by specific column headers. These features collectively enable users to work more efficiently with their search results.
NOTE: When logged into SCView and looking at the Search tab, each user's view will be slightly different depending on their permissions. The columns and options available may vary based on your assigned access level.
Understanding the Search Result Grid
Step 1:
Navigate to the Search tab in SCView by clicking on "Search" in the main navigation menu at the top of the screen. The Search tab interface will load, displaying the search criteria fields in the upper portion and the Search Result Grid in the lower portion of the screen.

Step 2:
Locate the Search Result Grid in the lower section of the Search tab. This grid area is positioned below the search criteria fields and action buttons (Clear, Edit, Search). The grid will initially appear empty until you perform a search query.
Step 3:
Locate the record count indicator at the top of the Search interface. This displays text such as "Displaying 1000 of 2879 records" or "Displaying 43 of 43 records." Understand that the first number indicates how many records are currently loaded and displayed in the Search Result Grid. The second number represents the total number of records that match your search criteria in the database.
Step 4:
After performing a search, review the results displayed in the Search Result Grid. Each row represents a single document that matches your search criteria. To select a single document, click once on the row you want to select. The selected row will become highlighted, typically with a different background color to indicate selection. To view the document images and thumbnails, double-click on the desired row. This action will load the document images on the right side of the screen and display page thumbnails for navigation.
Similarly, a row that is highlighted yellow designates a record containing Notes. Simply hover over the record with your mouse for the note content.
NOTE: To add 'Notes' to one of your Document Types, you must have administrator privileges or contact an administrator to set up a compatible index for that document type in the Document Type Manager. Once configured, any text entered in the Notes index will appear when hovering over its corresponding row in the Search Result Grid.

Understanding Dynamic Column Headers
Step 1:
Select a Department from the Department dropdown field located at the top of the search criteria section. This selection determines which document types are available for searching within that department.
Step 2:
Click on the Document Type dropdown field to view the available document types for your selected department. Notice that different document types are available based on departmental configurations and your user permissions.
Step 3:
Select a document type from the dropdown list. For example, selecting "Financial Packet" will configure the search interface for financial document searches. Observe that the search criteria fields above the grid update to show fields relevant to the Financial Packet document type, such as PO No, PO Date, Check No, Invoice No, Vendor, and Issue Date, etc.
Step 4:
Click the "Search" button to execute your search query. Once results populate in the grid, observe the column headers in the Search Result Grid. For the Financial Packet document type, you will see columns such as PO No, PO Date, Check No, Invoice No, Deliver To, Vendor, Vendor No, Requestor, Requisition No, Invoice Date, Issue Date, Function, Fund, IL, Job, Object, OPU, SCC, and Subject.
Step 5:
Return to the Document Type dropdown and select a different document type, such as "InvoicesTN." Notice that the search criteria fields update to reflect the new document type, showing fields like Check No, Invoice No, Invoice Date, Requestor Email, Vendor No, and Vendor.

Customizing Field Visibility with Search Field Preferences
Step 1:
Locate the Field Chooser icon in the search criteria section. This icon appears as a small grid or column selector icon, typically positioned near the search fields area. The exact location may vary slightly based on your screen resolution and interface configuration.

Step 2:
Click on the Field Chooser icon to open the "Search Field Preferences" modal window. This modal displays a comprehensive list of all available fields that can be shown or hidden in the Search Result Grid for the currently selected document type.
Step 3:
Review the list of available fields in the Search Field Preferences modal. You will see a search box at the top of the modal that allows you to quickly find specific fields. Below the search box, there is a "Select All" checkbox followed by individual field checkboxes including options such as Check No, Invoice No, Invoice Date, Requestor Email, Vendor No, Vendor, Page Created, Page Modified, Index Created, and Index Modified.
Step 4:
Use the search box at the top of the modal to filter the field list if you are looking for a specific field. Type the field name partially or fully, and the list will automatically filter to show matching fields.
Step 5:
Check the boxes next to the fields you want to display in the Search Result Grid. A green checkmark indicates the field is selected and will appear as a column in the grid. Unchecked fields will be hidden from the grid view.
Step 6:
Use the "Select All" checkbox if you want to display all available fields in the Search Result Grid. Clicking this checkbox when it is unchecked will select all fields. Clicking it when checked will deselect all fields.
Step 7:
Click the "OK" button (green button) at the bottom of the modal to save your field selections and apply them to the Search Result Grid. The modal will close, and the grid will refresh to display only the columns you selected.
Step 8:
If you want to cancel your changes without applying them, click the "Cancel" button (green button) or click the X icon in the top-right corner of the modal window. This will close the modal and retain the previous field configuration.
Grouping Search Results by Column
Step 1:
Locate the grouping area above the column headers in the Search Result Grid. This area displays the text "Drag a column header here to group by that column", indicating it is the designated drop zone for grouping.

Step 2:
Identify the column by which you want to group your search results. For example, if you want to group documents by Vendor, locate the "Vendor" column header.
Step 3:
Click and hold the left mouse button on the column header you want to use for grouping. Drag the column header upward toward the grouping area that displays "Drag a column header here to group by that column."
Step 4:
Release the mouse button when the column header is positioned within the grouping area. The Search Result Grid will reorganize to display results grouped by the selected column. Each unique value in that column will become a collapsible group header.
Step 5:
Click on the expand/collapse icons next to each group header to show or hide the documents within that group. This allows you to focus on specific groups of documents without being overwhelmed by the entire result set.
Step 6:
To add additional grouping levels, drag another column header to the grouping area. The results will then be grouped by the first column and sub-grouped by the second column, creating a hierarchical organization of your search results.
Step 7:
To remove a column from the grouping area, click and drag the grouped column header from the grouping area back to the column header row.
Understanding Sensitivity Flags in the Search Result Grid
Step 1:
Observe the data displayed in the Search Result Grid columns. You may notice that some fields display asterisks (*) instead of actual values. For example, the Vendor column might show "********" instead of the vendor name.
Step 2:
Understand that these asterisks indicate fields that have been configured with "High Sensitivity" settings in the Doc Type Manager. This is a security feature that masks sensitive information from users who do not have permission to view it.
Please read this article. Custom Forms: Sensitivity Levels
Step 3:
Locate the "Eye" icon in the menu bar at the top of the screen. This icon serves as the toggle for revealing or hiding sensitive field values.
Step 4:
Click the "Eye" icon to reveal the actual values in fields marked with sensitivity flags. If you have the appropriate permissions, the asterisks will be replaced with the actual data values. If you do not have permission, the values will remain masked.
Step 5:
Click the "Eye" icon again to re-mask the sensitive values if needed. This is useful when sharing your screen or when you want to maintain data privacy while working.
Using the Context Menu in the Search Result Grid
Right-click on any row in the Search Result Grid to open the context menu. This menu provides quick access to various document actions without navigating away from the search results. The context menu will appear at your cursor position, displaying a list of available options based on your user permissions and the number of documents selected.

Edit:
Select "Edit" from the context menu to modify the document's index values. This option allows you to update the indexes associated with the selected document. Once changes are made and saved, the page will refresh and reflect those changes in the Search Result Grid.
Delete:
Select "Delete" from the context menu to permanently remove the document along with all images contained within it. This action is irreversible and will delete the entire document folder and its contents.
Note: The Delete option is based on assigned privileges; if you do not see this option, you may not have the required permissions to delete documents.

View:
Select "View" from the context menu to display the document thumbnails on the right side of the screen. This action is functionally equivalent to double-clicking the row in the Search Result Grid. The document images will load in the viewing panel, and page thumbnails will appear for navigation purposes.
Merge Documents:
Select "Merge Documents" from the context menu to combine two documents of the same document type into a single document. This option is useful when document pages have been inadvertently split across multiple document records.
Upon selecting this option, a dialog box will appear prompting you to choose the primary document to keep. All images from the secondary document will be relocated into the selected primary document. The remaining document folders will be removed after the merge is complete.
NOTE: Any indexing information that exists only on the non-primary document will be lost during the merge process. Ensure you have verified the index values before proceeding with a merge operation.

Note: If any of the selected documents are currently in a workflow queue, the merge operation will fail and display an error message. make sure All documents must not be in a workflow before merge document
Email:
Sends selected row in the Search Result Grid via email to the selected recipient. This will open a secondary dialog box to fill in the necessary information.
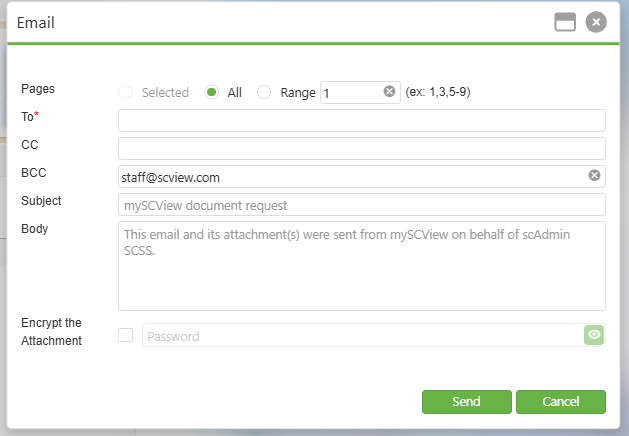
When the Email function is selected, a dialog window appears with the following components:
- Selected: Sends only the pages currently selected in the thumbnail view
- All: Sends all pages within the document (this appears to be the default selection)
- Range: Allows users to specify a custom page range (e.g., 1,3,5-9 format shown in the example)
- To: Primary recipient field for entering the main recipient's email address
- CC: Carbon copy field for additional recipients who should receive the document
- BCC: Blind carbon copy field for hidden recipients (shows "dn.staff.3@example.com" in the screenshot)
- Subject: Pre-populated with "mySCView document request" but can be customized
- Body: Message field containing default text: "This email and its attachment(s) were sent from mySCView on behalf of scAdmin SCSS." This can be edited to include additional context or instructions
- Encrypt the Attachment: Checkbox that enables password protection for the document attachment
When the "Encrypt the Attachment" checkbox is unchecked (default state):
a. The password field remains disabled and grayed out
b. Documents are sent as standard PDF attachments without encryption
c. Recipients can open attachments directly without any password requirement
When the "Encrypt the Attachment" checkbox is checked:
a. The password field becomes enabled and is required
b. You must enter a password before the email can be sent
c. If you attempt to click "Send" without entering a password, an error alert will appear
d. An error message "Password is required" will display below the password field - Send: Green button to confirm and send the email with the document attachments
- Cancel: Green button to close the dialog without sending
Note: When recipients receive an encrypted attachment, they will be prompted to enter the password when they attempt to open the PDF file. The document cannot be accessed without the correct password. The user who enters the password into the popup, is required to remember the password; we are not storing this password anywhere on the site.
Quick Print :
Creates a printable PDF of all images within a document. This can either be downloaded or opened.
Batch Print :
Creates a printable PDF of all images within all documents selected. This can either be downloaded or opened. Only available with multiple documents selected.
Notifications:
Used to see the notifications that were created for this document. Not useful to regular users.
Send to Workflow:
Step 1:
Select the row in the Search Result Grid you want to send to a workflow queue.
Step 2:
Right-click on the selected row and click "Send to Workflow" from the context menu.
Step 3:
The "Send To Workflow" dialog will appear, displaying a list of available workflow queues organized by category.

Step 4:
Review the available workflow options and select the appropriate workflow queue for your document. The available workflows will depend on your system configuration and user permissions.
Step 5:
Click the "OK" button to send the selected Search Result Grid to the chosen workflow queue. Click "Cancel" to abort the operation.
Step 6:
Once submitted, the document will be routed to the selected workflow queue for processing or approval. You can track the workflow status through the Page Group History or the Workflow module.
NOTE: The options that will appear on the popup after selecting this option will be dependent on how document types are set up in the workflow.
Save Results:
Allows the items in the lower left grid to be exported. This does not export the images, only the grid data.
Merge Report:
Select "Merge Report" from the context menu to combine multiple documents or generate a consolidated report from the selected document records. This option allows you to merge related documents into a unified report format for easier review, distribution, or archival purposes.
Request eSignature:
Select "Request eSignature" from the context menu to initiate an electronic signature request for the selected document allowing you to send the document to designated recipients for digital signing.
When you select this option, the system will guide you through the signature request process, where you can specify the signers, set the signing order if multiple signatures are required, and configure any additional signature requirements before sending the request.

Document History:
Select "Document History" from the context menu to view the complete lifespan of the document from its creation to its current state. This option opens the Document History window, which displays a chronological record of all actions performed on the selected document.
NOTE: Financial Packets and Requisitions maintain separate document histories. If you are looking for approval history related to a Purchase Order (PO), you will need to view the Document History for the associated Requisition rather than the PO document itself.

Properties:
Select "Properties" from the context menu to view detailed information about the selected document. This option opens the Document Properties window, which provides comprehensive metadata and configuration details organized across three tabs: Document, Indexes, and Pages.
- Document: When the Document Properties window opens, it defaults to the DOCUMENT tab. This tab displays general metadata and system information about the selected document. The window title shows "Document Properties" followed by the Document ID in parentheses.
- Indexes: Click on the INDEXES tab to view the index field values associated with the document. This tab displays all index entries that have been assigned to the document for search and categorization purposes. Use this tab to verify index values, identify which fields have been populated for the document, and check for any faux deleted index entries that may affect search results.
- Pages: Click on the PAGES tab to view detailed information about each page contained within the document. This tab provides page-level metadata including OCR status and page properties.

C. Best Practices
Selecting the Appropriate Document Type
- Always select the correct Document Type before searching to ensure relevant index fields and column headers are displayed in the Search Result Grid
Customizing Field Visibility for Efficiency
- Customize Search Field Preferences to display only relevant columns, reducing visual clutter and improving readability, and review periodically as workflow needs change
Utilizing the Grouping Feature for Large Result Sets
- Use column grouping to organize documents by common attributes such as Vendor, Requestor, or Date to quickly navigate specific categories without manual scrolling
Refining Search Criteria
- Narrow search parameters when the record count shows partial results (e.g., "Displaying 1000 of 2879 records") to ensure all relevant documents are accessible
Understanding Search Logic
- Remember that searches use "starts with" logic, so enter the first characters of the data you are looking for (e.g., search "North" to find "North Elementary")
Managing Sensitive Data Appropriately
- Use the Eye icon to reveal masked data only when necessary, and re-mask sensitive values before screen sharing, presenting, or stepping away from your workstation
Saving Search Configurations
- Use the Save Results feature to export grid data for reporting or record-keeping purposes to avoid repeatedly performing the same searches
Regular Browser Maintenance
- Periodically clear browser cache and cookies to ensure optimal performance and proper loading of SCView interface updates
D. Troubleshooting
Column Headers Not Updating When Changing Document Types
- Click outside the dropdown to confirm selection, use the "Clear" button to reset, reselect the document type, and refresh the browser (F5) if the issue persists
Grouping Feature Not Responding
- Verify the grouping area text is visible, reset browser zoom to 100% (Ctrl+0), try a different browser, and ensure JavaScript is enabled
Asterisks Displaying Instead of Actual Values
- Click the Eye icon in the toolbar to reveal masked values, and contact your system administrator if values remain hidden due to permission restrictions
Search Results Not Appearing in the Grid
- Verify search criteria accuracy, remember searches use "starts with" logic, and broaden your search by removing criteria or using fewer characters
Grid Display Appears Distorted or Misaligned
- Refresh the browser, ensure JavaScript is enabled, clear browser cache, and try accessing SCView from a different browser or device
Record Count Shows Limited Results
- SCView limits initial display for performance; refine search criteria with more specific values, date ranges, or additional filters to reduce the result set
Double-Click Not Loading Document Images
- Verify the document contains images, check internet connection, refresh the browser, and confirm you have permission to view the document contents
Selected Row Highlighting Not Visible
- Check browser display settings, ensure hardware acceleration is enabled, and try disabling browser extensions to identify conflicts
E. Related Articles
Search: OCR Search Functionality
Search: How to Setup User Search Filters
Conclusion
The Search Result Grid is a fundamental component of SCView's document management system, serving as the primary interface for viewing, organizing, and interacting with search results. By understanding dynamic column headers, customizing Search Field Preferences, utilizing the grouping functionality for large result sets, and properly managing sensitivity flags, users can significantly enhance their efficiency and maintain data security.
Implement the best practices and troubleshooting tips outlined in this guide to leverage the full potential of the Search Result Grid. Explore related articles for additional features that complement this functionality.