 | ||
Introduction
The Invoices tab, also referred to as the Invoice manager in SCView, is designed to streamline the handling of a large volume of invoices directly without requiring extensive access to the workflow system. This user-friendly interface is accessible via Tools > Invoices or by clicking the Invoices tab on any purchasing-related page within SCView.
A. Problem Statement
Users often face challenges in managing and tracking a high volume of invoices efficiently. Common issues include difficulty accessing relevant invoice details, difficulty in approving or denying invoices accurately, and challenges in updating invoice statuses or notes due to limited access to the full workflow.
B. Solution
Approve via Invoice Manager
The Invoice manager in SCView addresses these challenges by providing a centralized platform where invoices are easily accessible if the user’s email matches with the requester index of the invoice. The tool simplifies the review, approval, or denial of invoices with dedicated action buttons that funnel invoices correctly through the workflow without granting full workflow access. Additional features such as syncing latest updates, updating statuses, and adding notes enhance communication and process efficiency.

Invoices will only appear in this tab if the email listed in your user profile matches the requester index of the invoice. The Invoice manager DOES NOT have an admin-level view. This effect is achieved by looking at the actual Workflow page.
The columns of the upper area will correspond to the primary indexes of the invoice. These are entered when the page is added to the document, either via SCScan or upload on the Search page. PO Details can be pulled up by using the PO Details button located near the top of the page. To select a row for review, simply highlight the row.

Once the invoice is selected, the image of the invoice will appear in the right side of the screen. If there are multiple pages, they can be scrolled through. There is also an image manipulation toolbar, and if print rights are available, a print option is here as well.

The section in the lower left side of the screen is where the action takes place for invoice approvals.

The first set of buttons in the area labeled with a (1) are buttons made available through the workflow. These buttons will actually move the invoice to the correct next queue without providing access to the workflow. The buttons may have different labels than what is shown in the screenshot. Only Approve/Deny when everything else is correct as this will remove the invoice from the manager screen.
The Sync button (2) allows the lines below to be pulled in if they are not present. It also allows the most recent lines to be pulled in if there were any modifications made to the PO. Generally, this feature will not be used as the lines will already be present from the scanning process.
The PO Status option (3) will update the status column in the workflow. This will let the person processing invoices know what the intent is with this invoice. If the PO is ready to be closed and there will be no more invoices processed against the PO, choose the Full option. Otherwise, choose Partial. This is optional.
The Notes section (4) will provide notes to the person processing invoices if you need to leave any notes. This is optional.
The lower lines section notated by (5) will be how the PO will be paid. Generally, this section will already be filled out correctly by the person scanning invoices; but if any corrections need to be made or nothing is filled in, they can be made here. The Amount will be what is being paid on that particular line. The Status will be the status of the line item. Partial will be used when the line is still being paid on. Full will be used when the line is completely paid or no longer needs payment. Cancel is used to remove allocated funds from the line. Received should be the received date of the invoice. Pending will show a value if there is a payment pending for that line.
Approve via Email
In addition to using the Invoice Manager for approvals, users may also approve invoices directly through email notifications. This convenient feature streamlines the approval process, making it faster and more accessible for users who are listed as the requester on an invoice.
When an invoice is scanned and assigned to a requester, an automated email is sent out containing details about the invoice along with a link for easy approval. Though the appearance of this email may vary by district, the core elements remain consistent.
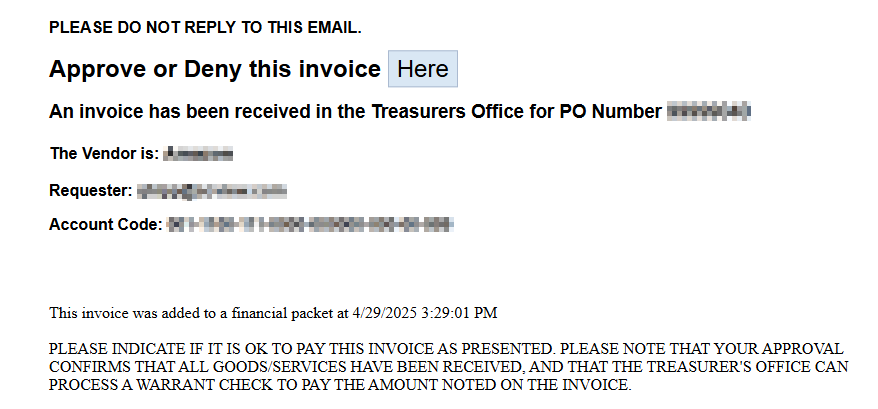
Upon clicking the "Here" button in the email:
- For Users with System Logins: If the requester has an account in the system, clicking the link will prompt them to log in, assuming they are not already. They must authenticate to proceed with the approval process.
- For Users without System Logins: If the requester does not have a login account, the system will permit them to approve the invoice anonymously. Their email address will be recorded in the audit history to note their approval action.
Once authenticated or directed appropriately based on their login status, the user will encounter an interface (which may slightly differ from district to district) where they can review the invoice details. Here, users have the option to add notes for record-keeping, select whether the approval is partial or full, and ultimately choose to approve or deny the invoice.

This "Approve via Email" method enhances flexibility in managing invoice approvals, ensuring that the process remains uninterrupted even when users are away from the main Invoice Manager system.
C. Best Practices
- Regular Reviews: Routinely check the Invoices tab to stay updated with new and pending invoices.
- Accurate Information: Ensure your user profile email matches the requester index to view relevant invoices.
- Utilize Sync Features: Regularly use the Sync button to update invoice lines, ensuring all information is current and accurate.
- Clear Communication: Use the Notes section effectively to communicate any important information to the person processing the invoices.
D. Troubleshooting
- Invoice Not Displaying: Confirm that the email in your user profile matches the requester index. If discrepancies exist, update the information or contact your admin.
- Workflow Buttons Not Functioning: Ensure you have the necessary permissions to use action buttons. If problems persist, refresh the page or restart the application.
- Incorrect Information in Invoice Lines: Use the Sync feature to update the lines. If the issue continues, verify the accuracy of the scanned data or manual entries.
E. Related Articles
How do I mass update all invoices to a new date?
How to Remove Duplicate Invoices
How do I submit an invoice to USAS?
Conclusion
The Invoices tab in SCView is an indispensable tool for managing a large volume of invoices efficiently without direct access to the full workflow. By understanding and utilizing the key features of the Invoice manager, users can greatly improve the speed and accuracy of their invoice processing tasks, streamline approval processes, and maintain accurate records for financial management and auditing purposes. This guide seeks to empower users to maximize the benefits offered by the Invoice manager, ensuring efficient and effective invoice management within SCView.