 | ||
Introduction
The Contacts Manager within the Forms Campaign module offers a streamlined method for maintaining and managing a contacts database in a systematic and organized manner. This guide provides detailed steps on how to effectively add, edit, and manage contacts and groups, which can be crucial for executing form campaigns and ensuring efficient communication across user groups.
A. Problem Statement
Managing a large and diverse contacts list can be cumbersome, especially when it involves frequent updates or integration into form campaigns. The challenges include sorting contacts, updating details, and ensuring accurate distribution lists for various campaigns.
B. Solution
The Contacts Manager in SCView offers practical solutions to address these challenges by enabling users to add, import, group, and categorize contacts easily. It supports functionalities such as importing from CSV or Excel files, creating new contacts manually, and managing contact groups, all designed to optimize the organization and accessibility of contact information.
With Contacts Manager, you can easily notify a group of users with a form campaign. This guide will walk through how to add contacts, as well as how to view and make edits to any existing contact.
Go to Tools > Manage Contacts.
On the manager screen, you can filter, edit, and add new contacts.

1. Group: Sort by contact group
2. Category: Sort by contact type
3. Search: Search all contacts
4. Import Contacts: Import contacts by uploading a CSV or Excel file (Please contact Support for file if you wish to upload contacts)
5. Create New Contact: Manually create new contact
6. Add to Group: Add 1 or more contacts to a group
7. Group Manager: Add, edit, or delete groups
8. Contact Categories: Add, edit, or delete categories
9. Email: Send an email to any contact or contact group
10: Export: Download contacts as an excel file
Create New Contact
1. Click Create New Contact.

2. Fill in all required fields and click Save.
NOTE: To add a Contact Method or Secondary Contacts, click the +
 : Edit a contact
: Delete a contact

Person ID: If a contact has a local ID, enter it here
Category: Assign category type for contact
First Name: Contact's first name
Middle Name: Contact's middle name
Last Name: Contact's last name
Date of Birth: Contact's date of birth
Contact Methods: We can add multiple contact types such as email, phone, and address. A contact can have multiple entries for the same type
Contact Groups: We can add a contact to 1 or more groups
Secondary Contacts: We can add a secondary contact. The contact must already be in the system. We can add them as an emergency contact
Add contact(s) to group
1. Select 1 or more contacts and click Add To Group.

2. Select one or more groups we wish to add the contact(s) to and click OK.
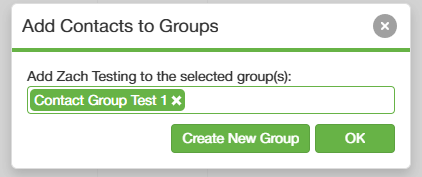
3. If you need to create a new group from this section, click the 'Create New Group' button

4. Fill out the required fields in the 'Contact Group' popup and save

5. The new group will automatically appear as selected in the dropdown menu. In addition, the new group will instantly appear in the dropdown list for easy addition of other contacts to this group.

Manage Groups
1. Click Group Manager.

From here, you can filter, edit, add, and delete groups.

Filter: Filter by All, Shared, and My Groups
 : Edit a group
 : Delete a group
Name: Name of the group
Description: Brief description of the group
Shared: Available to anyone with access to Manage Contacts
Owner: User who created group
Create New Group: Fill in required fields and click Save
Name: Name of group
Shared: Make available to anyone with access to Manage Contacts
Description: Brief description of the group
Owner Name: This will be filled in once group is saved
Import Contacts: Import contacts via CSV or Excel file
Create New Contact: Add new contact
Add Existing Contact: Add 1 or more contacts that are already in the system
Contacts: Edit or delete contacts added to the group
C. Best Practices
- Regular Updates: Keep the contacts list current by regularly reviewing and updating contact details and groups.
- Clear Group Definitions: Define clear parameters for contact groups to ensure that form campaigns are targeted appropriately.
- Verify Import Data: Carefully verify the details in the import file before uploading to minimize errors such as duplicates or outdated information.
- Backup Data: Regularly backup the contacts database to prevent data loss due to unforeseen circumstances or system errors.
D. Troubleshooting
Import Errors:
- If errors occur during the import process, check the format and data consistency of the CSV or Excel file. Ensure that it matches the expected template.
- Double-check the Action field during import verification to decide whether to update existing contacts or create new entries.
Issues Adding to Groups:
- If adding contacts to groups fails, ensure the selected contacts and groups are active and that you have the necessary permissions to modify these settings.
- Review the group limits and categories to ensure that the contacts meet the criteria for the group.
E. Related Articles
New Employees: Submit New Employee to USPS
Form Campaigns: Creating a Form Campaign
Conclusion
SCView's Contacts Manager provides an essential toolkit for effectively managing communication within different segments of an organization or user base through form campaigns. By following the outlined steps to manage contacts and groups efficiently, users can enhance their outreach efforts and ensure that the right contacts are engaged at the right time. Streamlining contact management not only saves time but also improves the effectiveness of communication campaigns deployed via SCView.