 | ||
Introduction
Learn how to use the MySCView Add/Edit Time Sheet Form to submit your time sheets for payroll. This guide covers every aspect of the form at a high level. Combine this with the action-oriented Time Sheets: Submit Time Sheets for Approval to ensure you can complete your time sheets quickly and correctly.
A. Problem Statement
Without understanding the structure and purpose of each section in the Add/Edit Time Sheet form, employees may spend unnecessary time figuring out where to enter information or which buttons to use.
B. Solution
To follow along with this guide, please use the main navigation bar to navigate to Tools > Time Sheets, then click the "Add Sheet" button on the Time Sheets Manager.
Image: Add Sheet Button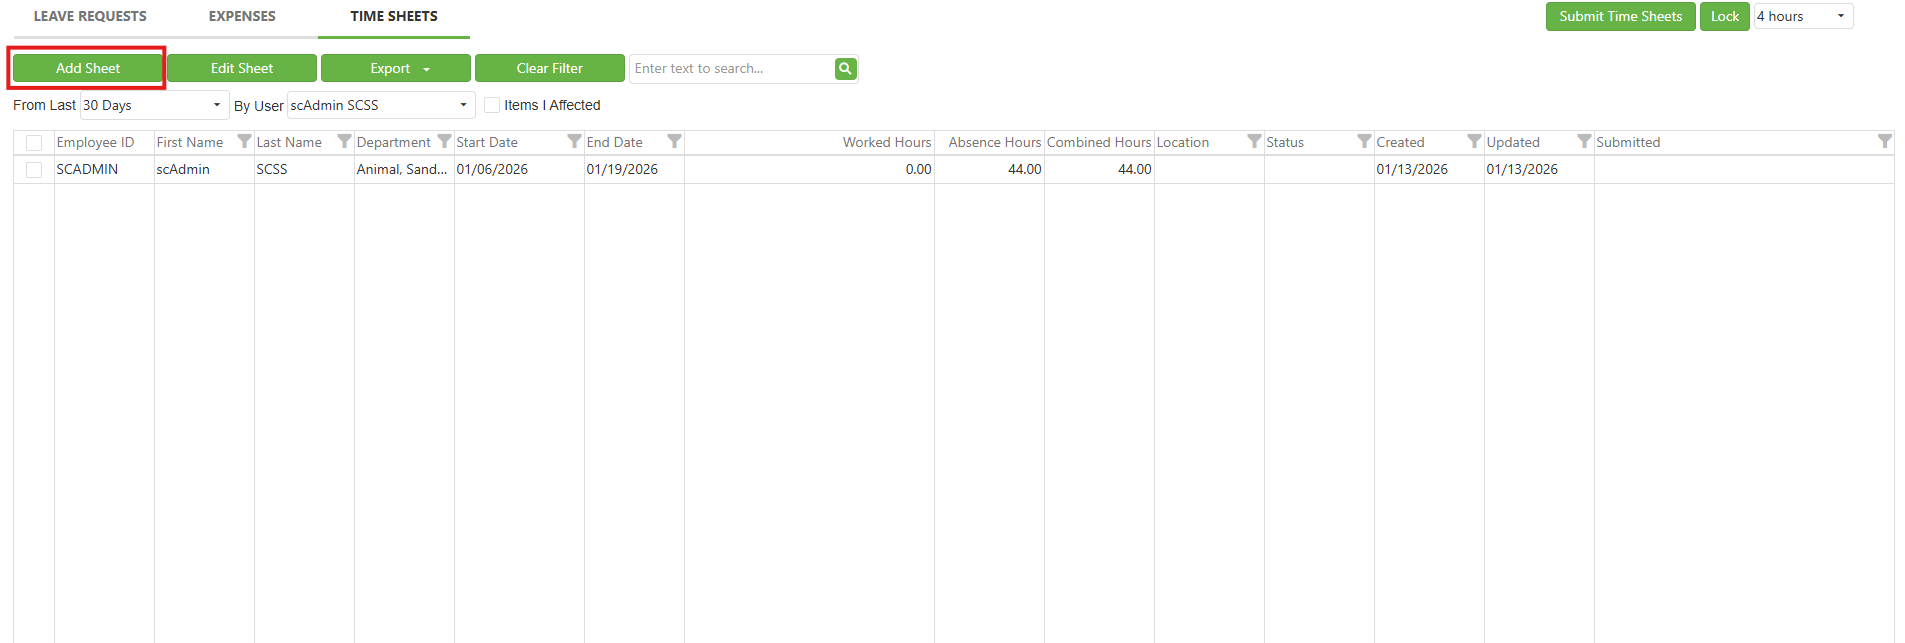
Step 1: Breakdown of the Time Entry Form
The Time Entry form can be broken down into five pieces, as seen below in Image: Time Entry Form, Segmented. These pieces are:
1 - Header* - The header is an informational panel that lists the pay period the time sheet represents, plus the Employee's name and ID. When entering time as an employee, the Employee and Employee ID fields are locked, and only the Payroll Period dropdown is functional.
2 - Action Buttons Panel - The action buttons panel contains buttons that perform actions on time sheet, generate files, or query outside sources.
3 - Summary* - The summary totals up the hours worked for each week in the pay period, the hours of Leave in the pay period, and the sum total amount of hours therein.
4 - Time Sheet Grid - The time sheet grid is where the user inputs each shift worked this pay period.
5 - Line Controls - The line controls are used to add or remove lines from the time sheet grid.
Sections of the time entry form marked with an asterisk (*) will not have a Step dedicated to explaining their function.
Image: Time Entry Form, Segmented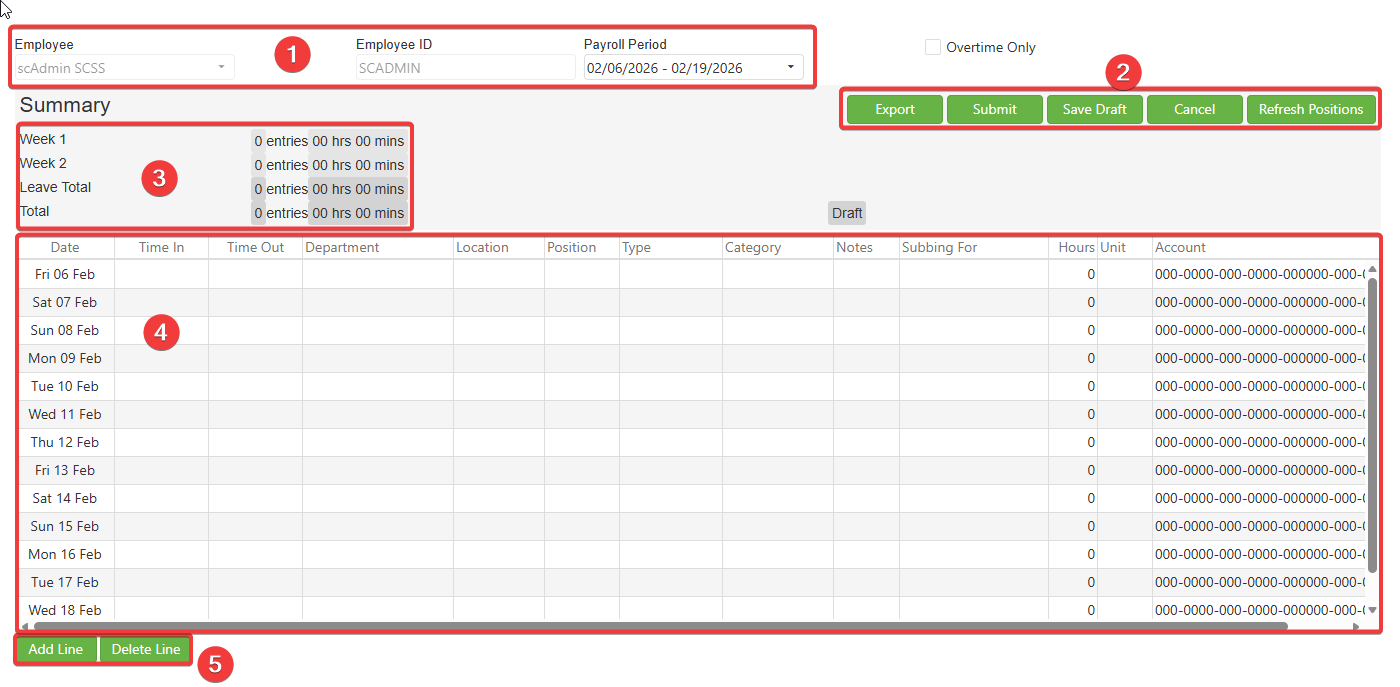
Step 2: The Action Buttons Panel
The Action Buttons Panel is a list of actions that affect the entire time sheet, generate files, or query outside sources. Each action in this panel can be considered "big" and is a departure from the data entry present in the rest of the form.
Export - Creates an Excel file containing the information held in the Time Sheet Grid
Submit - Submits the time sheet to validation; if all necessary fields are populated, it moves on to the workflow
Save Draft - Saves the time sheet without submitting it for validation
Cancel - Throws out all unsaved changes and returns to the Time Sheets Manager
Refresh Positions - Queries USPS for the employee's Position information, which sets what values are available for the Position column of the Time Sheet Grid; useful when USPS is being flaky
Step 3: Time Sheet Grid
The Time Sheet Grid is all about data entry. Here, each line represents a shift worked/taken off by the employee. To input a shift, review the nature of each column presented in the list below, click each cell to activate it, and then fill in the cell with either freeform typing or dropdown selection, as appropriate for that particular column.
Time Sheet Columns
Date - The day of the shift
- Used as a date picker
Time In - Clock in time for the shift
- Used as a time picker dropdown
Time Out - Clock out time for the shift
- Used as a time picker dropdown
Department - The department for which the shift was worked
- Used as a dropdown with values defined by the user's profile
Location* - Where the shift was worked
- Used as a dropdown with values defined by administrators
Position - The work role performed during the shift
- Used as a dropdown with values drawn from USPS
Type* - Designates the shift as either Absence or Attendance;
- Used as a dropdown and defaults to "Attendance"
Category* - Acts as a subtype for Type; set Type first to get a list of options to populate;
- Used as a dropdown and defaults to "Attendance"
Notes - A freeform text field for notes
- Type to fill
Subbing For* - Select another employee if substituting for that individual
- Used as a dropdown and populated with other users
Hours - Hours of the shift, calculated from the Time In and Time Out values.
- Automatically calculated
Unit - Pay unit for the shift: Daily or Hourly
- Automatically drawn from USPS based on Position chosen
Account* - The account code responsible for paying for the shift
- Automatically drawn from USPS based on Position chosen
Columns marked with an asterisk (*) can be removed from the time sheet by administrators. Navigate to Admin > Site Settings > Time Sheets to do so.
Video: Submitting a One-Line Time Sheet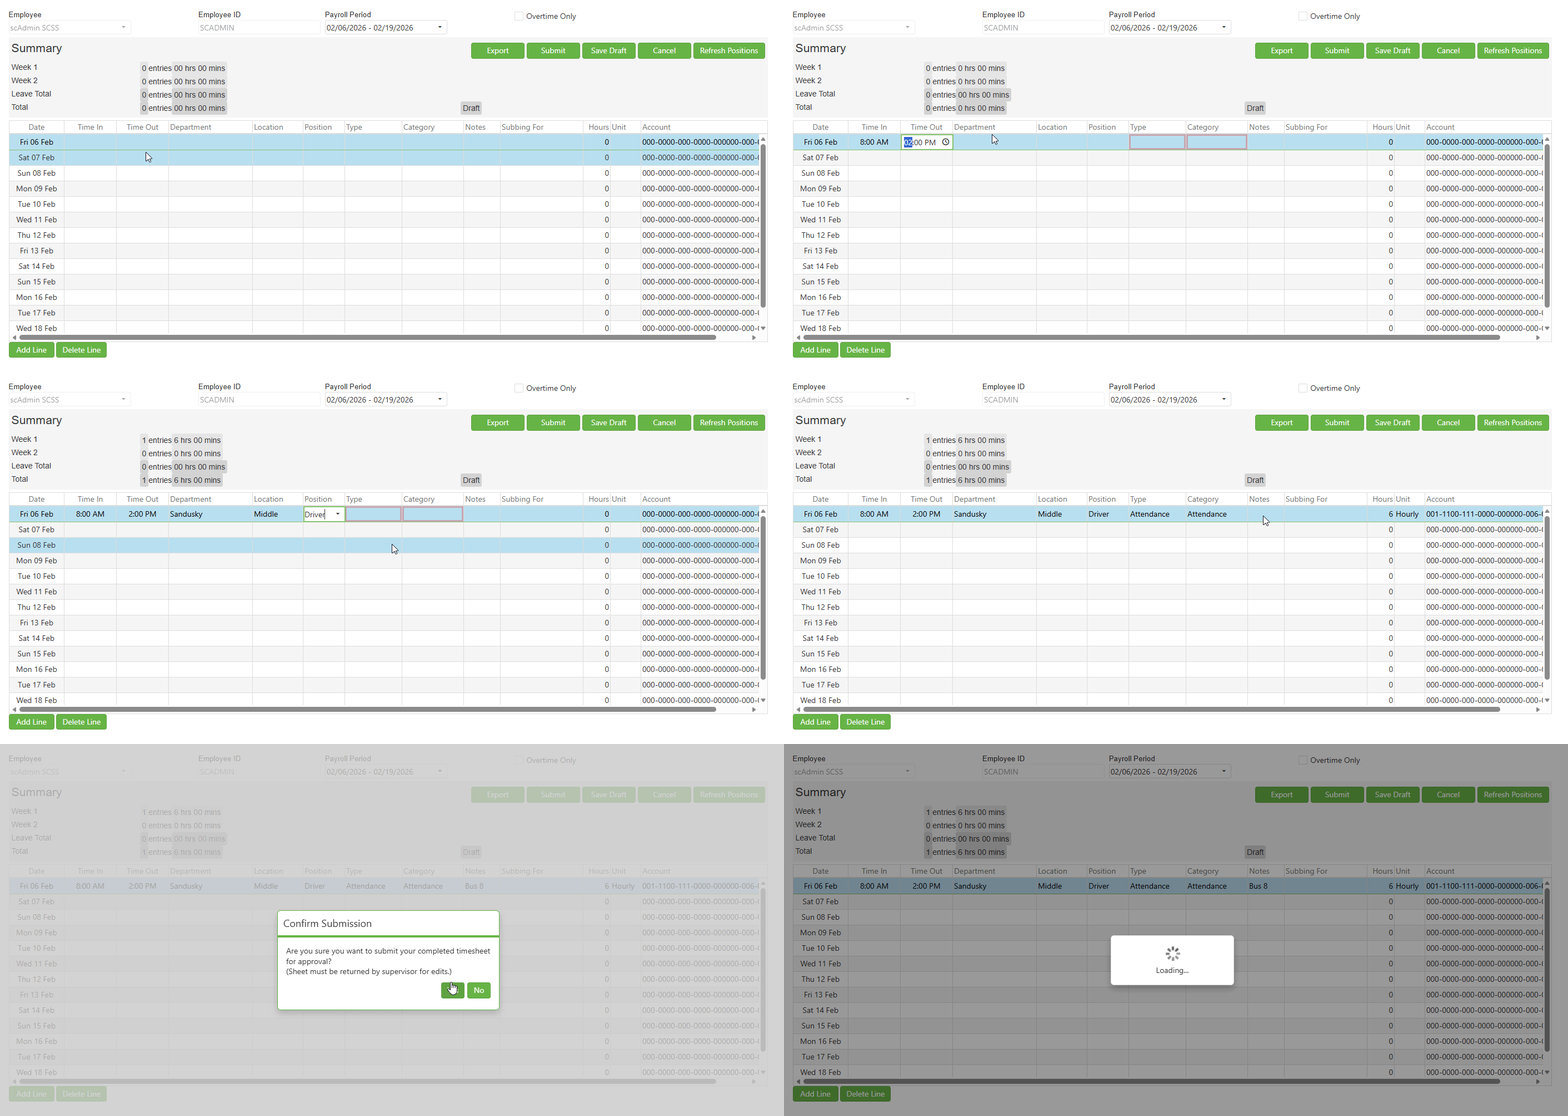
Copy Line Details and Paste Line Details
You may copy one of the time sheet lines and paste it into other lines. To do this, right click a line and select Copy Line Details; then, select another line, right click it, and select Paste Line Details. This will overwrite all columns of the new line, even if it has current values in its cells.
Image: Line Details Context Menu

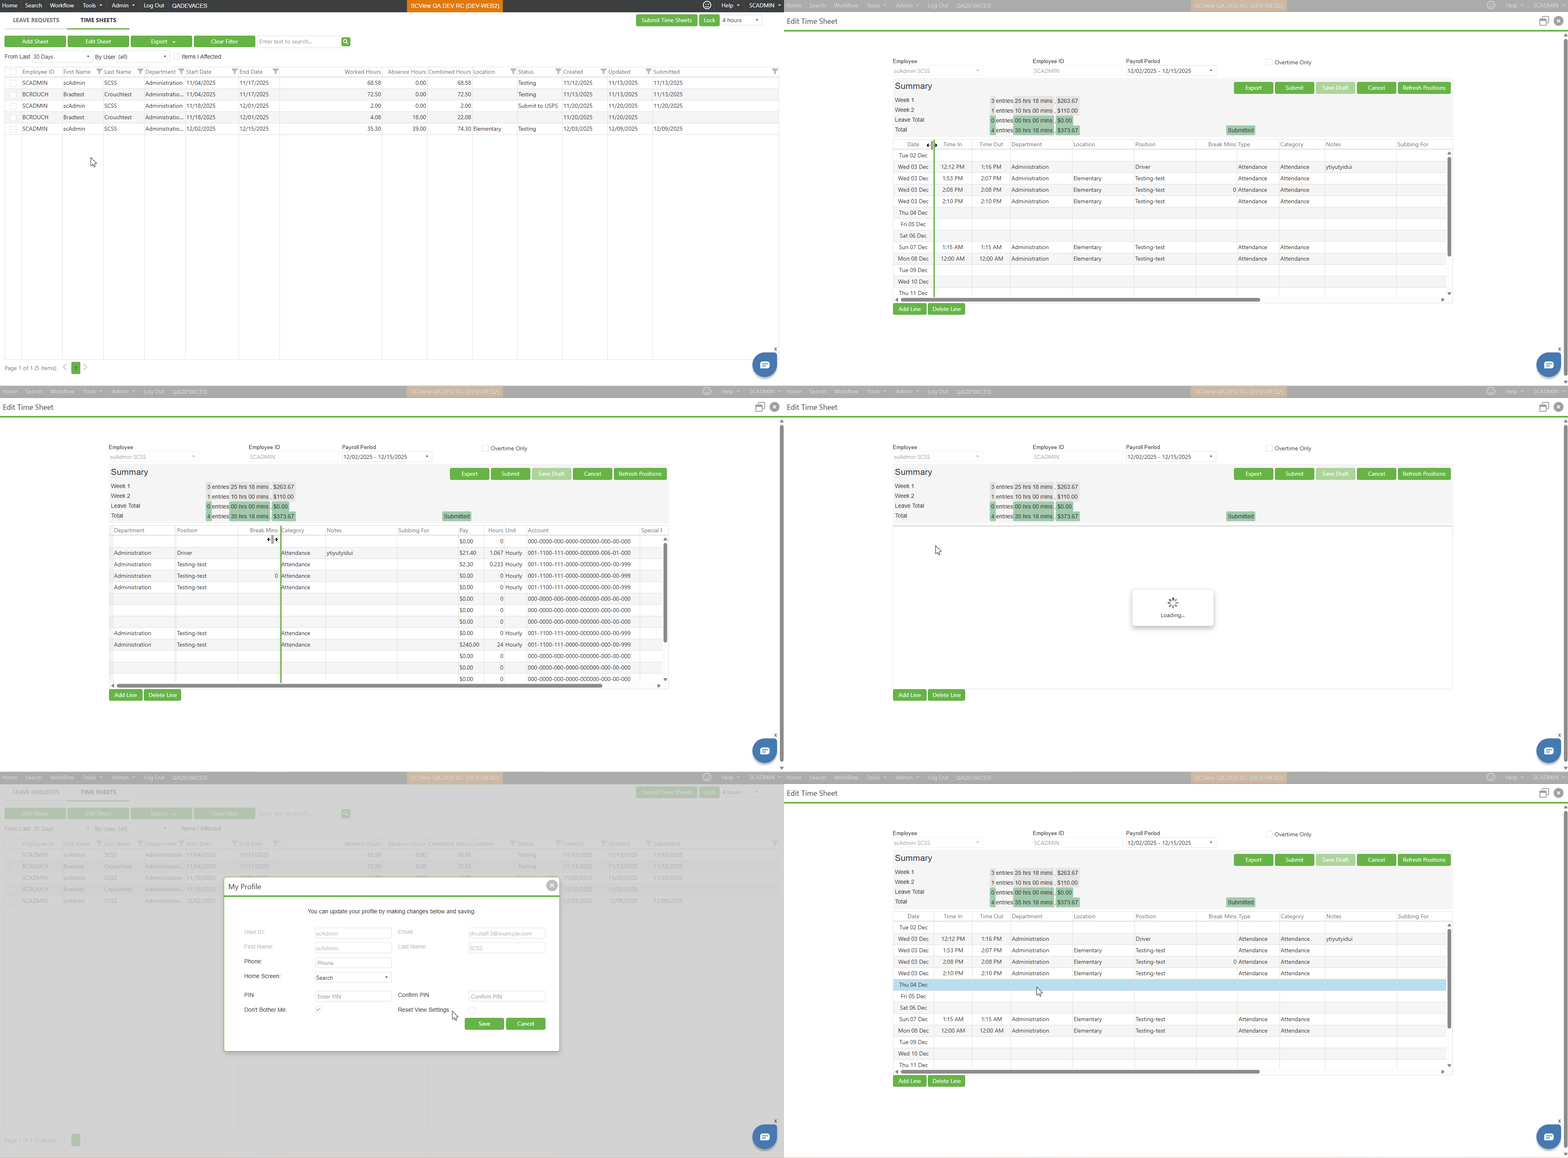
Columns Width Management
- Columns have a minimum defined width for proper display
- If columns are manually resized narrower than minimum width and the page is refreshed, affected columns automatically reset to 40px width when Time Sheet reopens
- This reset prevents display issues from overly narrow columns
- A "Reset View Settings" button is available to restore all columns to their original default sizes
- Use this feature if columns become misaligned or improperly sized
- Recommended when experiencing any column display issues
Note: The last line item column (rightmost column) cannot be resized narrower -
it maintains its minimum width but can be expanded wider as needed
Video: Width Management
Step 4: Line Controls
The Line Controls located just underneath the Time Sheet Grid modify the grid itself by adding or removing lines.
Add Line - This adds an empty line to the top of the Time Sheet Grid; it may be filled out like any other line.
Delete Line - If a line in the Time Sheet Grid is currently highlighted, it is deleted.
C. Best Practices
- Save Drafts Frequently — Use the "Save Draft" button often to avoid losing your work, especially when entering multiple shifts.
- Use Copy and Paste Line Details — When entering repetitive shifts, use the right-click context menu to copy and paste line details. This saves time and reduces data entry errors.
- Refresh Positions When Needed — If your Position dropdown appears empty or outdated, click the "Refresh Positions" button to pull the latest information from USPS.
- Review the Summary Before Submitting — Always check the Summary section to verify your total hours are accurate before clicking "Submit."
- Reset View Settings If Needed — If columns appear misaligned or improperly sized, use the "Reset View Settings" button to restore the default layout.
- Add Notes for Unusual Entries — Use the Notes column to provide context for irregular shifts, substitutions, or absences. This helps approvers process your time sheet faster.
- Double-Check Time In and Time Out — Ensure your clock-in and clock-out times are accurate, as the Hours column calculates automatically from these values.
D. Troubleshooting
- Unable to access Time Sheets — Contact your administrator or SCSS Support to verify your permissions.
- Position dropdown is empty or outdated — Click the "Refresh Positions" button to query USPS for updated position information.
Columns are misaligned or too narrow — Click the "Reset View Settings" button to restore all columns to their default sizes.
Time sheet will not submit — Ensure all required fields are populated. Review each line for missing Date, Time In, Time Out, Department, or Position values.
E. Related Articles
Time Sheets: Submitting Time Sheets for Approval
Time Sheets: Break Time Entry Types
Conclusion
With this step-by-step breakdown, you are now equipped to navigate the Time Entry form efficiently. By understanding the purpose of each section—from the Header and Summary to the Action Buttons Panel and Time Sheet Grid—you can enter your shifts with confidence and accuracy. Use the best practices outlined above to streamline your workflow, and refer to the troubleshooting section if you encounter any issues. For further guidance, review the related article Time Sheets: Submitting Time Sheets for Approval to complete the submission process.
Was this article helpful?
That’s Great!
Thank you for your feedback
Sorry! We couldn't be helpful
Thank you for your feedback
Feedback sent
We appreciate your effort and will try to fix the article