
 | ||
Introduction
This guide provides step-by-step instructions for importing data into SCView's IPDP (Individual Professional Development Plan) system. The IPDP import functionality allows administrators to efficiently bulk-load data from Excel spreadsheets into SCView, eliminating the need for manual data entry and reducing the potential for errors. By following this guide, you will learn how to properly format your import files, navigate the import process, interpret validation reports, and troubleshoot common issues that may arise during data importation.
A. Problem Statement
Manually entering large volumes of IPDP data into SCView is time-consuming and error-prone. Without understanding proper file formatting and column mapping requirements, administrators often encounter validation errors, failed imports, or incomplete data transfers. This guide addresses these challenges by providing instruction for successful bulk data imports.
B. Solution
To follow along with this guide, please use the main navigation bar to navigate to Admin > Site Settings > IPDP.
For troubleshooting purposes, a column mapping section is presented at the end of this guide. It details the pairing of external Excel file columns to internal SCView grid columns.
IPDP District Certification Import
Step 1: Open the IPDP District Certification Popup
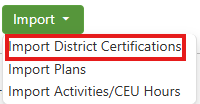
From the IPDP Site Settings page, click the Import button and select Import District Certifications to bring up the Import District Certifications popup.
Image: Import District Certifications
Step 2: Upload IPDP District Certification File
The user may either drag and drop the desired file onto the IPDP District Certification Popup or click the Select a file button to bring up a standard import dialog. If the second option is chosen, navigate to the desired file in your operating system's file explorer and select it. Either method will move Import District Certifications to its second page.
Image: Import District Certifications Popup, Page 1

Step 3: Inspect the IPDP District Certification Import Report
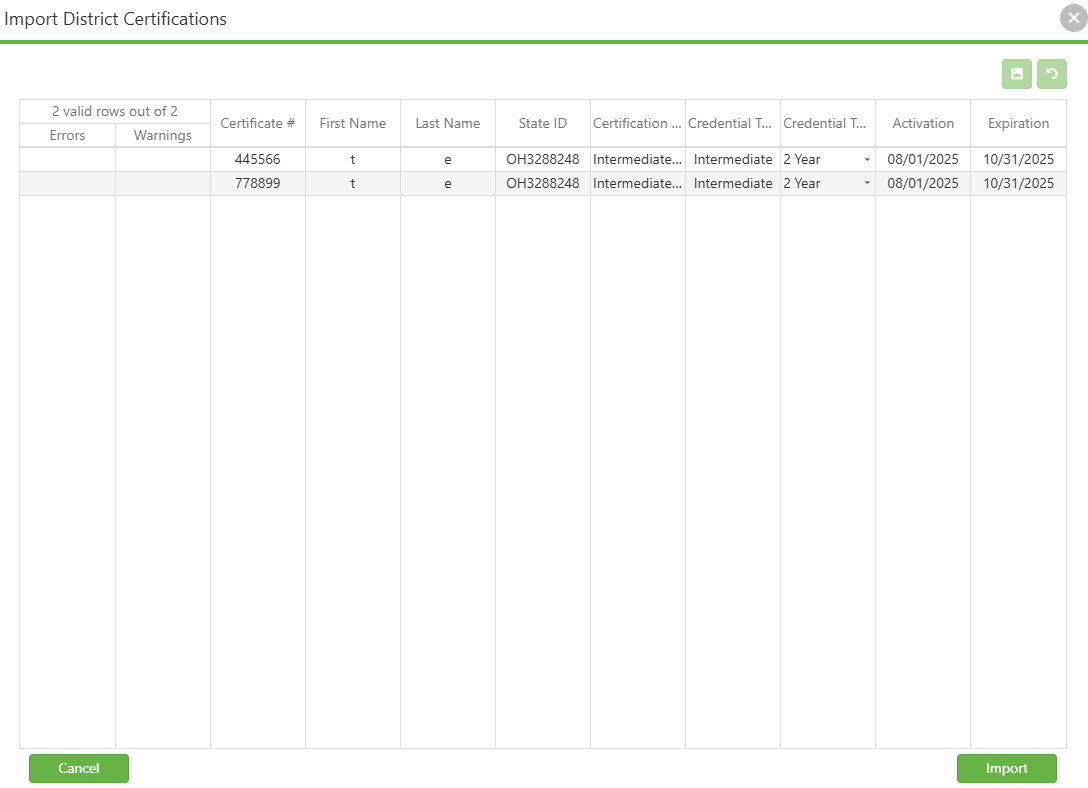
After selecting the file to be imported, the Import District Certifications popup moves on to the data verification step. Read over the breakdown of the screen below, and if the information presented meets requirements, click the green Import button at the bottom right of the screen.
Grid Overview - The grid present on the second page of Import District Certifications is broken up into a number of rows. Each of these represents a single certification to be imported. The Errors and Warnings columns display issues with each individual row's import, while all columns to the right of Warnings display data from the import file.
If a column is empty, the import file is either lacking the data or has the header for that data named improperly. See Section:
IPDP District Certification Column Mapping Rules, below, for details on what an import file's headers must be named for SCView to pick up each column's data.
Errors - An error is a "hard" issue that is bad enough to stop the import of a data row. If an error is present, that row will present a red X icon in the Errors column. Hover over the red X icon to receive a message stating what the problem is. Correct that issue, and start the import process over.
Warnings - A warning is a "soft" issue that is worth reporting, but it is not bad enough to stop the import of a data row. If a warning is present, that row will present a yellow "caution sign" icon in the Warnings column. Hover over the caution sign icon to receive a message stating what the problem is. As warnings are a soft issue, the user can choose to ignore them and authorize import, anyway.
In the image below, we have warnings because the "Certificate Number" column is empty for each row. While this is fairly serious, it is not necessarily a dealbreaker, and so row import is still enabled.
Image: Import District Certifications Popup, Page 2
Step 4: Perform Inline Edits
All IPDP Import types support inline editing. To perform an inline edit, click the cell that needs to be changed and make the changes. Once all changes have been made, click the green Save (floppy disk) button to save changes or the green Revert (counterclockwise arrow) button to throw away changes, respectively. Fields that have been changed are highlighted green.
Image: IPDP Certifications Import with Unsaved Changes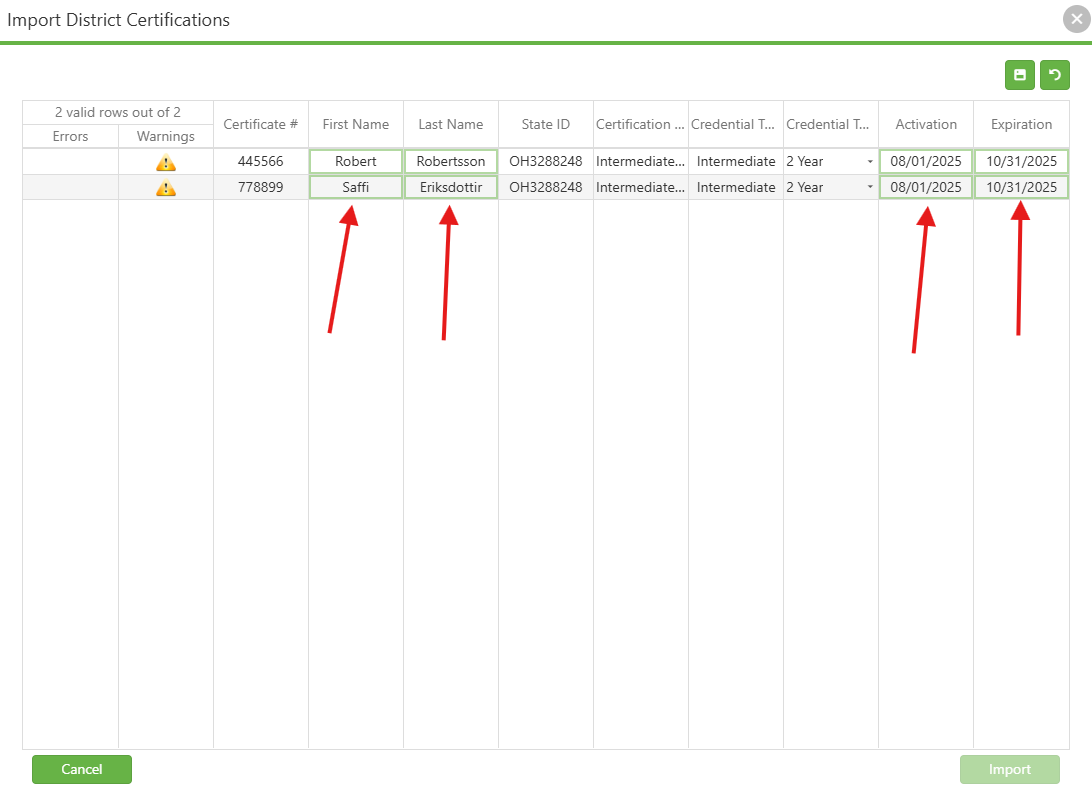
Step 5: Import Finalized
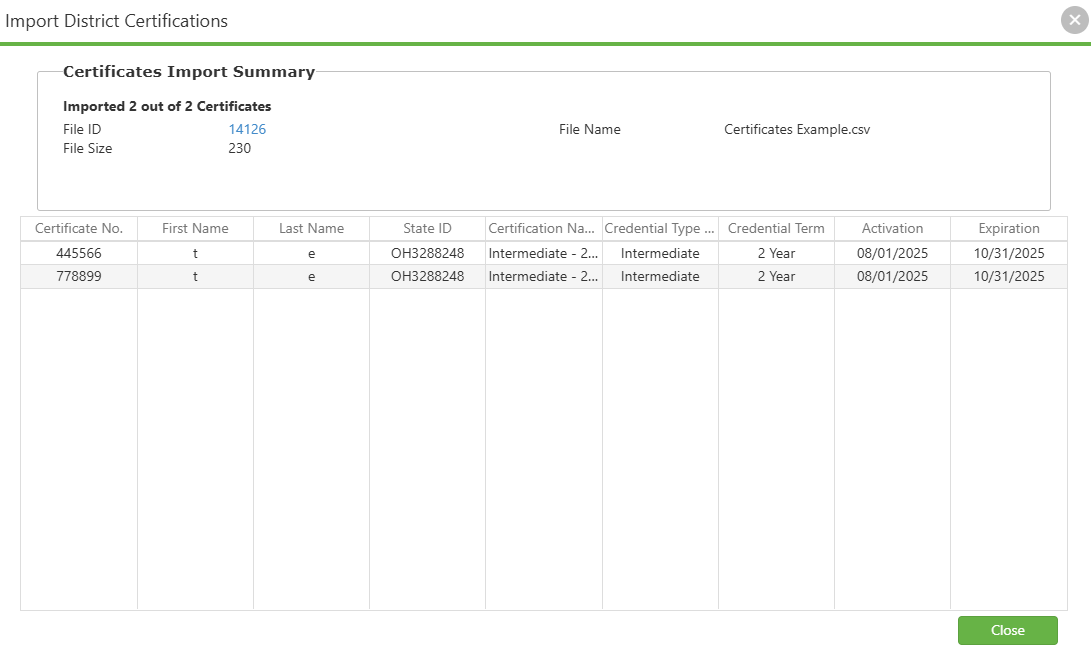
After selecting the Import option on the second page of the Import District Certifications popup, a confirmation report appears. Read over the report to make sure that the data imported is to your liking.
When done, click the green Close button. The import is now complete!
Image: Import District Certifications Popup, Page 3
IPDP District Certification Column Mapping Rules
NOTE: The choice of header names in the spreadsheet file uploaded is important, as SCView maps columns of data in the spreadsheet to its own columns based on those names. If creating your own spreadsheet for import, please follow the guidelines listed below to select appropriate column headers.
For each listing, the bolded name is the column or value in SCView, and what is after the hyphen (-) describes what it matches up with in your import Excel file.
Columns
- Certificate # - Header named "Certificate Number"
- First Name - Header named "FName"
- Last Name - Header named "LName"
- State ID - Header named "State ID"; if "StateID" is not present, header named "EmployeeID"
- Certification Name - Requires both "Credential Type Name" and "Credential Term", displays the data values of both separated by a hyphen
- Credential Type Name - Header named "Credential Type Name"
- Credential Term - Header named "Credential Term"
- Activation - Header named "Issue Date"
- Expiration - Header named "Expiration Date"
C. Best Practices
- As all three IPDP import types are accessed via the same menu, it can be easy to click the wrong one. Read the popup header before uploading!
- Ensure your Excel file includes both "Credential Type Name" and "Credential Term" headers, as both are required to generate the Certification Name in SCView.
- Double-check that either "State ID" or "EmployeeID" is present in your file to properly link certifications to employees.
- Review all warnings before clicking Import to ensure no critical data is missing.
D. Troubleshooting
- If a column fails to import, cross-reference with the mapping rules for District Certification Import. An incorrect or misspelled header may be the cause.
- All three IPDP imports use different header mapping. If an import isn't working, verify you selected the correct import type.
- If Certification Name is blank, ensure both "Credential Type Name" and "Credential Term" headers exist and contain data in your Excel file.
- If certifications are not linking to employees, verify that "State ID" or "EmployeeID" is present and matches employee records in SCView.
E. Related Articles
Site Settings - IPDP Activities/CEU Hours Import
Site Settings - IPDP Plans Import
Conclusion
You now have the knowledge to successfully import IPDP District Certifications into SCView. By properly formatting your Excel files, understanding column mapping requirements, and interpreting validation reports, you can streamline your data imports and minimize errors.