 | ||
Introduction
The Campaign Management System provides a streamlined approach to creating, distributing, and managing form-based campaigns within your organization. This powerful tool enables administrators to efficiently send customized forms to multiple recipients, track responses, and maintain secure control over campaign timelines. With features including merge file integration, dynamic field mapping, and enhanced security through link expiration settings, the system offers both flexibility and control for organizations seeking to automate their form distribution processes.
A. Problem Statement
Organizations struggle with distributing forms to large groups of recipients using manual methods. Sending forms individually takes too much time and often leads to mistakes, especially when trying to personalize content for hundreds or thousands of users. Without automation, it's difficult to track who has completed their forms, set secure expiration dates for links, or ensure consistent data across submissions. Staff members waste valuable time on repetitive tasks like sending reminders and following up with non-responders. These manual processes also create security risks, as forms may remain accessible indefinitely without proper controls. The result is reduced efficiency, lower response rates, and increased potential for errors that impact the entire organization's operations.
B. Solution
Our Campaign Management System addresses these challenges by providing a comprehensive platform that automates the entire form distribution lifecycle.
Create a New Campaign:
1. Initiate a New Campaign:
- Click on the New Campaign button to start the process.

2. Configure Campaign Settings:
- Name: Enter a descriptive name for the campaign. (Max of 50 characters)
- Description: Provide a brief outline of what the campaign is about. (Max of 250 characters)
- Form Group: Select the form or group of forms you want to use. Note: The form must be part of a form group created by SC Strategic Solutions' Support staff, and empty form groups will not appear in the list.
- Merge File Type: Select the appropriate merge file option from the dropdown menu. This setting determines how recipient data and form pre-fill information will be handled for your campaign.
Merge File Type Options:
a) None (Default):
When "None" is selected, merge file will not be used for the form campaign wizard process. Recipients must be selected manually through contacts and contact groups. Form fields will not be pre-populated from an external file.
b) Merge File and Contact:
When "Merge File and Contact" is selected, merge file contents will be used to link to existing contacts or create new contacts (where applicable) to send forms to the user. Pre-filled form data will integrate contact information and merge file information. A merge file upload is mandatory when this option is selected. You cannot proceed to the next step without uploading a valid merge file.
c) Merge File Only:
When "Merge File Only" is selected, only merge file contents will be used to send forms to the user and pre-fill form data. This option does not link to or create contacts in the system. A merge file upload is mandatory when this option is selected. You cannot proceed to the next step without uploading a valid merge file.
Note: Merge file upload is only required when "Merge File and Contact" or "Merge File Only" is selected as the Merge File Type.
Merge File Upload and Validation:
- Click "Select merge file" or drag and drop your Excel file to upload
- The merge file must have a column named Email, which is used to find existing or create new contacts
- The merge will also utilize these additional contact columns when included: FirstName, MiddleName, LastName, and DateOfBirth
Ensure you upload a valid merge file before proceeding:
- If an invalid merge file is uploaded, a "Merge File" validation dialog will appear showing the specific error (e.g., "File has no rows")


- Click OK on the validation dialog to acknowledge the error
The system will automatically: - Display the failed file with a delete icon (X) next to the file path
- Show "Upload failed" status beneath the file name
- To remove the invalid file, click the delete icon (X)
Validation Requirements:
- The file must contain at least one row of data
- The Email column is mandatory
- If you attempt to proceed without uploading a valid merge file when "Merge File and Contact" or "Merge File Only" is selected, an error message "Please upload a valid merge file" will appear in red above the upload button
You cannot advance to the next step until either: - A valid merge file is successfully uploaded, OR
- The Merge File Type is changed to "None"


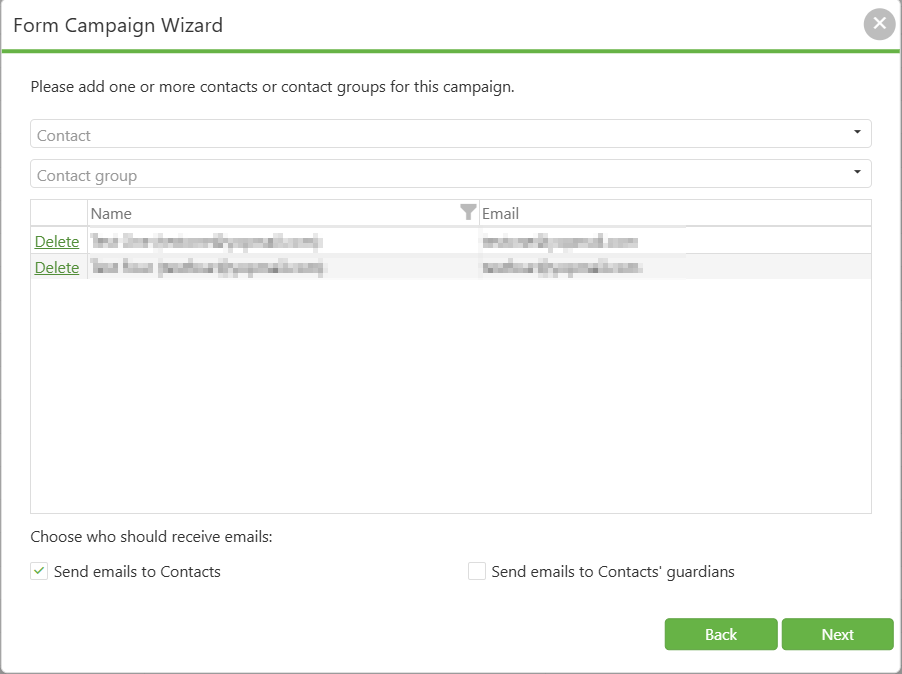
3. Select Recipients:
The recipient selection process varies based on your Merge File Type selection:
a) When Merge File Type is "Merge File and Contact":
- Recipients are automatically fetched from the uploaded merge file
- The system displays contacts from the merge file in a read-only format
- The merge file will link to existing contacts or create new contacts where applicable
- You cannot manually add or remove individual contacts or contact groups
Note: Determine your recipient list BEFORE creating the merge file, as modifications must be made in the Excel file prior to upload
b) When Merge File Type is "Merge File Only":
- Recipients are determined entirely from the uploaded merge file
- The system uses the merge file data to send forms directly to users
- No contact records are created or linked in the system
- You cannot manually add or remove recipients
Note: This option is ideal for one-time form distributions where contact management is not required

c) When Merge File Type is "None":
Manually select recipients using the dropdown menus:
- Add individual contacts
- Add contact groups
You can add or delete recipients as needed using the interface
Choose email delivery options:
- Send emails to Contacts
- Send emails to Contacts' guardians
- Both options can be selected
Click Next after finalizing your recipient list
Note: The recipient selection interface changes dynamically based on your merge file choice in Step 2.
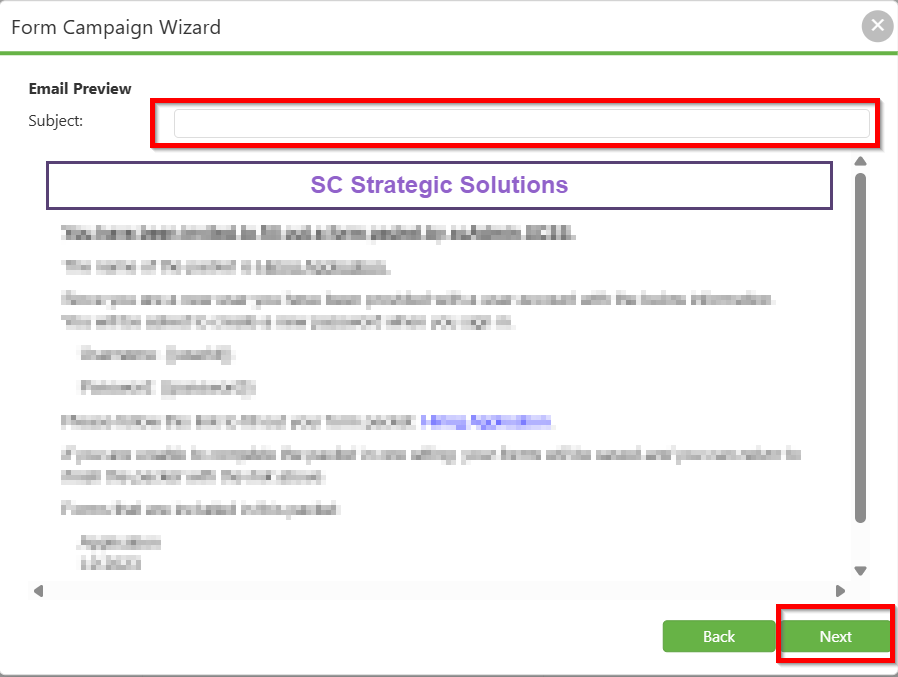
4. Customize Email Settings:
- Add the subject line and customize the email message.
- Adjust any additional settings related to email formatting or content per your requirements.
5. Configure Form Fields:
- If using a merge file, ensure it’s properly linked and fields correspond to form requirements.

- Manually fill in or adjust fields as necessary:
- Field: Specify which field on the form needs to be filled.
- Value: Set a static value directly or use {{Macros}} for dynamic content based on the uploaded file.
- Locked: Check if the field should be non-editable by the recipient when they receive the form.

Field Validation (Merge File Users):
When using the "Merge File and Contact" or "Merge File Only" option, the system validates macro compatibility before proceeding to the final step.
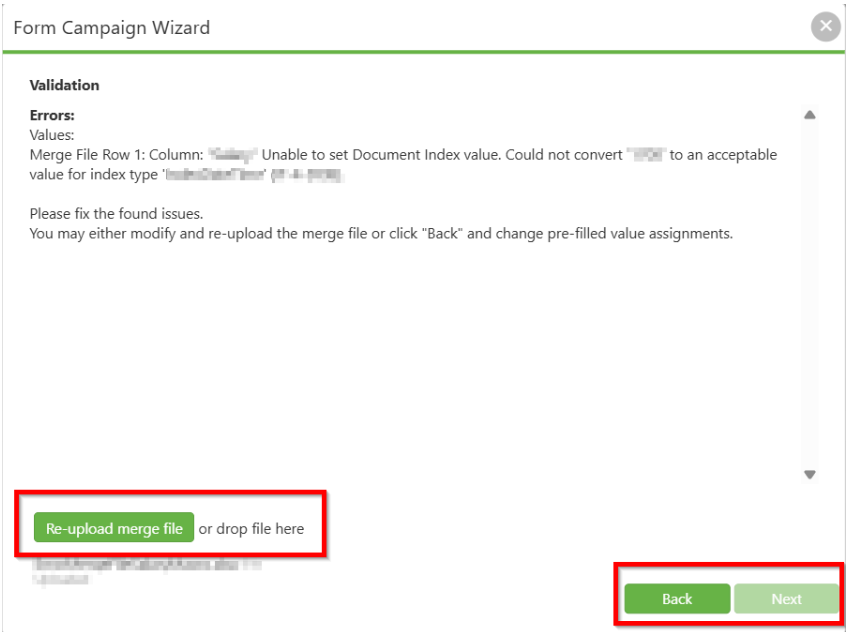
Validation Process:
- After configuring form fields and clicking Next, the system checks if all {{Macros}} match with the uploaded merge file column values
- If mismatches are detected, a Validation error screen appears
When Validation Errors Occur:
- The validation screen displays specific error details, such as: "Values: Merge File Row 1: Column: [ColumnName] Unable to set Document Index value. Could not convert '[value]' to an acceptable value for index type '[type]'"
- Error messages identify the exact row and column causing the issue
Resolution Options:
a) Re-upload Corrected Merge File:
- Click the "Re-upload merge file" button or drag and drop a corrected file directly onto the upload area
- The system will re-validate with the new file
b) Go Back and Modify Settings:
- Click the Back button to return to the form field configuration
- Adjust the pre-filled value assignments to match your merge file structure
- Remove or correct any problematic {{Macros}}
Note: You cannot proceed to finalize the campaign until all validation errors are resolved. The Next button remains inactive until either A corrected merge file is successfully uploaded and validated, OR You go back and fix the macro/field assignments
6. Finalize and Launch Campaign:
- Review all settings and confirm the information is correct.
- Set the dates for when the campaign should run and click Finish.
- The campaign will initiate within 15 minutes, and emails will be dispatched to the selected recipients.
Update: Enhanced Link Expiration Settings
We have introduced a new feature that enables you to assign expiration dates to your links for enhanced security and control. You can now configure the expiration settings as follows:

No Expiration: Select this option if you want your link to remain active indefinitely.

Expire After Form Completion: Choose this option to have the link expire automatically once the associated form group has been fully completed.

Expire After Set Duration: This option allows you to specify a number of days after which the link will automatically expire after the end date of the form campaign, regardless of form completion.

Additionally, for greater flexibility, you can combine the last two options: set the link to expire after the form group is completed and also specify a maximum number of days. This ensures that the link will expire when the form group is completed or when the specified number of days is reached, whichever comes first. This dual condition is particularly useful if you need to enforce a strict time limit for form completion.

C. Best Practices
- Campaign Naming Convention: Use clear, descriptive names (within 50 characters) that include the date and purpose for easy identification
- Form Group Preparation: Coordinate with SC Strategic Solutions' Support staff to ensure form groups are properly configured before campaign creation
Merge File Type Selection: Choose the appropriate Merge File Type based on your campaign requirements: - Select "None" when you want to manually select recipients from existing contacts and contact groups
- Select "Merge File and Contact" when you need to link merge file data with existing contacts or create new contacts while integrating both contact and merge file information for form pre-fill
- Select "Merge File Only" when you want to use merge file data exclusively for sending forms and pre-filling data without creating or linking to contact records
- Merge File Validation: Test merge files with a small group before launching large campaigns to verify field mapping accuracy
- Verify your merge file contains the mandatory Email column before upload
- Include optional columns (FirstName, MiddleName, LastName, DateOfBirth) for better contact management
- Ensure the file has at least one row of data to avoid validation errors
- Test merge files with a small group before launching large campaigns to verify field mapping accuracy
- Pre-plan and finalize recipient lists in the Excel file, as they cannot be modified after upload
- Recipient Selection: Carefully review recipient lists to avoid duplicate sends when selecting both contacts and guardians (applicable when Merge File Type is "None")
- Field Locking Strategy: Lock pre-populated fields that shouldn't be modified to maintain data integrity
- Link Expiration Planning: Choose appropriate expiration settings based on campaign urgency and security requirements
- Email Customization: Personalize email content using {{Macros}} to improve engagement rates
- Preview macro field mappings before proceeding to avoid validation errors at the final steps
- Keep a backup of your original merge file in case modifications are needed during validation
- Campaign Review: Always review all settings before launching to prevent configuration errors
D. Troubleshooting
- Form group not appearing in dropdown: Verify the form group has been created by Support staff and contains at least one form
Merge File Type Selection Issues: - If you need to use a merge file but "None" is selected, change the Merge File Type to "Merge File and Contact" or "Merge File Only" from the dropdown
- If you selected "Merge File and Contact" or "Merge File Only" but want to manually select recipients, change the Merge File Type back to "None"
- Merge file fields not populating correctly: Ensure column headers in Excel match exactly with form field names; contact Support for assistance
- Merge file fields not populating correctly: Ensure column headers in Excel match exactly with form field names; contact Support for assistance
- Check if the file contains at least one row of data
- Verify the mandatory Email column exists with exact spelling and capitalization
- Ensure the file is in the correct Excel format (.csv or .xlsx)
- Remove any empty rows or corrupted data from the file
- Ensure a file has been successfully uploaded when "Merge File and Contact" or "Merge File Only" is selected as the Merge File Type
- If upload failed previously, uncheck the "Use Merge File" option or upload a corrected file
- Click the delete icon (X) to remove failed uploads before attempting a new upload
- Change Merge File Type to "None" to switch to manual recipient selection
- Campaign emails not being received or campaign not launching: Check recipient email addresses for accuracy; verify campaign status shows as active; confirm the campaign end date hasn't passed and all required fields are completed; allow up to 15 minutes for initial dispatch
- Recipients report expired links: Review expiration settings; consider extending duration or removing expiration for time-sensitive campaigns
- Fields appearing as editable when they should be locked: Verify the "Locked" checkbox is selected for each field during configuration
- Verify all {{Macro}} names exactly match column headers in your merge file (case-sensitive)
- Check data types match between form fields and merge file values
- Ensure date formats are consistent (MM/DD/YYYY or as required by the form)
- Remove any special characters or spaces from column names that might cause parsing issues
- This indicates a data type mismatch between the merge file and form field
- Common causes: text in numeric fields, incorrect date formats, or invalid dropdown values
- Solution: Review the specific row and column mentioned in the error, correct the data in Excel, and re-upload
E. Related Articles
Form Campaigns: Form Campaign Manager
Form Campaigns: Monitor and Update Campaign
Conclusion
The Campaign Management System transforms how organizations handle form distribution and collection, replacing manual processes with an efficient, automated solution. By leveraging features such as the flexible Merge File Type options, customizable expiration settings, and dynamic field configuration, administrators can create targeted campaigns that save time while improving data accuracy and security. The three Merge File Type options: None, Merge File and Contact, and Merge File Only: provide organizations with the flexibility to choose the approach that best fits their specific campaign requirements. Success with the system depends on proper planning, adherence to best practices, and coordination with Support staff when needed.