 | ||
Introduction
In many districts, administrative staff are responsible for managing multiple document types that require viewing, approval, or submission using systems like USAS or USPS. The SCView Workflow module provides an efficient solution for handling these tasks by offering an organized and simplified interface to manage document workflows effectively. However, users often face challenges in navigating the module effectively due to its complexities and diverse functionalities.
A. Problem Statement
Staff in various districts frequently struggle with efficiently managing and processing a diversity of document types due to the lack of a streamlined system. The existing system often leads to delays and inefficiencies in document approval processes, which can interrupt the smooth operation of administrative functions. Users need a system that allows for quick access, editing, and submitting of documents with minimal complexity.
B. Solution
SCView's Workflow module addresses these issues by offering a structured approach to managing document workflows. The module provides features like a workflow list for permission-based access, queue browser for document management, and various action buttons for direct document handling. This allows users to edit, approve, and submit documents directly to USAS following the necessary protocols.
Many districts will have multiple modules and documents needing to be viewed, approved or submitted to USAS. An easy way of viewing and separating all of these doc types is the Workflow view. With Workflow, approvers can easily view what modules have documents awaiting approval, easily view the file, edit and submit to USAS or USPS depending on the type.
Note: An Admin must give a user access before being able to use Workflow.Accessing Workflow
Click on the Workflow button at the very top bar in SCView.

Main Workflow View:

1. Workflow List - This will list all workflows that a user will have permission to view. Within all workflows will be the listed queues under that respective workflow. Hitting the caret to the left of a workflow will expand the workflow to show all queues. Clicking on a queue will update the main window view to reflect items in that queue.
Note: If a user is not set up on a workflow as an allowed user, then that workflow
will not show at all on this list. Reach out to an admin for assistance with being
added as an allowed user to a specific workflow.
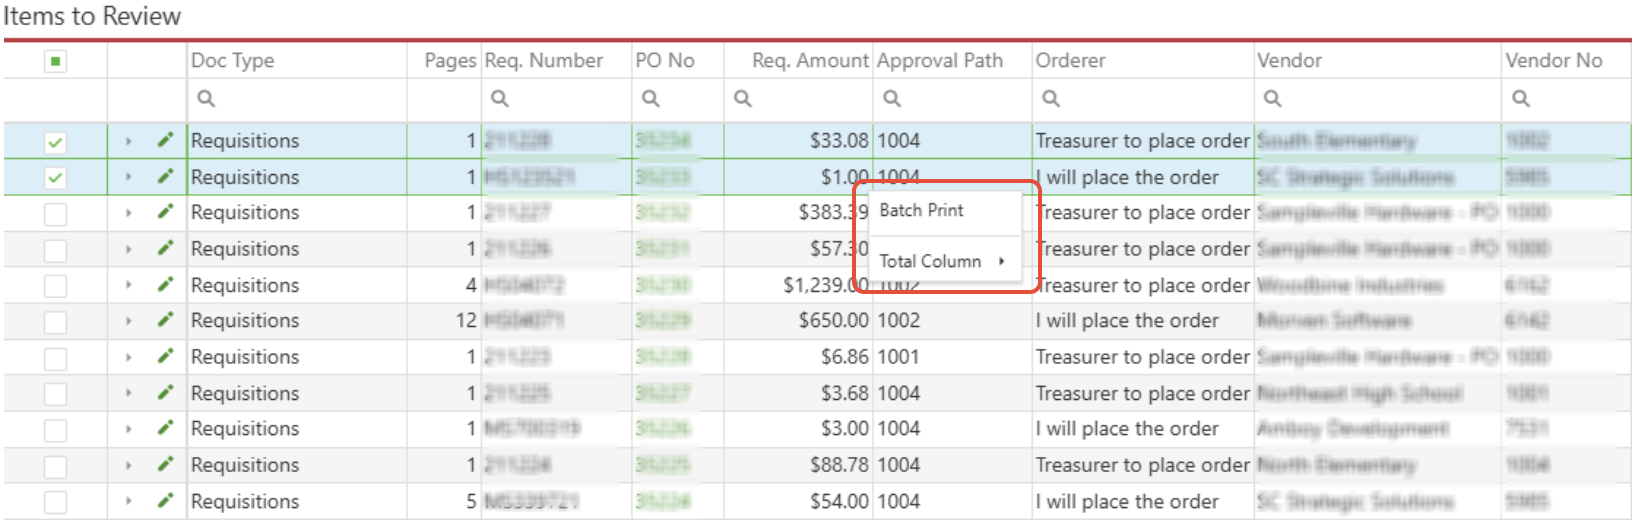
2. Queue's Doc Browser - This window will list all items in the selected queue, and all columns shown have small magnifying glasses next to the column header. Text may be entered into these to allow a quicker search for a specific document. 
 Next to each listed item a checkbox is shown on the far left, allowing an item to be selected.
 To the right of that is a caret which, if clicked, will drop down the selected item and show line items, if relevant for the queue. Requisitions will expand to show all line items.

Finally, the pencil icon will allow a user to edit the listed item. For example, forms will allow the form to be edited, requisitions will allow the req to be edited, etc.
Note: Some items will have a green sync button or Bal button listed. This depends
on the doc type being viewed. Sync will sync the invoice with USAS. Bal will do a
balance query.
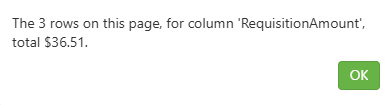
When working with numeric columns, you can right-click on the column to access a "Total Column" option in the context menu.
You have the flexibility to generate totals for just your selected rows, all rows currently visible on the page, or across all pages in your dataset when multiple pages exist. This enhancement streamlines your workflow by providing quick access to essential calculations without requiring additional steps or external tools.
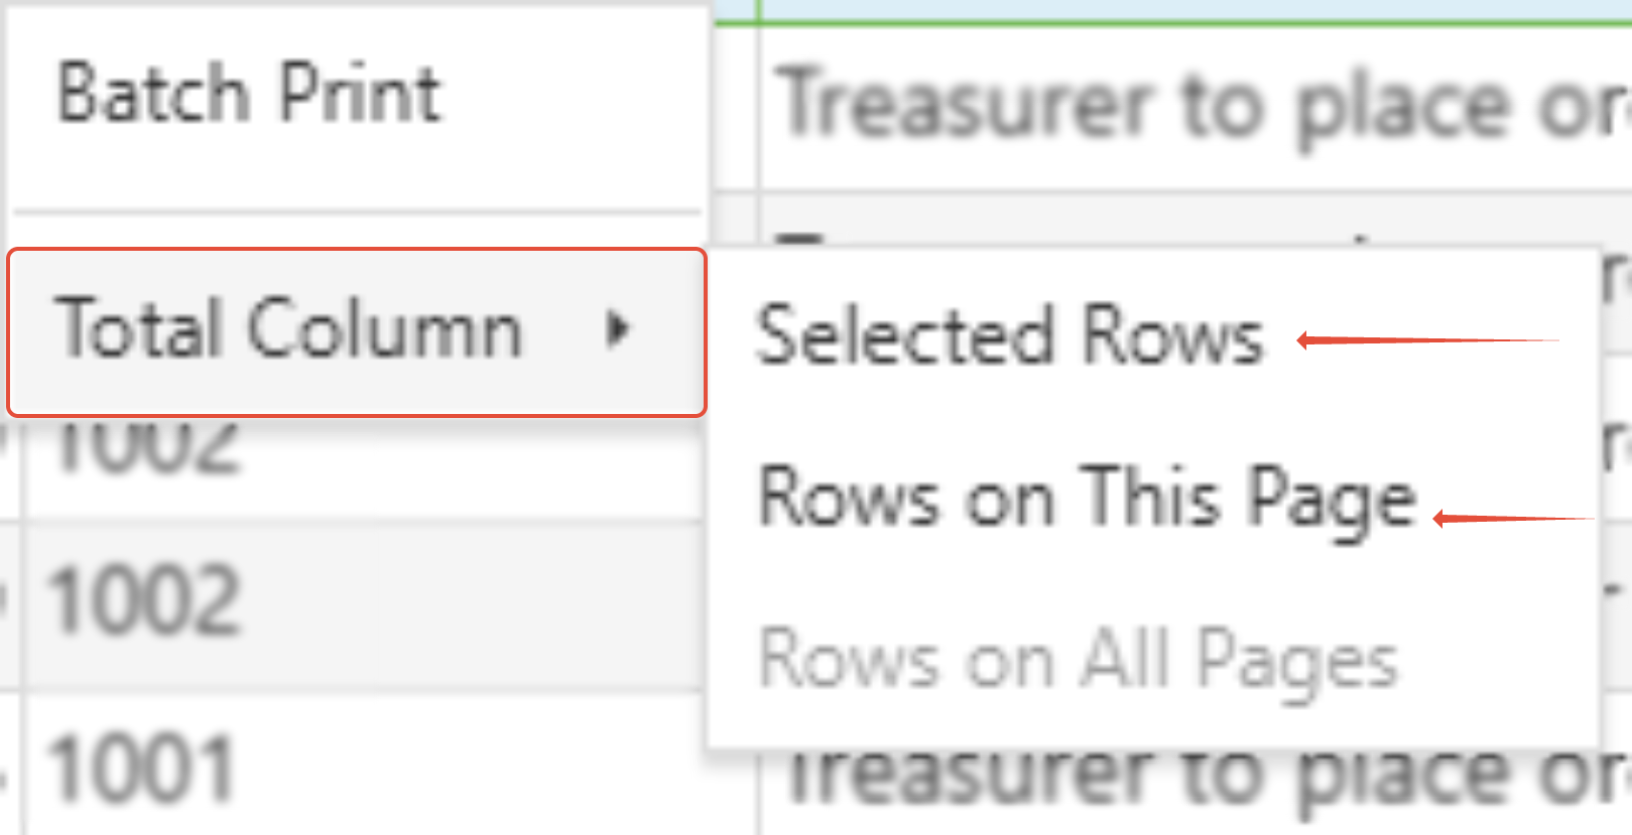
This feature opens an intuitive dialog that calculates and displays column totals based on your row selection from the context menu.
Sensitivity Flags
Within each item of the selected queue there may be fields that are hidden or displaying asterisks (*). These will occur based on your sensitivity levels set in your document type manager. High sensitivity levels will hide the field entirely from header. Notice in the image the First Name header is missing. This is due to the Sensitivity Level being set to High.

The Fields displaying asterisks (*) are fields that have a Sensitivity Level of Low. Low sensitivity items can be viewed by toggling the "Eye" icon located in the site menu.
In this image the icon currently indicates that the sensitive data is currently hidden.

After clicking the eye icon it will toggle a new icon similar to the eye however with a "\" through it. The grid will refresh and the fields displaying asterisks will now display with their correlating data.

 Document Type - This dropdown will reflect the type/s of document that can be selected and shown in the viewed queue. For example: Requisitions may only show requisitions, while Onboarding may have all form types listed. By default, (all) is normally used.
Export - The option to export selected rows or all rows in a viewed queue will export all listed items into a .xlsx (Excel) file. This file will match the order shown in workflow.
Expand/Collapse All - This will expand all items in the browser to show all line items. Normally this is used to expand all line items for all requisitions.
Clear - This will clear all of the columns of text that has been entered to search and will restore to a blank default view.
3. Action Buttons - Depending on what queue is selected from the workflow list, action buttons will show depending on how they are set in the queue. Normally these will be Approve, Reject, and Return buttons.

4. History Preview - This will list all history on the selected item in the queue window. Actions such as when the item was created, if it was appended/edited, and to which queues it has entered will show here. Errors will also be shown, i.e. why an item failed to submit to USAS.

5. Image Preview Window - This will display and preview the selected item's pages, scrollable to the last page.

An action bar at the top of the preview window will allow some basic controls, such as adding a new page to the selected item, printing, zooming in/out, rotating the view, adding annotations and tools for stamping/burning.
Note: Each of these abilities requires the specific doc type permission to use.
Reach out to your local admin for assistance. For example, if attempting to print a
requisition, the Requisition Doc Type - Print permission must be granted to do so.
View Document List - If you right-click on a queue, you will be able to click on the View Document List popup.

Here you will be able to view all of the documents in that queue, remove them from the queue, click on their doc ID, or unqueue the documents. 
C. Best Practices
- User Access and Permissions: Ensure that all users have the appropriate permissions set by admins to access necessary workflows and functionalities, which streamlines the process and avoids unauthorized access.
- Navigating the Workflow List: Regularly update and maintain the workflow list to reflect the current needs and ensure that all document queues are properly organized to aid quick access.
- Utilize Search and Filter Features: Make full use of the search functions and filters within the queue browser to quickly locate specific documents, which saves time and increases efficiency.
- Regularly Review and Update Documents: Utilize the editing features to ensure all documents are up-to-date before submission to USAS or USPS, ensuring compliance and accuracy.
- Exporting and Reporting: Use the Export feature to generate Excel reports for record-keeping and auditing purposes, ensuring all data is backed up outside the system.
D. Troubleshooting
- Missing Workflows or Documents: If certain workflows or documents are not visible, check user permissions. Contact an admin for access issues.
- Document Submission Errors: Check the history and error messages in the History preview for clues on why a document failed to submit and rectify the outlined issues.
- Performance Issues with SCView: Ensure your local systems are updated and meet the software requirements. Slow performance can sometimes be due to outdated hardware or insufficient system resources.
- Editing and Submission Problems: When facing issues with editing or submitting documents, ensure that you have the necessary document type permissions. If issues persist, seek administrative support.
E. Related Articles
Workflow: Archiving to Personnel Files
Conclusion
The SCView Workflow module significantly enhances document management capabilities for district staff, paving the way for more structured and efficient administrative processes. By adhering to best practices and troubleshooting common issues effectively, users can maximize the benefits of the Workflow module, leading to timely and accurate document processing. With ongoing support and updates, SCView can continue to adapt and meet the evolving needs of its users.