 | ||
Introduction
This guide provides detailed instructions for managing and operating the Refunds manager within the SCView platform. Designed to streamline the process of handling refunds, this resource will help users efficiently add, edit, and submit refunds directly to the Unified School Accounting System (USAS) and ensure that all procedures comply with the configured settings.
A. Problem Statement
Users may encounter challenges while navigating the Refunds manager, particularly in creating refunds accurately, managing line items, and understanding the workflow for submitting refunds to USAS. This can lead to errors in refund processing and delays in subsequent financial reconciliations.
B. Solution
To overcome these challenges, specific steps should be followed in SCView to ensure accurate creation, modification, and submission of refunds. By adhering to prescribed guidelines and leveraging built-in functionalities such as automatic check creation and detailed line item management, users can enhance the accuracy and efficiency of refund operations.
1. Go to www.myscview.com to log in.
If you've never logged in before, please contact your admin for your username and initial password.

2. Click on the Tools menu and select Refunds.

3. The screen below is referred to as the Refunds manager. Here you can see the details of all the refunds you have created.
 In this screen you are able to add a refund with the Add Refund button.
You are also able to copy a refund with Copy Refund button.
A user can click Edit Refund if it hasn't been submitted to USAS or is not currently in a workflow waiting to be approved.
Any user can use Delete Refund to delete a refund that was saved as a draft. Only users who have Delete permissions can delete a refund after it has been submitted. If you have Delete permissions, it can't be deleted if it is in a workflow that is locked for editing. The Import and Export buttons allow users to mass import and export refunds in an Excel file. Arbitrary numbers must be used for line grouping purposes when autonumbering is enabled in Admin > Site Settings > ARI.
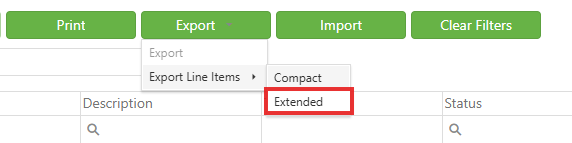
When exporting, electing the Line Items > Extended version yields all details related to the selected record(s). This template can be used for mass import.

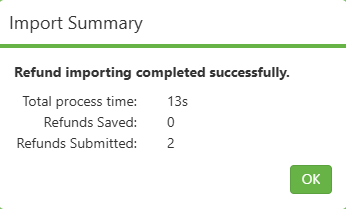
After selecting your import file, the pending records will be validated and the user can then choose to have all entries saved as drafts or to submit all entries that pass validation and save others for review as drafts.

The import summary popup gives visual counts of how many records were saved as drafts and how many records have been submitted to the workflow.
Your refund is given a number either after it has been successfully submitted to USAS or at the time it is created and sent for approval. This will depend on the settings set by an admin user. You can also see the status of each refund, if it has been saved as a draft, where it is waiting to be approved, or if it has been submitted to USAS. The other columns on the manager page are populated with information that you fill out on the refund (Example: Refund No, Refund Date, Refund Total, etc.).
4. First, fill out the Refund To field. This field can have anything typed as to who is being provided the refund, or we can pull a vendor from USAS if you start typing the vendor name or vendor number. Received From Email is an optional field that can tie into email notifications if requested to Strategic Solutions' staff. Requester is not editable and automatically uses the email address of the user creating the refund.

Refunds have the option to create checks upon successfully submitting to USAS so that there is no extra step to follow within USAS. Once the refund has been posted to USAS successfully, and if the refund was created with Create Check marked as Yes with a Check Number (Check No) and Check Date filled out, the check will be created in USAS.

As mentioned prior, the Refund Number will not be assigned until after the refund has been submitted to USAS or until after it is created and sent for approval, depending on settings. Choose the Refund Date and enter in the Total amount of the entire refund that is being created. Refunds can't be submitted if the Total does not match the Total of every line item. The Description field is the summary of all the lines created on the refund. There is an Attach option that will display the documents if we have access to the Search page or the Workflow page to approve.


5. Refund Line Items: Create line items for the refund.

Add Line: Creates new line to fill out. Edit Line, Copy Line, and Delete Line do exactly as the button names describe to the line that is highlighted.
Amount: Amount for this particular line item
Description: Description for this particular line item
Account Desc: We can start typing out the name of the account or click the magnifying glass to search results
Acct Code: We can start typing the account code or click the magnifying glass to search if we didn't search by Acct Desc. We can search accounts by using the Binoculars icon as well.
Click Save when finished adding a line.
Total Section: This section automatically calculates the total of every line item, providing an overall line item sum
6. Lastly, we can click Submit to send it into an approval workflow or click Save Draft to finish creating the refund at a later time or cancel to discard the current process.

NOTE: When submitting a refund and choosing Yes for Print Checks, after it has
successfully been submitted, you will need to use ChkSeq Option 2. If you have
questions after choosing that option, please contact your ITC for more information.
7. Clear Filters
Clear filters button will remove any filters set in the From Last dropdown, User dropdown, Search textbox, and or any of the filters set in the data grid. The From Last dropdown has a default value of 30 days and user has a default of (Any).
8. Right Click Options on Grid
- Add - This function mirrors the green Add Rfnd. button, bringing up the Add Refund popup.
- Copy - Operates like the green Copy Rfnd. button, opening a popup with the refund you wish to copy.
- Delete - Equivalent to the green Delete Rfnd. button, triggering a confirmation popup for deleting the right-clicked refund.
- Edit - Functions similarly to the green Edit Rfnd. button, bringing up the refund you selected for editing in a popup.
- Export - Matches the functionality of the green Export button.
- Print - Provides the same action as the green Print button, allowing you to print and either download or open the file; However, you are unable to print a refund that is still a draft.
- Refresh from USAS - Accesses USAS to check the status of the selected refund and applies updates if any changes have been made.
- Document History - Enables viewing the document history of the refund, including how many times it has been submitted, edited, etc.

C. Best Practices
- Accurate Data Entry: Ensure that all fields, particularly the Refund To and the Amount fields, are completed accurately to prevent discrepancies.
- Regular Review of Permissions: Check that all users have appropriate permissions for actions they need to perform within the Refunds manager to avoid unauthorized changes or deletions.
- Utilization of Vendor Integration: Make use of the built-in functionality to pull vendor data directly from USAS to reduce manual entry errors.
D. Troubleshooting
- Issue in Loading Vendor Data: If the vendor data does not populate, check network connectivity and ensure you have the correct access permissions. If issues persist, refresh the page or restart the session.
- Refund Submission Errors: In case of errors during the submission to USAS, verify that all mandatory fields are filled and the total amounts align. Review the error message for specific guidance and adjust data entries accordingly.
- Check Creation Issue: If the automatic check creation fails, ensure that all required fields (Check No, Check Date) are correctly filled out and that the Create Check option is marked as Yes. Confirm settings with USAS if inconsistencies continue.
E. Related Articles
Conclusion
Effectively managing refunds through the SCView platform is crucial for maintaining accurate accounts and ensuring financial integrity. By following the outlined steps and adopting best practices, users can handle refund processes from initiation to completion with confidence and efficiency. Should any issues arise during these processes, the troubleshooting tips provided should aid in quickly resolving common problems, thus ensuring continuous operational flow and compliance with financial management standards.