 | ||
Introduction
The Mileage module within our system provides a versatile tool for managing travel expenses by facilitating the creation and submission of requisitions and invoices directly to USAS. This guide aims to explain how users can navigate and utilize this module effectively to streamline their mileage claims.
A. Problem Statement
Users may find it challenging to navigate the functionality of the Mileage module, specifically when selecting the correct options for producing requisitions or invoices and ensuring these documents are correctly processed within the workflow. Confusion can arise due to variations in workflow queue titles or the availability of submitting options in different databases.
B. Solution
The correct use of the Mileage module requires understanding the specific steps and settings necessary to successfully create and submit requisitions and invoices. This involves selecting the right checkboxes on the Mileage form, filling out required information accurately, and following through with the appropriate submission buttons within the workflow queues.
The Mileage module has options to create a requisition and/or invoice as well as have them submit to USAS. This guide will explain how this process works.
Note: That not all titles of workflow queues or buttons may match your own database
 and not all databases have both options enabled to submit as a requisition and
 invoice.
Mileage Form
On the mileage form, there will be checkboxes to Submit with PO (creating an invoice) and Create Requisition. The user will not have to input this information at the start, but the proper box will have to be checked and filled out before the final approval/submission.
Submit with PO check box
When checked, we need to enter the PO Number in order for an invoice to be generated off of the mileage request.

Note: That the submit with PO check box and corresponding PO Number field will only
be displayed on the Mileage form if the Show Submit with PO setting in enabled in
Site Settings
Create Requisition checkbox
The Vendor Number, approval path for requisitions (Deliver To Vendor#), and Account section (Fund #) information must be filled out before submitting the Mileage request through the final approval
in order for us to know where to send the requisition into the Requisitions workflow.
Note: That the Create Requisition check box and corresponding vendor fields will only
 be displayed on the Mileage form if the Mileage Submission Create Requisition setting
 is enabled in Site Settings

After the mileage approval process is at its final queue, typically called Needs Submission, we will have button options for Submit to Create Invoice and Submit to Create Req.
Workflow - Submit to Create Requisition Confirm Action screen
When we choose to create a requisition off of the mileage request, we will not have a PO number yet. It will display the Account Code column and PO No column on the Confirm action screen regardless of whether we are submitting for invoices or requisitions. If no account code was assigned, it will be padded with zeros. If an account code is invalid, an error will be produced with a user-friendly explanation. The pencil icon in the first column allows the user to edit the mileage form directly from the confirm action screen to make changes if necessary.
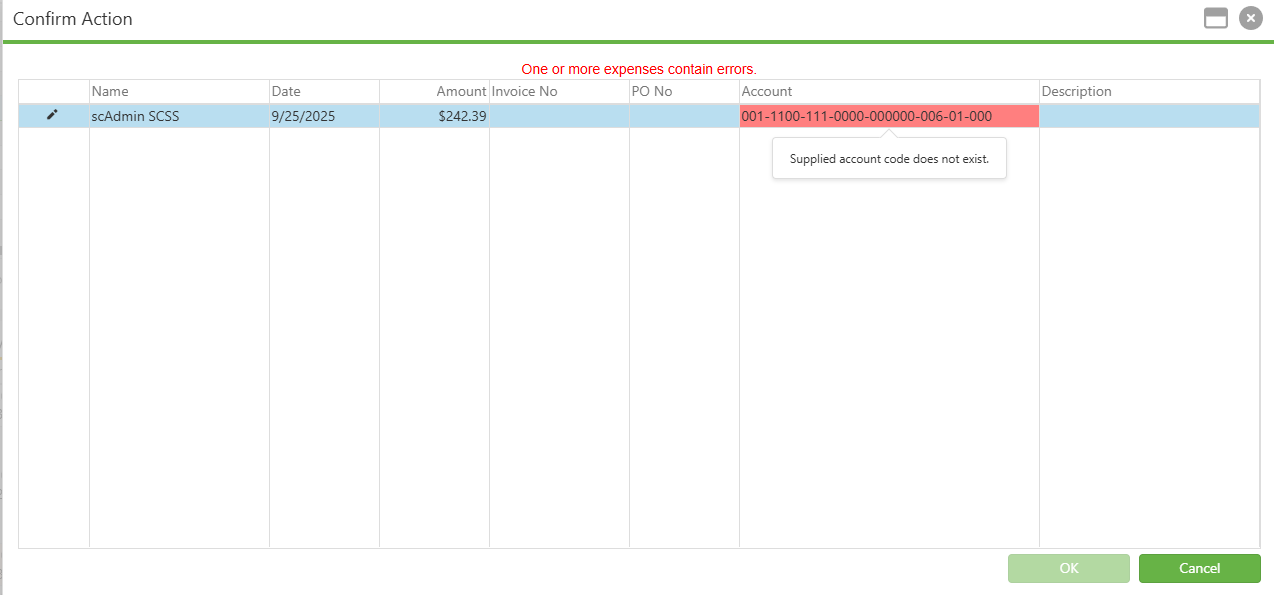
Once validated and we click the OK button, it will make a copy of the mileage request as a requisition and send it to the Requisitions workflow based on the approval path.
Workflow - Submit to Create Invoice Confirm Action screen
Now that we have the PO number, we can enter it either by editing the mileage request in the workflow and updating the changes, or by clicking the Submit to Create Invoice button in the workflow. If we didn't need to create an invoice off of the mileage request, we would use the Submit button under the Needs Submission queue. Otherwise, we would use the Submit button under the Holding for PO queue. We need to make sure the PO No is correct when submitting as an invoice, as this is the final step before it copies over and sends it to AP Workflow with the proper line items based on the PO.
Note: If the PO number/req information isn't on the Confirm boxes, it will not create
an invoice/requisition.
Once we click the OK button, it will send the mileage request to the Completed queue in the Mileage workflow. At the same time, it will make a copy of the mileage request but as an invoice in the AP workflow.

Copy To Target Confirm Action

Instead of using Submit to Create Invoice in the Holding for PO - Invoice for Mileage queue, you may use the Copy To Target button (name may be different). Clicking this will cause a Confirm Action popup to appear. You may review the information of the selected lines here to verify before clicking OK.
Once OK is clicked, the mileage will be sent to the Completed queue. It will also create a copy of the mileage request document as a mileage invoice and send it to Online Indexing. There, you'll index the document and then submit the batch into the AP Workflow.
C. Best Practices
- Clear Understanding of Options: Familiarize yourself with the Mileage form options such as Submit with PO and Create Requisition to understand their implications.
- Accurate Information Entry: Ensure that all required fields like PO number, vendor details, and account codes are filled out correctly to avoid discrepancies during the requisition or invoice creation.
D. Troubleshooting
- Incorrect Queue Selections: If you find that submissions are not processing as intended, double-check that you are using the correct submission queue. Refer to system documentation or Support for guidance.
- Missing Information Upon Submission: Ensure all mandatory fields are completed. If information is missing on the confirmation screens, return to the Mileage form to verify data entry.
E. Related Articles
Expense/Mileage: Account Code Query
How do I use the Mileage Form?
Mileage: Copy To Target Configuration
Conclusion
Effectively leveraging the Mileage module for creating and managing requisitions and invoices ensures efficient handling of travel expense claims. By adhering to the best practices and troubleshooting common issues as outlined, users can enhance the functionality and reliability of their financial processing workflows. This guide serves to assist in navigating the complexities of the Mileage module, promoting a smoother and more accurate submission process.