 | ||
Introduction
Welcome to the comprehensive guide for managing and processing Accounts Receivable invoices on MySCView. This guide is designed to help you navigate through MySCView's AR Invoice functionalities efficiently, whether you are creating, viewing, or modifying invoices.
A. Problem statement
Many users face challenges while trying to manage AR invoices due to a lack of understanding of the system's functionalities, including sorting, exporting, and specific invoice operations like editing, copying, and deleting.
B. Solution
This document provides a step-by-step approach to manage invoices effectively, covering login procedures, accessing various menu options, adding invoices, and using advanced features like exporting data and printing reports. We also include troubleshooting tips for common issues and outline best practices to enhance your workflow efficiency.
1. Go to www.myscview.com to log in.
If you've never logged in before, please contact your admin for your username and initial password.

2. Click on the Tools menu and select AR Invoices.

3. On the AR Invoices screen, you can see the details of all the invoices you have created. We can sort invoices that we see using any of the column headers or drop-down options for date ranges, vendors, users (if you are an admin), or status.
We are able to add an invoice with the Add Inv. button.
We are also able to copy an invoice with the Copy Inv. button.
A user can click Edit Inv. to make changes if the invoice is not currently in a workflow waiting to be approved.
Any user can use Delete Inv. to delete an invoice that was saved as a draft. Only users who have Delete permissions can delete an invoice after it has been submitted. If you have Delete permissions, it can't be deleted if it is sitting in the workflow.
Print: There are 3 printing options for invoices:
Batch Print: Prints the invoice image on all selected invoices. We can't use this option if we have invoices selected that
are still drafts.
Aging: Downloads a report that shows all invoices with their due dates labeling which invoices are past due.
Statement: Downloads a report that shows a summary of every invoice per vendor.
Export: Downloads an Excel file grid view of all invoices that are selected, displayed just like we see on this page.
Void: This button updates the Status on the invoice to void. If we are creating Receipts and try to Add an Invoice Line, it will not be able to pull any voided invoices as a result. To refer to the AR Receipts guide, please click here.

Clear Filters: This button will remove and or put filters back to their default states. All filters in the data grid will be removed. From Last will revert back to its default of 30 days. Vendor will be empty. User will default to (any). Status will default to (any). Prefix will default to (any). and search will be blank.
Paging: In the bottom right of the Manager screen there is paging for minimizing the amount of items displayed at once. Clicking the numbers or the arrows will display another page with additional line items.

Right-Click Menu:
If unable to complete an action from below, it is due to not having proper permissions to complete the action.
Add: Create new invoice.
Copy: Copy selected invoice.
Delete: Delete selected invoice.
Mark as Paid: Mark selected invoice as Paid.
Mark as Partially Paid: Mark selected invoice as Partially Paid.
Void: Mark selected invoice as Void. NOTE: If a receipt is attached, this will not allow you to void.
Export:
Export: Export basic Excel file of selected invoice(s).
Export Line Items: Export line details of all invoices shown in the grid.
Batch Print: Print or download PDF of selected invoices.
Document History: View audit history of selected invoice.

4. Adding Invoices:
- First, fill out the Vendor by clicking the drop-down arrow to choose from the list or by typing in the vendor number or vendor name and choosing from the specific list that displays. You may also free type a vendor name.
- Recipient Email: Typically, the Recipient Email is set to the person creating the invoice. Our default setup sends an email notification to this user to inform them once the invoice has completed the workflow process. If emails are not sending, please reach out to your admin to contact the Support team in order to help set up this process.
- CC Email: For multiple recipients, additional emails separated by a semicolon (;) can be added in the CC Email field
- Prefix: The Prefixes are listed in the drop-down on the AR Invoice tab by entering them in the Prefix list portion in the ARI portion of Site Settings (Admin > Site Settings > ARI). Prefixes are a filter and the amount of prefixes varies depending on the client. A prefix can be both letters and numbers. You can have a prefix with a minimum of two letters or have a prefix be as long as 7 letters and numbers.
- Invoice Number: We can have invoices set to be automatically assigned based on a number set within the system or we can allow users to enter the Invoice Number manually. This will depend on your admin's preference.
- Invoice Date: Choose the date of the invoice.
- Terms: Predefined terms chosen by the database admin will be available in the drop-down menu and the term combined with the Invoice Date will determine the Due Date.
- You can now add a PO Number to invoices, which can be referenced after setting the Due Date. This way you can refer to the PO when creating the invoice.
- General Description/Comment: This is the summary of the entire invoice and will appear on the invoice image that is generated.
- Internal Notes: These notes will only appear within MySCView and will display in the History section of the Workflow for the approver to view.
- There is an Attach option to include any supporting documentation that will show in the workflow for approvers.
NOTE: If you wish to have multiple Remit Addresses, please reach out to Support via chat or email.
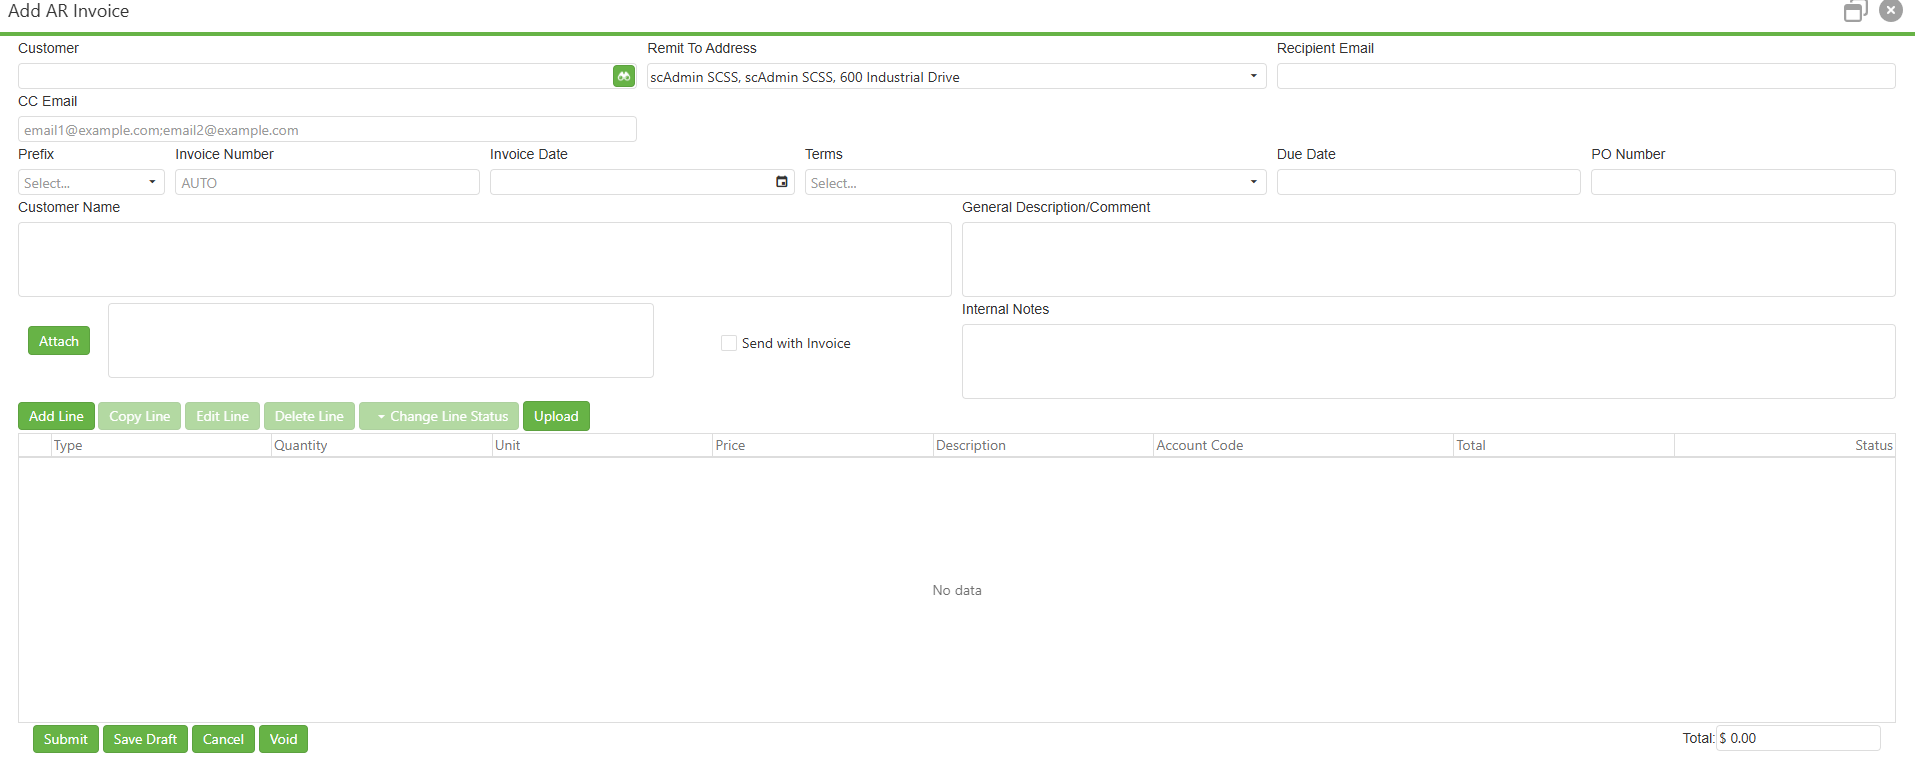
5. Invoice Lines: Create line items for the invoice.

Add Line: Creates new line to fill out. Edit Line, Copy Line, and Delete Line do exactly as the button names describe to the line that is highlighted.
Type: There are options for RC or RX which has account codes that are pulled directly from USAS.
Quantity: The number of items on this line.
Unit: Optional field to describe a unit of measurement.
Price: Price of the line item. Total Price after the line is saved is calculated by Price multiplied by Quantity.
Receipt Amount: Amount for this particular line item.
Description: Description for this particular line item.
Account Desc: We can start typing out the name of the account and click the magnifying glass to search results.
Acct Code: We can start typing the account code and click the magnifying glass to search if we didn't search by Acct Desc. We can search accounts by using the binoculars icon as well.
Accounts available for RC are determined by USAS and are Cash and Revenue Accounts.
Void Line: Sets status to Void and will not be available to choose if referencing this invoice when creating a receipt.
Mark as Paid: Sets status to Paid.
Upload: Allows an Excel sheet to be uploaded with line items so they don't have to be created through MySCView. The columns in the Excel sheet will need to match up with the columns in MySCView in order to pull correctly.

6. Lastly, we can click Submit to send it into an approval workflow or click Save Draft to finish creating the invoice at a later time.

C. Best Practices
- Regularly Update Permissions: Ensure user permissions are updated to reflect their current responsibilities to avoid unauthorized access or errors in invoice processing.
- Utilize Sorting and Filtering Options: Making full use of the filtering and sorting tools will streamline invoice management, helping you to quickly find necessary documents.
- Utilize Batch Operations: Leverage batch printing and export features to handle multiple invoices simultaneously, reducing manual entry errors.
- Verify Details Before Submission: Always check invoice details thoroughly before submitting them into the workflow to avoid delays or rejections.
D. Troubleshooting
- Missing Invoices: Ensure you have the necessary permissions and that invoices haven't been voided or deleted by another user.
- Problems with Exporting Data: Ensure all selected invoices match the criteria for the Export function being used. Check for pop-up blockers if downloads do not start.
E. Related articles
AR Invoices: Mass Import/Create AR Invoices from Excel Spreadsheet
AR Invoices: Add Manage Customers Button
Conclusion
Navigating MySCView to manage AR invoices is straightforward once familiar with the system's capabilities and layout. By following the outlined best practices and utilizing the troubleshooting tips provided, you can enhance your invoicing efficiency and accuracy. As always, ensure your account permissions are up-to-date, and do not hesitate to reach out to your administrative team for support when needed.