 | ||
Introduction
The SCView Leave module is an integral part of our organizational toolkit, designed to streamline the management of leave requests and ensure that employee absences are handled efficiently and transparently. This guide provides a comprehensive overview of the module, highlighting its functionality, key features, and the process for submitting leave requests. It is essential for all users to understand how to effectively utilize this tool to manage their leaves accurately and ensure compliance with organizational policies.
A. Problem Statement
Managing leave requests within an organization can often be complex and prone to errors if not handled properly. Employees may encounter issues such as unavailable leave categories, incorrectly displayed balances, or difficulty in submitting requests due to system errors. Furthermore, the need for accurate documentation and approval workflows makes it essential to have a robust system in place that can handle these demands smoothly.
B. Solution
The SCView Leave module addresses these challenges by providing a user-friendly platform where employees can submit leave requests with all the necessary details such as the type of leave, dates, and any required documentation. The system is designed to show real-time balances and pending requests to help employees plan their leaves accordingly. For administrators, the module offers tools to approve, track, and manage all leave requests efficiently, ensuring organizational norms are maintained.
1. Go to www.myscview.com to log in.
If you've never logged in before, please contact your admin for your username and initial password.

2. Click on the Tools dropdown and select Leave Requests.
3. Click the Add button or right-click from the context menu and click on Add to create a new leave request.


Note: **Some of the items discussed in this guide may not be available to your district**
Information Section
The fields in the upper section of the form will be used to determine each individual line of leave.
Leave Reason: This is the primary category of the leave. These can be customized and may appear different per district. If the leave option is not available in USPS, it will automatically be submitted as Other. Standard leave items are:
- Sick
- Personal
- Vacation
- Professional
- Jury Duty
- FMLA
- Calamity
- Other
Detail: A subcategory of the leave reason. If there has been no additional detail specified, the box will be disabled. If there are options available for the specific leave reason, the box will be enabled. The box can be expanded up to 200 characters, this is determined by your administrator.
Department: This is a drop-down based on the list of departments in the user profile. If the user only has a single department, this box is automatically selected and locked for the user with the value of the department.
Substitute Necessary: Notifies approvers that a substitute will be needed. Does not perform any automatic actions.
Comment: Notes on why the leave is taking place.
Attach: Selecting Attach will prompt the upload of a file to attach to the Leave Request.
If the user uploads two files with the same name, the dialog box shown below appears.
- Replace: Selecting Replace will replace the older file with the newer file of the same name.
- Rename: Selecting Rename will attach the newer file with a number appended to it to give it a unique filename.
- Cancel: Cancel simply cancels the operation. The new file is not attached.

Balance details are available in the upper-right corner of the form. There are two columns of details. The Balance column is the balance available in the USPS system. The Total Queued column on the right shows how much time is scheduled to be taken, as it is in workflow, but has not yet been fully processed.

Line Items

Once all of the relevant information has been filled out above, the lines can be added to the overall leave. Selecting the Add or Edit options opens a dialog where line information can be added or edited.
Note: Your admins can control how many lines you enter at once and the application
will warn you if you hit that limit.

Date: The start date of the requested leave.
Position: The position to be used to take the leave. If there is a position missing from the list or one that should not be in the list, clicking the Refresh Positions icon (circled in red) will pull in the most up-to-date positions for the employee from USPS.
Location: If your database has enabled integration with our SmartSub product, the Location line will appear here. Simply use the dropdown to select the building from which you will be absent on the day of your Leave.
Amount Requested: This box will work differently depending on if you are an hourly or daily benefit employee.
Classic Time Entry (in image above)
Hourly: The left box is the number of hours to be taken. The right box is the number of minutes. This will only allow the maximum of one full day's time. If your standard day is 8 hours, it will stop at 8. If your standard day is 3.5 hours, it will stop at 3 on the left box and 0.50 on the right box. The minute increments are determined by your administrator.
Daily: The left box will either be a 1 or 0. 1 means an entire day will be taken. A 0 means that the remainder of the day must be selected in the box to its right. The increments are determined by your administrator.
Partial Time Entry

Hourly: The left box is a time selector used to pick the time the Leave starts. The right box is the fraction of the day that the employee will be out. When saved, this fraction is automatically multiplied by the number of hours the employee works daily to calculate the number of hours of Leave to request.
Daily: The left box is a time selector used to pick the time the Leave starts. The right box is the fraction of the day that the employee will be out. This number is reported directly upon the Leave request.
"Full" Time Entry - "Time Entry" setting in Payroll Site Settings
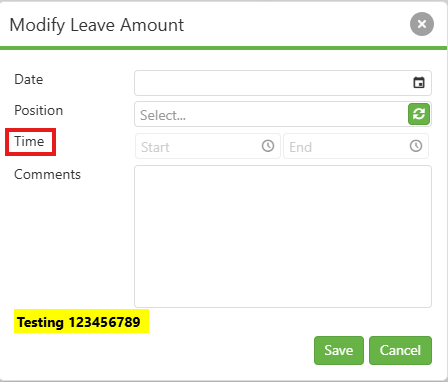
IMPORTANT: The Amount field gets renamed to Time when Time Entry is enabled. The Start Time and End Time fields contain helper text to designate what each field is meant to do.
Hourly: The left box is a time selector used to pick the time the Leave starts, and the right box is another time selector used to pick when the Leave ends. The hourly span of the two selected times is reported directly upon the Leave request.
Daily: The left box is a time selector used to pick the time the Leave starts, and the right box is another time selector used to pick when the Leave ends. The number of hours spanning the two selected times is divided by the number of hours the employee works daily to calculate the number of days of Leave to request.
Comments: Any individual line comment needed - each line can have its own comment.
After the line item(s) are added, they can be edited, copied, and deleted. Highlight a row before clicking the action button. Copying a line will copy the line exactly, but increment the date by one. It does not ignore weekends. A line can be copied any number of times.
Professional Leave
If the leave reason selected is professional, the bottom section of the form will become available for editing. Once the costs associated dropdown is marked Yes, the section opens up. If your district does not have the option for leave to create a requisition, the section highlighted in red will not be available from the below screenshot and also even when the option is available, but it is disabled (This may not be displayed depending on your settings). See below the Add and Delete instructions for how to use this section.

Add: Clicking Add will open a dialog where the item can be added to the list. The amount is entered, followed by a description of the item. Once the Save button is clicked, it will generate the line item and place it in the lower section.

Mileage Item Selection Behavior
When Mileage is selected from the Item dropdown, the dialog behavior changes based on the system's mileage configuration settings.
If mileage is enabled in the system, or if mileage is disabled but a mileage rate has been defined, the Amount field will automatically change to a Mileage field. In this case, the user is required to enter the number of miles traveled. The system will then automatically calculate the total cost by multiplying the entered miles with the predefined mileage rate.
However, if mileage is disabled and no mileage rate has been defined in the system, the Amount field will remain unchanged. The user must manually enter the cost amount, and no automatic mileage-based cost calculation will occur.

Note:
1. The Mileage field appears when mileage is enabled OR when mileage is disabled but the rate is defined.
2. The Amount field appears only when mileage is disabled AND the mileage rate is not defined.
3. Automatic cost calculation depends on having a predefined mileage rate in the system.
Delete: Deletes a line item.
Requisition Information
After lines have been entered, the details for the requisition can be entered.
Vendor #: The vendor to be paid. If you are not sure of the correct vendor number, you can use the Binoculars icon to search for the correct vendor.
Deliver To Vendor #: This is the vendor number that corresponds to the correct approval path for the requisition.
Account Number: The account number being used to pay for the line item.
To apply this information to a line, click the checkbox for each line to which you want to add the information, then click Apply to Req. If a different account number will be used for different lines, simply update the account number and check the appropriate box before clicking Apply to Req again. This will also overwrite any existing information, so you'll use this instead of an edit button.
Note: The requisition is not created on submission - it must be processed via
workflow. Once the leave form is at the final approval, the confirm screen will
create the requisition and send to the Requisitions workflow.
Submitting
Once all required fields have been completed, a draft can be saved or submitted. If the draft is saved, it does not enter the workflow; as this can be confusing to some users, we have a confirmation screen that highlights the fact that a draft will not be routed to the attention of an approver (see below). Any fields filled in or attachments for the draft will remain. If the draft is submitted, the leave is created along with the image, and it then enters the workflow.
Image: Save Draft Confirmation Screen

Note: If you do not see the buttons for Save Draft, Submit, and Cancel, click
the maximize window. If you do not click Save Draft or Submit and close out of
the leave request, all information entered will be lost

C. Best Practices
- Regularly Update User Profiles: Ensure that user profiles are updated with the correct department and role information to facilitate accurate handling of leave requests.
- Check Available Balances: Before submitting a leave request, always check the available and pending balances to avoid any discrepancies.
- Document Submission: Attach all necessary documents related to the leave request, such as medical certificates for sick leaves, ensuring that the request is well-supported and can be processed quickly.
- Utilize Comments: Use the comment sections to provide additional details or clarifications needed for your leave request, helping approvers understand the context better.
D. Troubleshooting
- Missing Leave Categories: If certain leave categories are missing, check if they are customized for your specific district. If the required category is still missing, contact your system administrator for assistance.
- Errors in Balance Details: Refresh the balance details if they do not seem to update after previous submissions. Report persistent discrepancies to the Support team.
- If SmartSub is enabled, you must write something in the Comment of the Add Leave popup before you will be allowed to submit the Leave Request.
- If the Mileage field does not appear when selecting the Mileage item, verify that mileage is enabled or a mileage rate has been defined in the system. Contact your administrator if the issue persists.
E. Related Articles
Leave: Undo Leave Submitted to USPS
Expenses/Mileage: Site Settings
Conclusion
The SCView Leave module is an essential tool designed to simplify leave management processes within our organization. By following the guidelines and best practices outlined in this guide, users can maximize the benefits of the module, ensuring a smooth operation and compliance with organizational standards. Should any issues arise, the troubleshooting steps provided will help address and resolve them promptly, maintaining the system's effectiveness and reliability.