 | ||
Introduction
In this guide, we will explore the streamlined process for managing requisitions through MySCView, focusing on how to effectively create, modify, and submit requisitions with detailed steps to enhance your user experience.
A. Problem Statement
Users often encounter difficulties navigating the Requisitions manager in MySCView, struggling to efficiently manage vendor selections, handle various line items, and understand the nuances of the requisition submission process.
B. Solution
To resolve these common issues, this guide provides clear, step-by-step instructions that simplify the requisition process—from logging in to submitting a requisition. Additionally, it includes troubleshooting tips and best practices to optimize the experience and ensure accurate submissions.
1. Go to www.myscview.com to log in.
If you've never logged in before, please contact your admin for your username and initial password.

2. Click on the Tools menu then select Requisitions.

3. This screen is referred to as the Requisitions manager. Here you can see the details of all the requisitions you have created. In this screen you are able to add a requisition with the button Add Req. You are also able to copy a requisition with Copy Req if it is exactly the same as one you have created prior. Your requisitions are given a number, and if it has been approved and submitted, they are given a PO Number. You can also see the status of each requisition: if it has been saved as a draft, where it is waiting to be approved, and if it has been submitted to USAS. The other columns tell you the details that you will be providing when you click on Add Req.

4. The Attention To field automatically prefills with the username tied to the Requester Email. If the site settings allow it, you may edit this field. It cannot be cleared and left blank, however, so submission will fail without it.
The Requested PO Date field automatically prefills with today's date but can be modified. This date is used by the "From Last" filter on the requisitions manager page when filtering by current fiscal year vs prior fiscal year, rather than the date the requisition was created.
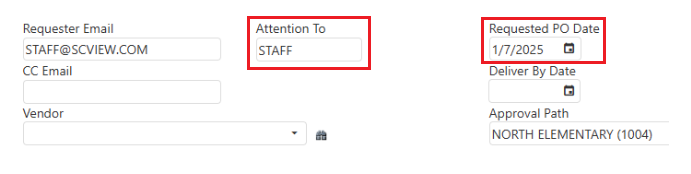
5. You can partially enter a vendor name, and a dropdown list will populate with relevant results.

If a more detailed search is required, click the binoculars icon to the right of the Vendor box, which will open the vendor search window.

Here you can perform a blank search by clicking Find, which will populate all available vendors. You may also enter a Starting Vendor Number or Ending Vendor Number to its right. The Status dropdown will filter results depending on whether the vendor is active or inactive in USAS.
Note: If you select an inactive vendor, the requisition entry page will display
a notification. If the notification text is highlighted in orange, you can
still proceed to submit your requisition. However, if the notification text is
highlighted in red indicating the vendor is inactive, you will not be able to
submit your requisition.


6. The Fax Vendor checkbox will tell the system whether or not you want the vendor to be faxed a copy of the requisition. If the box is checked, then the fax number must be present and valid. (10 Digits)
Note: The Fax number will append the country code automatically when the fax gets
sent out.

7. Click the dropdown arrow and select your Approval Path. The Deliver To field will auto populate with the Deliver To address. If you need to select a separate Deliver To address from the approval path, you select it here.
If you would like to add an additional attention to or modify the title of the address you can select the text and make one-time changes to the current requisition.

8. In order to add a phone number box to the Deliver To section, contact Support.

9. You can add any notes for the approvers in the Internal Notes. These will not show on the PO. Some districts will have the option to choose Who will place the order from its drop-down list.

10. Click on Add Line

11. Fill out the Quantity, Price, Description, and Account information. Add an account by entering the partial name of an account in Account Description. Alternatively, you can use the filter button to the right of the box to search.
To search by XREF code, enter: followed by the code in the Account Desc field.

You can also search via the account code, by clicking the filter button to the right of the account code fields.

Clicking the magnifying glass to the right of the filter button will open an account search window. The same abilities used for account description and code can be used here as well. Alternatively, leaving the fields blank and clicking Find will provide an open search. You can also pick the status type of an account via the dropdown Status box.

12. When finished, click on the Update button. You may now add more lines, Save Draft, or Submit your requisition.
Saving as draft allows you to work on the requisition at a later time. It does not submit it for approval.

If you have added multiple lines and you need to update account codes, make sure the first line is set to the correct account code. Then right-click on that line and choose Apply Account to Next to apply it to the account directly below it or choose Apply Account to End to apply the account to all lines below it. You can also choose to Clear Current Account on the line selected or move the line up or down on the list.

You may also use an Excel spreadsheet to autofill the line items' details of a requisition. Please reach out to Support if you do not currently have the template. Once this is filled out you may either drag and drop the Excel spreadsheet into the line items box, or you can select Upload and choose the file.
13. For an in-depth guide on how Split By Price and Split By Qty work, please refer to the Split Line-Item article.
C. Best Practices
Accurate Vendor Selection:
- Utilize the vendor search function effectively by entering partial or complete vendor names and use the binoculars icon for an expanded search when necessary.
Use of Approval Paths:
- Always verify and select the appropriate approval path and delivery address to ensure that requisitions are processed and delivered correctly.
Detailed Line-Item Management:
- Be diligent in entering line-item specifics such as quantity, price, and description accurately, and review account information carefully before submission.
D. Troubleshooting
Inactive Vendor Selection:
- If an inactive vendor is selected in error, look for the notification highlighted in orange. Switch to an active vendor to proceed.
Issues with Line Items Updating:
- If updates to line items are not reflecting properly, confirm that you clicked the Update button after making changes. If persistent issues occur, clear the browser cache or try a different browser.
Insufficient Pending Funds:
- If one or more of the account codes selected do not have sufficient funds available, you will receive an error stating so.
- A user permission exists that will allow a user to bypass this error and allow submission. See Related Articles.
E. Related Articles
Conclusion
By adopting a structured approach to managing requisitions in MySCView, you can significantly enhance your efficiency and accuracy. This guide aims to equip you with the knowledge and skills needed to navigate the Requisitions manager confidently. Whether you're adding requisition lines, selecting vendors, or submitting for approval, adhering to these guidelines will help maintain clarity and precision in your procurement processes. Should you encounter issues, refer back to these troubleshooting tips or contact Support for further assistance.